Django Starter
home Page

Login Page

Register Page
Reset Page
Technologies Used
Django Starter | Production-Ready Django Boilerplate
A comprehensive Django starter project featuring modern best practices, multiple integrations, and enterprise-ready architecture. Clone it, configure it, and start building your application immediately.
Project Features
- Account Management: Complete authentication with email verification, password reset, profile management, and account deletion.
- Social Authentication (OAuth): One-click sign-in via Google, GitHub, Facebook, Twitter/X (OAuth 2.0), and LinkedIn (OpenID Connect) using django-allauth. Includes account page UI to connect/disconnect providers.
- Real-Time WebSocket Notifications: Push notifications via Django Channels with toast UI, notification bell with badge, and auto-reconnecting WebSocket client.
- Professional HTML Email Templates: Branded activation, welcome, password reset, and social-connected emails sent via Mailjet REST API with plain-text fallbacks.
- PostgreSQL Database: Production-grade relational database with migrations and connection pooling.
- AWS S3/MinIO Storage: Flexible 3-tier file storage (public/protected/private) supporting both AWS S3 and self-hosted MinIO with signed URLs.
- Redis Integration: High-performance caching, session storage, Celery message broker, and Channels layer backend.
- MailJet Email Service: Transactional emails via both Mailjet REST API (direct) and django-anymail backend.
- Docker Containerization: Fully containerized with Docker Compose for local development.
- Kubernetes Deployment: Production-ready K8s manifests with ConfigMaps, Secrets, and Rancher-compatible service definitions.
- CI/CD Pipeline: Automated build, test, and deployment with Jenkins (separate build and deploy Jenkinsfiles).
- Notes Application: Full-featured CRUD app demonstrating all Django Generic Class-Based Views — ListView, DetailView, CreateView, UpdateView, DeleteView, FormView, RedirectView, and TemplateView — with categories, tags, comments, pinning, archiving, and version history.
- Elasticsearch Search: Full-text search with autocomplete suggestions, analytics dashboard, index management, and cluster health monitoring.
- Kafka Event Streaming: Real-time event publishing and consumption with Apache Kafka, including event dashboard and analytics views.
- RabbitMQ Messaging: Priority-based message queue system for async notifications with dashboard and message history.
- Commands Dashboard: Web UI for management command execution, scheduling, metrics collection, data import/export, and command log tracking — with 19 built-in management commands.
- REST API: Complete Django REST Framework API with session/basic authentication, Swagger/OpenAPI docs (drf-spectacular), ReDoc, throttling, filtering, and API key management.
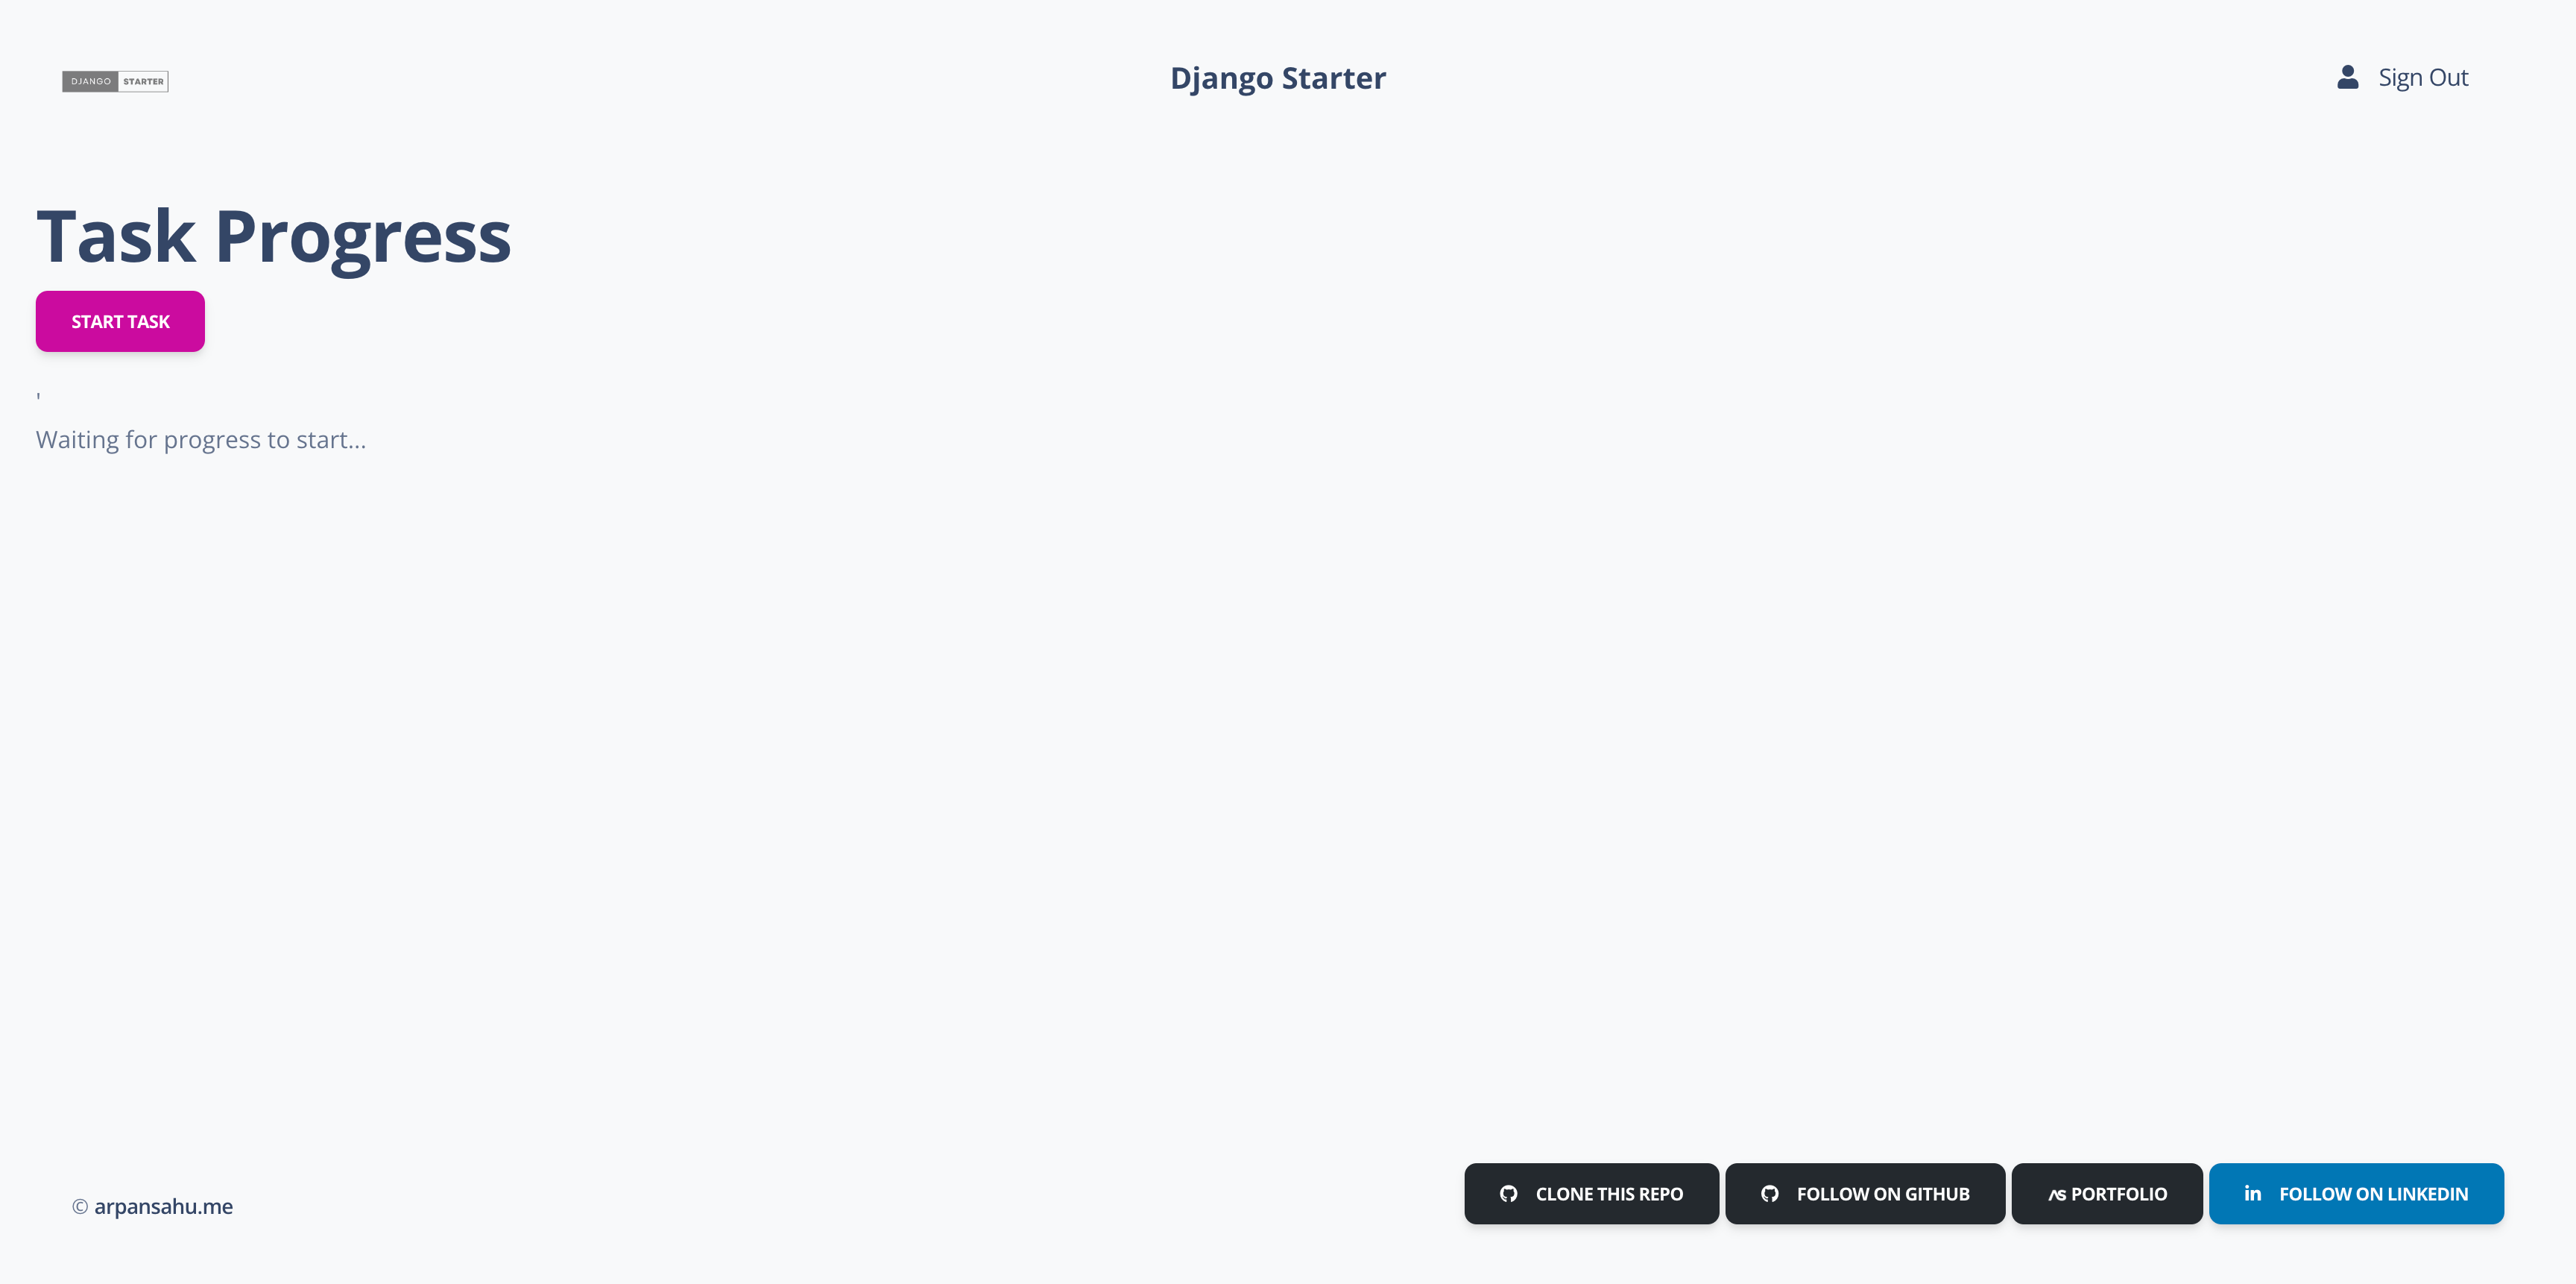
- Celery Task Queue: Background task processing with real-time WebSocket progress tracking via custom Celery progress app and Flower monitoring.
- Comprehensive Testing: Automated test generation with django-test-enforcer, Playwright UI tests, pytest with parallel execution (xdist), and full coverage reporting.
- Error Tracking: Sentry integration for production error monitoring and alerting.
- Service Health Checks: 11 management commands to verify database, cache, email, storage, Elasticsearch, Kafka, RabbitMQ, Celery, Flower, and Harbor connectivity.
Why Use This Starter?
- 🚀 Production-Ready: Battle-tested configurations for real-world deployments
- 🔧 Fully Configured: All integrations pre-wired and working out of the box
- 📦 Modular Design: Enable/disable features based on your needs
- 🔐 Social Auth: 5 OAuth providers configured and ready to use
- 🧪 Test Coverage: Built-in testing infrastructure with 100% view coverage
- 📡 Real-Time: WebSocket notifications and Celery progress tracking
- 📖 Well Documented: Comprehensive documentation and code comments
Can be cloned and used as a base project for any Django application.
-Deployed on AWS / Now in My Own Home Ubuntu Server LTS 22.0 / Hostinger VPS Server
- Ubuntu 22.0 LTS - Base operating system
- Nginx - Web proxy server with HTTPS
- Wildcard SSL - Let's Encrypt certificate via acme.sh
- Acme-dns - Automated wildcard certificate renewal
- Docker/Kubernetes - Container orchestration with k3s, managed via Portainer at https://portainer.arpansahu.space
- Jenkins - CI/CD pipeline at https://jenkins.arpansahu.space
- PostgreSQL - Schema-based database with TLS stream proxy at https://postgres.arpansahu.space:9552
- PgAdmin - PostgreSQL management UI at https://pgadmin.arpansahu.space
- Redis - Caching and message broker with TLS stream proxy at https://redis.arpansahu.space:9551
- Redis Commander - Redis management UI at https://redis.arpansahu.space
- MinIO - Self-hosted S3 storage server at https://minio.arpansahu.space (Console) and https://minioapi.arpansahu.space (API)
- Harbor - Self-hosted Docker registry at https://harbor.arpansahu.space
- RabbitMQ - Message queue broker at https://rabbitmq.arpansahu.space
- Kafka/AKHQ - Event streaming platform with UI at https://kafka.arpansahu.space
- SSH Web Terminal - Browser-based SSH access at https://ssh.arpansahu.space
- Sentry - Error tracking and monitoring at https://arpansahu.sentry.io
- Monitoring Stack - Prometheus, Grafana, and node-exporter for system monitoring
What is Python ?
Python is a high-level, general-purpose programming language. Its design philosophy emphasizes code readability with the
use of significant indentation. Python is dynamically typed and garbage-collected. It supports multiple programming
paradigms, including structured, object-oriented and functional programming.
What is Django ?
Django is a Python-based free and open-source web framework that follows the model-template-view architectural pattern.
What is Django REST Framework ?
Django REST Framework (DRF) is a powerful and flexible toolkit for building Web APIs in Django. It provides serialization,
authentication, viewsets, routers, throttling, filtering, and pagination out of the box, making it easy to build
RESTful APIs that follow best practices.
What is drf-spectacular ?
drf-spectacular is an OpenAPI 3.0 schema generation library for Django REST Framework. It auto-generates Swagger UI
and ReDoc documentation from your API views and serializers, providing interactive API documentation for developers.
What is Redis ?
Redis is an in-memory data structure project implementing a distributed, in-memory key-value database with optional durability.
The most common Redis use cases are session cache, full-page cache, queues, leader boards and counting, publish-subscribe, and much more. In this project, Redis is used as a cache backend, Celery message broker, and Django Channels layer.
What is Celery ?
Celery is an asynchronous task queue/job queue based on distributed message passing. It is focused on real-time operation
but supports scheduling as well. In this project, Celery handles background task processing with real-time WebSocket
progress tracking via a custom progress recorder.
What is Flower ?
Flower is a real-time web-based monitoring tool for Celery. It provides detailed information about the state of workers,
tasks, and queues. It allows you to monitor task progress, view task details, and control worker pools from a web interface.
What is Django Channels ?
Django Channels extends Django to handle WebSockets, HTTP2, and other protocols beyond traditional HTTP. It builds on
ASGI (Asynchronous Server Gateway Interface) and enables real-time features like push notifications, live updates,
and chat systems. In this project, Channels powers real-time notification delivery and Celery task progress updates.
What is Daphne ?
Daphne is an HTTP, HTTP2, and WebSocket protocol server for ASGI and ASGI-HTTP, developed as part of the Django Channels
project. It serves as the production-ready ASGI server for Django applications that need WebSocket support.
What is PostgreSQL ?
PostgreSQL is a powerful, open-source object-relational database system with a strong reputation for reliability,
feature robustness, and performance. It supports advanced data types, full-text search, and JSON storage.
What is Elasticsearch ?
Elasticsearch is a distributed, RESTful search and analytics engine built on Apache Lucene. It provides full-text
search, structured search, analytics, and logging capabilities. In this project, it powers the search app with
autocomplete suggestions, index management, cluster health monitoring, and search analytics.
What is Apache Kafka ?
Apache Kafka is an open-source distributed event streaming platform used for high-performance data pipelines,
streaming analytics, data integration, and mission-critical applications. In this project, Kafka handles real-time
event publishing and consumption with an event dashboard and analytics views.
What is RabbitMQ ?
RabbitMQ is an open-source message broker that implements the Advanced Message Queuing Protocol (AMQP). It supports
multiple messaging patterns including point-to-point, publish-subscribe, and request-reply. In this project,
RabbitMQ powers priority-based async notifications with a dashboard and message history.
What is MinIO ?
MinIO is a high-performance, S3-compatible object storage system. It is designed for large-scale data infrastructure
and provides an API compatible with Amazon S3. In this project, MinIO serves as self-hosted object storage for
public, protected, and private file uploads.
What is Docker ?
Docker is a platform for developing, shipping, and running applications inside lightweight, portable containers.
Containers package an application with all its dependencies, ensuring it runs consistently across different environments.
What is Kubernetes ?
Kubernetes is an open-source container orchestration platform that automates deploying, scaling, and managing
containerized applications. In this project, K8s manifests, ConfigMaps, Secrets, and service definitions are
provided for production deployment.
What is Jenkins ?
Jenkins is an open-source automation server that enables continuous integration and continuous delivery (CI/CD).
This project includes separate Jenkinsfiles for build and deploy pipelines.
What is Nginx ?
Nginx is a high-performance HTTP server and reverse proxy. In this project, Nginx handles SSL termination,
HTTP-to-HTTPS redirection, WebSocket proxying, and reverse proxying to the application server.
What is Harbor ?
Harbor is an open-source container image registry that provides role-based access control, image scanning,
and replication. It is used in this project to store Docker images built by the CI/CD pipeline.
What is Sentry ?
Sentry is an application monitoring platform that provides real-time error tracking and performance monitoring.
It helps developers identify, triage, and resolve issues in production applications.
What is django-allauth ?
django-allauth is a comprehensive Django authentication library that handles account registration, login,
social authentication, email verification, and account management. In this project, it provides OAuth sign-in
via Google, GitHub, Facebook, Twitter/X (OAuth 2.0), and LinkedIn (OpenID Connect), with a custom adapter
for sending branded welcome emails and WebSocket notifications on social signup.
What is Mailjet ?
Mailjet is a cloud-based email delivery service for sending transactional and marketing emails. In this project,
it is used both as a direct REST API (via mailjet-rest) for custom email sends and as a Django email backend
(via django-anymail) for allauth-triggered emails.
What is Playwright ?
Playwright is a framework for end-to-end testing of web applications. It supports Chromium, Firefox, and
WebKit browsers and provides APIs for automating browser interactions. In this project, Playwright is used
for UI integration tests alongside pytest.
What is Pytest ?
Pytest is a mature full-featured Python testing tool. It supports fixtures, parameterization, markers, and
plugins. Combined with pytest-django, pytest-xdist (parallel execution), and coverage, it forms the testing
backbone of this project.
Tech Stack
![]()
![]()
![]()
![]()
![]()
Demo
Available at: https://django-starter.arpansahu.space
Demo Features
- Homepage Dashboard: File manager, async tasks, messaging, event streaming, search, notifications, notes, API, and commands sections.
- Social Login: Sign in with Google, GitHub, Facebook, Twitter/X, or LinkedIn via circular OAuth buttons on login/register pages.
-
Account Management:
View profile, connect/disconnect social providers, change password, and delete account at
/account/. - Real-Time Notifications: WebSocket-powered toast notifications with bell icon and badge counter in the navbar.
-
REST API Docs:
Interactive Swagger UI at
/api/docs/and ReDoc at/api/redoc/. - Flower Dashboard: Celery task monitoring at port 8054.
admin login details:--
email: admin@arpansahu.space
password: showmecode
License
Installation
Installing Pre requisites
pip install -r requirements.txt
Create .env File and don't forget to add .env to gitignore
  cp env.example .env
  # Edit .env and add your values for all required variables
Required Environment Variables
# Core
SECRET_KEY=your-secret-key
DEBUG=True
ALLOWED_HOSTS=*
DOMAIN=localhost:8016
PROTOCOL=http

# Database
DATABASE_URL=postgres://user:pass@localhost:5432/django_starter

# Redis (used for cache, Celery broker, and Channels layer)
REDIS_CLOUD_URL=redis://localhost:6379

# Email (Mailjet)
MAIL_JET_API_KEY=your-mailjet-api-key
MAIL_JET_API_SECRET=your-mailjet-api-secret

# Storage (S3/MinIO)
AWS_ACCESS_KEY_ID=your-key
AWS_SECRET_ACCESS_KEY=your-secret
AWS_STORAGE_BUCKET_NAME=your-bucket
BUCKET_TYPE=MINIO
USE_S3=True

# Social Authentication (OAuth) — all optional, only configure providers you need
GOOGLE_CLIENT_ID=
GOOGLE_CLIENT_SECRET=
GITHUB_CLIENT_ID=
GITHUB_CLIENT_SECRET=
FACEBOOK_APP_ID=
FACEBOOK_APP_SECRET=
TWITTER_API_KEY=
TWITTER_API_SECRET=
LINKEDIN_CLIENT_ID=
LINKEDIN_CLIENT_SECRET=

# Elasticsearch (optional)
ELASTICSEARCH_HOST=https://localhost:9200
ELASTICSEARCH_USER=elastic
ELASTICSEARCH_PASSWORD=

# Kafka (optional)
KAFKA_BOOTSTRAP_SERVERS=
KAFKA_SECURITY_PROTOCOL=SASL_SSL
KAFKA_SASL_MECHANISM=PLAIN
KAFKA_SASL_USERNAME=
KAFKA_SASL_PASSWORD=

# RabbitMQ (optional)
RABBITMQ_HOST=localhost
RABBITMQ_PORT=5672
RABBITMQ_USER=guest
RABBITMQ_PASSWORD=guest

# Sentry (optional)
SENTRY_DSH_URL=
SENTRY_ENVIRONMENT=development

# Flower (Celery monitoring)
FLOWER_ADMIN_USERNAME=admin
FLOWER_ADMIN_PASS=admin
Making Migrations and Migrating them.
  python manage.py makemigrations
  python manage.py migrate
Creating Super User
python manage.py createsuperuser
Setting up Social Authentication (OAuth)
Configure OAuth callback URLs in each provider's developer console:
| Provider | Callback URL |
|---|---|
http://localhost:8016/accounts/google/login/callback/
|
|
| GitHub |
http://localhost:8016/accounts/github/login/callback/
|
http://localhost:8016/accounts/facebook/login/callback/
|
|
| Twitter/X |
http://localhost:8016/accounts/twitter/login/callback/
|
http://localhost:8016/accounts/linkedin_oauth2/login/callback/
|
For production, replace
http://localhost:8016
with
https://yourdomain.com
.
See
docs/OAUTH_SETUP.md
for detailed setup instructions for each provider.
Installing Redis On Local (For ubuntu) for other Os Please refer to their website https://redis.io/
  curl -fsSL https://packages.redis.io/gpg | sudo gpg --dearmor -o /usr/share/keyrings/redis-archive-keyring.gpg
  echo "deb [signed-by=/usr/share/keyrings/redis-archive-keyring.gpg] https://packages.redis.io/deb $(lsb_release -cs) main" | sudo tee /etc/apt/sources.list.d/redis.list
  sudo apt-get update
  sudo apt-get install redis
  sudo systemctl restart redis.service
to check if its running or not
sudo systemctl status redis
Run Server (choose one)
  # Development server (no WebSocket support)
  python manage.py runserver 8016

  # ASGI server with WebSocket support (recommended for real-time features)
  daphne -b 127.0.0.1 -p 8016 django_starter.asgi:application

  # Production WSGI server
  gunicorn --bind 0.0.0.0:8016 django_starter.wsgi
Run Celery Worker (for background tasks)
celery -A django_starter worker -l info
Run Flower (Celery monitoring dashboard)
celery -A django_starter flower --port=8054
Verify All Services
python manage.py test_all_services
Use these CACHE settings
CACHES = {
    'default': {
        'BACKEND': 'django_redis.cache.RedisCache',
        'LOCATION': config('REDIS_CLOUD_URL'),
        'OPTIONS': {
            'CLIENT_CLASS': 'django_redis.client.DefaultClient',
        }
    }
}
Change settings.py static files and media files settings | Now I have added support for BlackBlaze Static Storage also which also based on AWS S3 protocols
if not DEBUG:
    BUCKET_TYPE = BUCKET_TYPE

    if BUCKET_TYPE == 'AWS':
        AWS_S3_CUSTOM_DOMAIN = f'{AWS_STORAGE_BUCKET_NAME}.s3.amazonaws.com'
        AWS_DEFAULT_ACL = 'public-read'
        AWS_S3_OBJECT_PARAMETERS = {
            'CacheControl': 'max-age=86400'
        }
        AWS_LOCATION = 'static'
        AWS_QUERYSTRING_AUTH = False
        AWS_HEADERS = {
            'Access-Control-Allow-Origin': '*',
        }
        # s3 static settings
        AWS_STATIC_LOCATION = f'portfolio/{PROJECT_NAME}/static'
        STATIC_URL = f'https://{AWS_S3_CUSTOM_DOMAIN}/{AWS_STATIC_LOCATION}/'
        STATICFILES_STORAGE = f'{PROJECT_NAME}.storage_backends.StaticStorage'
        # s3 public media settings
        AWS_PUBLIC_MEDIA_LOCATION = f'portfolio/{PROJECT_NAME}/media'
        MEDIA_URL = f'https://{AWS_S3_CUSTOM_DOMAIN}/{AWS_PUBLIC_MEDIA_LOCATION}/'
        DEFAULT_FILE_STORAGE = f'{PROJECT_NAME}.storage_backends.PublicMediaStorage'
        # s3 private media settings
        PRIVATE_MEDIA_LOCATION = f'portfolio/{PROJECT_NAME}/private'
        PRIVATE_FILE_STORAGE = f'{PROJECT_NAME}.storage_backends.PrivateMediaStorage'

    elif BUCKET_TYPE == 'BLACKBLAZE':
        AWS_S3_REGION_NAME = 'us-east-005'

        AWS_S3_ENDPOINT = f's3.{AWS_S3_REGION_NAME}.backblazeb2.com'
        AWS_S3_ENDPOINT_URL = f'https://{AWS_S3_ENDPOINT}'

        AWS_DEFAULT_ACL = 'public-read'
        AWS_S3_OBJECT_PARAMETERS = {
            'CacheControl': 'max-age=86400',
        }

        AWS_LOCATION = 'static'
        AWS_QUERYSTRING_AUTH = False
        AWS_HEADERS = {
            'Access-Control-Allow-Origin': '*',
        }
        # s3 static settings
        AWS_STATIC_LOCATION = f'portfolio/{PROJECT_NAME}/static'
        STATIC_URL = f'https://{AWS_STORAGE_BUCKET_NAME}.{AWS_STATIC_LOCATION}/'
        STATICFILES_STORAGE = f'{PROJECT_NAME}.storage_backends.StaticStorage'
        # s3 public media settings
        AWS_PUBLIC_MEDIA_LOCATION = f'portfolio/{PROJECT_NAME}/media'
        MEDIA_URL = f'https://{AWS_STORAGE_BUCKET_NAME}.{AWS_PUBLIC_MEDIA_LOCATION}/'
        DEFAULT_FILE_STORAGE = f'{PROJECT_NAME}.storage_backends.PublicMediaStorage'
        # s3 private media settings
        PRIVATE_MEDIA_LOCATION = f'portfolio/{PROJECT_NAME}/private'
        PRIVATE_FILE_STORAGE = f'{PROJECT_NAME}.storage_backends.PrivateMediaStorage'

    elif BUCKET_TYPE == 'MINIO':
        AWS_S3_REGION_NAME = 'us-east-1'  # MinIO doesn't require this, but boto3 does
        AWS_S3_ENDPOINT_URL = 'https://minio.arpansahu.spacee'
        AWS_DEFAULT_ACL = 'public-read'
        AWS_S3_OBJECT_PARAMETERS = {
            'CacheControl': 'max-age=86400',
        }
        AWS_LOCATION = 'static'
        AWS_QUERYSTRING_AUTH = False
        AWS_HEADERS = {
            'Access-Control-Allow-Origin': '*',
        }

        # s3 static settings
        AWS_STATIC_LOCATION = f'portfolio/{PROJECT_NAME}/static'
        STATIC_URL = f'https://{AWS_STORAGE_BUCKET_NAME}/{AWS_STATIC_LOCATION}/'
        STATICFILES_STORAGE = f'{PROJECT_NAME}.storage_backends.StaticStorage'

        # s3 public media settings
        AWS_PUBLIC_MEDIA_LOCATION = f'portfolio/{PROJECT_NAME}/media'
        MEDIA_URL = f'https://{AWS_STORAGE_BUCKET_NAME}/{AWS_PUBLIC_MEDIA_LOCATION}/'
        DEFAULT_FILE_STORAGE = f'{PROJECT_NAME}.storage_backends.PublicMediaStorage'

        # s3 private media settings
        PRIVATE_MEDIA_LOCATION = 'portfolio/borcelle_crm/private'
        PRIVATE_FILE_STORAGE = 'borcelle_crm.storage_backends.PrivateMediaStorage'
else:
    # Static files (CSS, JavaScript, Images)
    # https://docs.djangoproject.com/en/3.2/howto/static-files/

    STATIC_URL = '/static/'

    STATIC_ROOT = os.path.join(BASE_DIR, 'staticfiles')
    MEDIA_URL = '/media/'

MEDIA_ROOT = os.path.join(BASE_DIR, 'media')
STATICFILES_DIRS = [os.path.join(BASE_DIR, "static"), ]
run below command
python manage.py collectstatic
and you are good to go
Custom Django Management Commands
Service Health Check Commands
- test_all_services — Run all service health checks for the Django Starter application.
python manage.py test_all_services
- test_db — Test if the database is working properly by performing CRUD operations.
python manage.py test_db
- test_cache — Test if the caching system (Redis) is working correctly with set/get operations and expiration validation.
python manage.py test_cache
- test_email — Test if the email service (MailJet) is configured and working properly.
python manage.py test_email
- test_storage — Test if MinIO/S3 storage is working properly.
python manage.py test_storage
- test_elasticsearch — Test if Elasticsearch is working properly.
python manage.py test_elasticsearch
- test_kafka — Test if Kafka is working properly.
python manage.py test_kafka
- test_rabbitmq — Test if RabbitMQ is working properly.
python manage.py test_rabbitmq
- test_celery — Test if Celery is working properly.
python manage.py test_celery
- test_flower — Test if Flower (Celery monitoring) is accessible.
python manage.py test_flower
- test_harbor — Test if Harbor Docker Registry is working properly.
python manage.py test_harbor
Commands App — Management Commands Dashboard
- send_notifications — Send notifications via email, SMS, or webhook.
python manage.py send_notifications
- health_check — Perform comprehensive system health checks.
python manage.py health_check
- run_scheduled_tasks — Run scheduled tasks that are due for execution.
python manage.py run_scheduled_tasks
- generate_report — Generate reports from command execution data.
python manage.py generate_report
- collect_metrics — Collect system metrics and store them in the database.
python manage.py collect_metrics
- cleanup_old_data — Clean up old data based on retention policies.
python manage.py cleanup_old_data
- import_data — Import data from CSV, JSON, or API sources.
python manage.py import_data
- export_data — Export data to CSV, JSON, or Excel formats.
python manage.py export_data
Readme Manager
Each repository contains an
update_readme.sh
script located in the
readme_manager
directory. This script is responsible for updating the README file in the repository by pulling in content from various sources.
What it Does
The
update_readme.sh
script performs the following actions:
-
Clone Required Files
: Clones the
requirements.txt,readme_updater.py, andbaseREADME.mdfiles from thecommon_readmerepository. - Set Up Python Environment : Creates and activates a Python virtual environment.
-
Install Dependencies
: Installs the necessary dependencies listed in
requirements.txt. -
Run Update Script
: Executes the
readme_updater.pyscript to update the README file usingbaseREADME.mdand other specified sources. - Clean Up : Deactivates the Python virtual environment and removes it.
How to Use
To run the
update_readme.sh
script, navigate to the
readme_manager
directory and execute the script:
cd readme_manager && ./update_readme.sh
This will update the
README.md
file in the root of the repository with the latest content from the specified sources.
Updating Content
If you need to make changes that are specific to the project or project-specific files, you might need to update the content of the partial README files. Here are the files that are included:
- Project-Specific Files :
-
env.example -
docker-compose.yml -
Dockerfile -
Jenkinsfile -
Project-Specific Partial Files :
-
INTRODUCTION:../readme_manager/partials/introduction.md -
DOC_AND_STACK:../readme_manager/partials/documentation_and_stack.md -
TECHNOLOGY QNA:../readme_manager/partials/technology_qna.md -
DEMO:../readme_manager/partials/demo.md -
INSTALLATION:../readme_manager/partials/installation.md -
DJANGO_COMMANDS:../readme_manager/partials/django_commands.md -
NGINX_SERVER:../readme_manager/partials/nginx_server.md
These files are specific to the project and should be updated within the project repository.
- Common Files :
-
All other files are common across projects and should be updated in the
common_readmerepository.
There are a few files which are common for all projects. For convenience, these are inside the
common_readme
repository so that if changes are made, they will be updated in all the projects' README files.
# Define a dictionary with the placeholders and their corresponding GitHub raw URLs or local paths

include_files = {
    # common files

    "README of Docker Installation": "https://raw.githubusercontent.com/arpansahu/common_readme/main/AWS%20Deployment/01-docker/docker_installation.md",
    "DOCKER_END": "https://raw.githubusercontent.com/arpansahu/common_readme/main/AWS%20Deployment/01-docker/docker_end.md",
    "README of Nginx Setup": "https://raw.githubusercontent.com/arpansahu/common_readme/main/AWS%20Deployment/02-nginx/README.md",
    "README of Jenkins Setup": "https://raw.githubusercontent.com/arpansahu/common_readme/main/AWS%20Deployment/12-jenkins/Jenkins.md",
    "README of PostgreSql Server With Nginx Setup": "https://raw.githubusercontent.com/arpansahu/common_readme/main/AWS%20Deployment/03-postgres/README.md",
    "README of PGAdmin4 Server With Nginx Setup": "https://raw.githubusercontent.com/arpansahu/common_readme/main/AWS%20Deployment/06-pgadmin/README.md",
    "README of Portainer Server With Nginx Setup": "https://raw.githubusercontent.com/arpansahu/common_readme/main/AWS%20Deployment/05-portainer/README.md",
    "README of Redis Server Setup": "https://raw.githubusercontent.com/arpansahu/common_readme/main/AWS%20Deployment/04-redis/README.md",
    "README of Redis Commander Setup": "https://raw.githubusercontent.com/arpansahu/common_readme/main/AWS%20Deployment/07-redis_commander/README.md",
    "README of Minio Server Setup": "https://raw.githubusercontent.com/arpansahu/common_readme/main/AWS%20Deployment/08-minio/README.md",
    "README of RabbitMQ Server Setup": "https://raw.githubusercontent.com/arpansahu/common_readme/main/AWS%20Deployment/09-rabbitmq/README.md",
    "README of Kafka Server Setup": "https://raw.githubusercontent.com/arpansahu/common_readme/main/AWS%20Deployment/10-kafka/Kafka.md",
    "README of AKHQ UI Setup": "https://raw.githubusercontent.com/arpansahu/common_readme/main/AWS%20Deployment/10-kafka/AKHQ.md",
    "README of Intro": "https://raw.githubusercontent.com/arpansahu/common_readme/main/AWS%20Deployment/Intro.md",
    "INSTALLATION ORDER": "https://raw.githubusercontent.com/arpansahu/common_readme/main/AWS%20Deployment/INSTALLATION_ORDER.md",
    "HOME SERVER SETUP": "https://raw.githubusercontent.com/arpansahu/common_readme/main/AWS%20Deployment/home_server/README.md",
    "SSH KEY SETUP": "https://raw.githubusercontent.com/arpansahu/common_readme/main/AWS%20Deployment/home_server/steps/00-ssh-key-setup.md",
    "HARDWARE PREPARATION": "https://raw.githubusercontent.com/arpansahu/common_readme/main/AWS%20Deployment/home_server/steps/01-hardware-preparation.md",
    "UBUNTU INSTALLATION": "https://raw.githubusercontent.com/arpansahu/common_readme/main/AWS%20Deployment/home_server/steps/02-ubuntu-installation.md",
    "INITIAL CONFIGURATION": "https://raw.githubusercontent.com/arpansahu/common_readme/main/AWS%20Deployment/home_server/steps/03-initial-configuration.md",
    "NETWORK CONFIGURATION": "https://raw.githubusercontent.com/arpansahu/common_readme/main/AWS%20Deployment/home_server/steps/04-network-configuration.md",
    "UPS CONFIGURATION": "https://raw.githubusercontent.com/arpansahu/common_readme/main/AWS%20Deployment/home_server/steps/05-ups-configuration.md",
    "BACKUP INTERNET": "https://raw.githubusercontent.com/arpansahu/common_readme/main/AWS%20Deployment/home_server/steps/06-backup-internet.md",
    "MONITORING SETUP": "https://raw.githubusercontent.com/arpansahu/common_readme/main/AWS%20Deployment/home_server/steps/07-monitoring-setup.md",
    "AUTOMATED BACKUPS": "https://raw.githubusercontent.com/arpansahu/common_readme/main/AWS%20Deployment/home_server/steps/08-automated-backups.md",
    "REMOTE ACCESS SETUP": "https://raw.githubusercontent.com/arpansahu/common_readme/main/AWS%20Deployment/home_server/steps/09-remote-access.md",
    "CORE SERVICES INSTALLATION": "https://raw.githubusercontent.com/arpansahu/common_readme/main/AWS%20Deployment/home_server/steps/10-core-services.md",
    "SSH WEB TERMINAL SETUP": "https://raw.githubusercontent.com/arpansahu/common_readme/main/AWS%20Deployment/ssh-web-terminal/README.md",
    "ROUTER ADMIN AIRTEL SETUP": "https://raw.githubusercontent.com/arpansahu/common_readme/main/AWS%20Deployment/airtel/README.md",
    "README of Readme Manager": "https://raw.githubusercontent.com/arpansahu/common_readme/main/Readme%20manager/readme_manager.md",
    "AWS DEPLOYMENT INTRODUCTION": "https://raw.githubusercontent.com/arpansahu/common_readme/main/Introduction/aws_desployment_introduction.md",
    "STATIC_FILES": "https://raw.githubusercontent.com/arpansahu/common_readme/main/Introduction/static_files_settings.md",
    "SENTRY": "https://raw.githubusercontent.com/arpansahu/common_readme/main/Introduction/sentry.md",
    "CHANNELS": "https://raw.githubusercontent.com/arpansahu/common_readme/main/Introduction/channels.md",
    "CACHE": "https://raw.githubusercontent.com/arpansahu/common_readme/main/Introduction/cache.md",
    "README of Harbor" : "https://raw.githubusercontent.com/arpansahu/common_readme/main/AWS%20Deployment/11-harbor/harbor.md",
    "INCLUDE FILES": "https://raw.githubusercontent.com/arpansahu/common_readme/main/include_files.py",
    "MONITORING": "https://raw.githubusercontent.com/arpansahu/arpansahu-one-scripts/main/README.md",

    # kubernetes k3s (current production setup: k3s + Portainer, Nginx-managed HTTPS)
    "KUBE DEPLOYMENT": "https://raw.githubusercontent.com/arpansahu/common_readme/main/AWS%20Deployment/kubernetes_k3s/README.md",

    # project files
    "env.example": "../env.example",
    "docker-compose.yml": "../docker-compose.yml",
    "Dockerfile": "../Dockerfile",
    "Jenkinsfile-deploy": "../Jenkinsfile-deploy",
    "Jenkinsfile-build": "../Jenkinsfile-build",
    "DEPLOYMENT YAML": "../deployment.yaml",
    "SERVICE YAML": "../service.yaml",


    # project partials files
    "INTRODUCTION": "../readme_manager/partials/introduction.md",
    "INTRODUCTION MAIN": "../readme_manager/partials/introduction_main.md",
    "DOC_AND_STACK": "../readme_manager/partials/documentation_and_stack.md",
    "TECHNOLOGY QNA": "../readme_manager/partials/technology_qna.md",
    "DEMO": "../readme_manager/partials/demo.md",
    "INSTALLATION": "../readme_manager/partials/installation.md",
    "DJANGO_COMMANDS": "../readme_manager/partials/django_commands.md",
    "NGINX_SERVER": "../readme_manager/partials/nginx_server.md",
    "SERVICES": "../readme_manager/partials/services.md",
    "JENKINS PROJECT NAME": "../readme_manager/partials/jenkins_project_name.md",
    "JENKINS BUILD PROJECT NAME": "../readme_manager/partials/jenkins_build_project_name.md",
    "STATIC PROJECT NAME": "../readme_manager/partials/static_project_name.md",
    "PROJECT_NAME_DASH" : "../readme_manager/partials/project_name_with_dash.md",
    "PROJECT_DOCKER_PORT": "../readme_manager/partials/project_docker_port.md",
    "PROJECT_NODE_PORT": "../readme_manager/partials/project_node_port.md",
    "DOMAIN_NAME": "../readme_manager/partials/project_domain_name.md"
}
Also, remember if you want to include new files, you need to change the
baseREADME
file and the
include_files
array in the
common_readme
repository itself.
Deployment on AWS EC2/ Home Server Ubuntu 22.0 LTS/ Hostinger VPS Server
Deployment Architecture Evolution
This project and all related services have evolved through multiple deployment strategies, each with unique advantages. This documentation covers all three approaches to provide flexibility based on your needs.
Deployment Timeline
Phase 1: Heroku (Legacy)
- Initial hosting on Heroku
- Simple deployment but expensive at scale
- Limited control over infrastructure
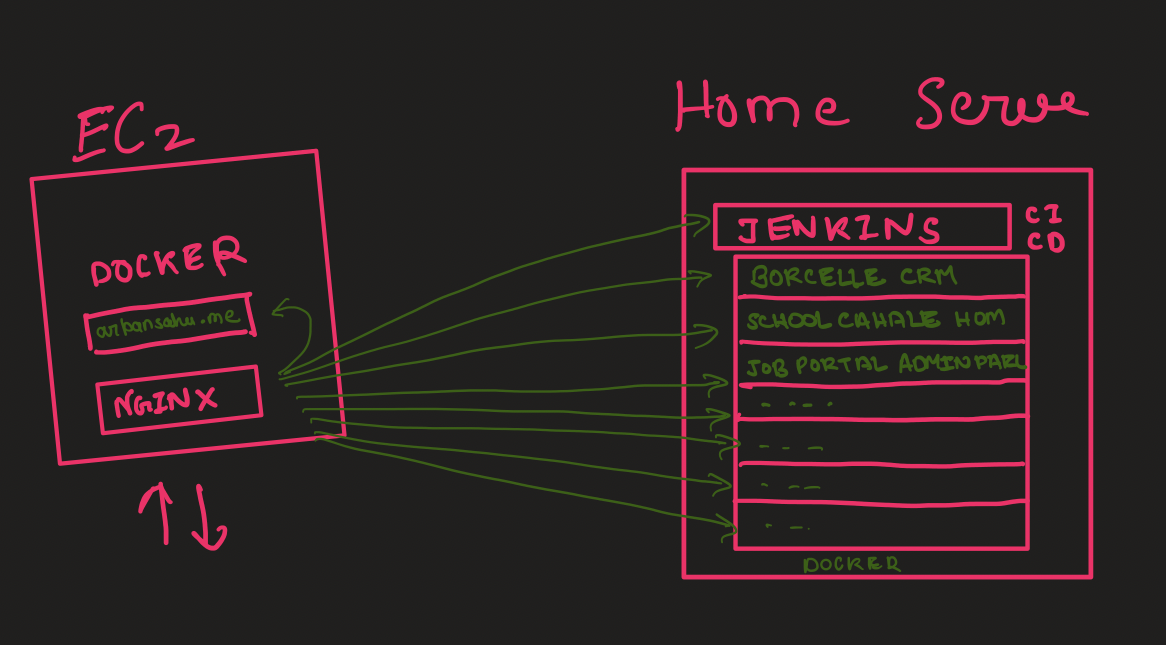
Phase 2: EC2 + Home Server Hybrid (2022-2023)
- EC2 for portfolio (arpansahu.spacee) with Nginx
- Home Server for all other projects
- Nginx on EC2 forwarded traffic to Home Server
- Cost-effective but faced reliability challenges
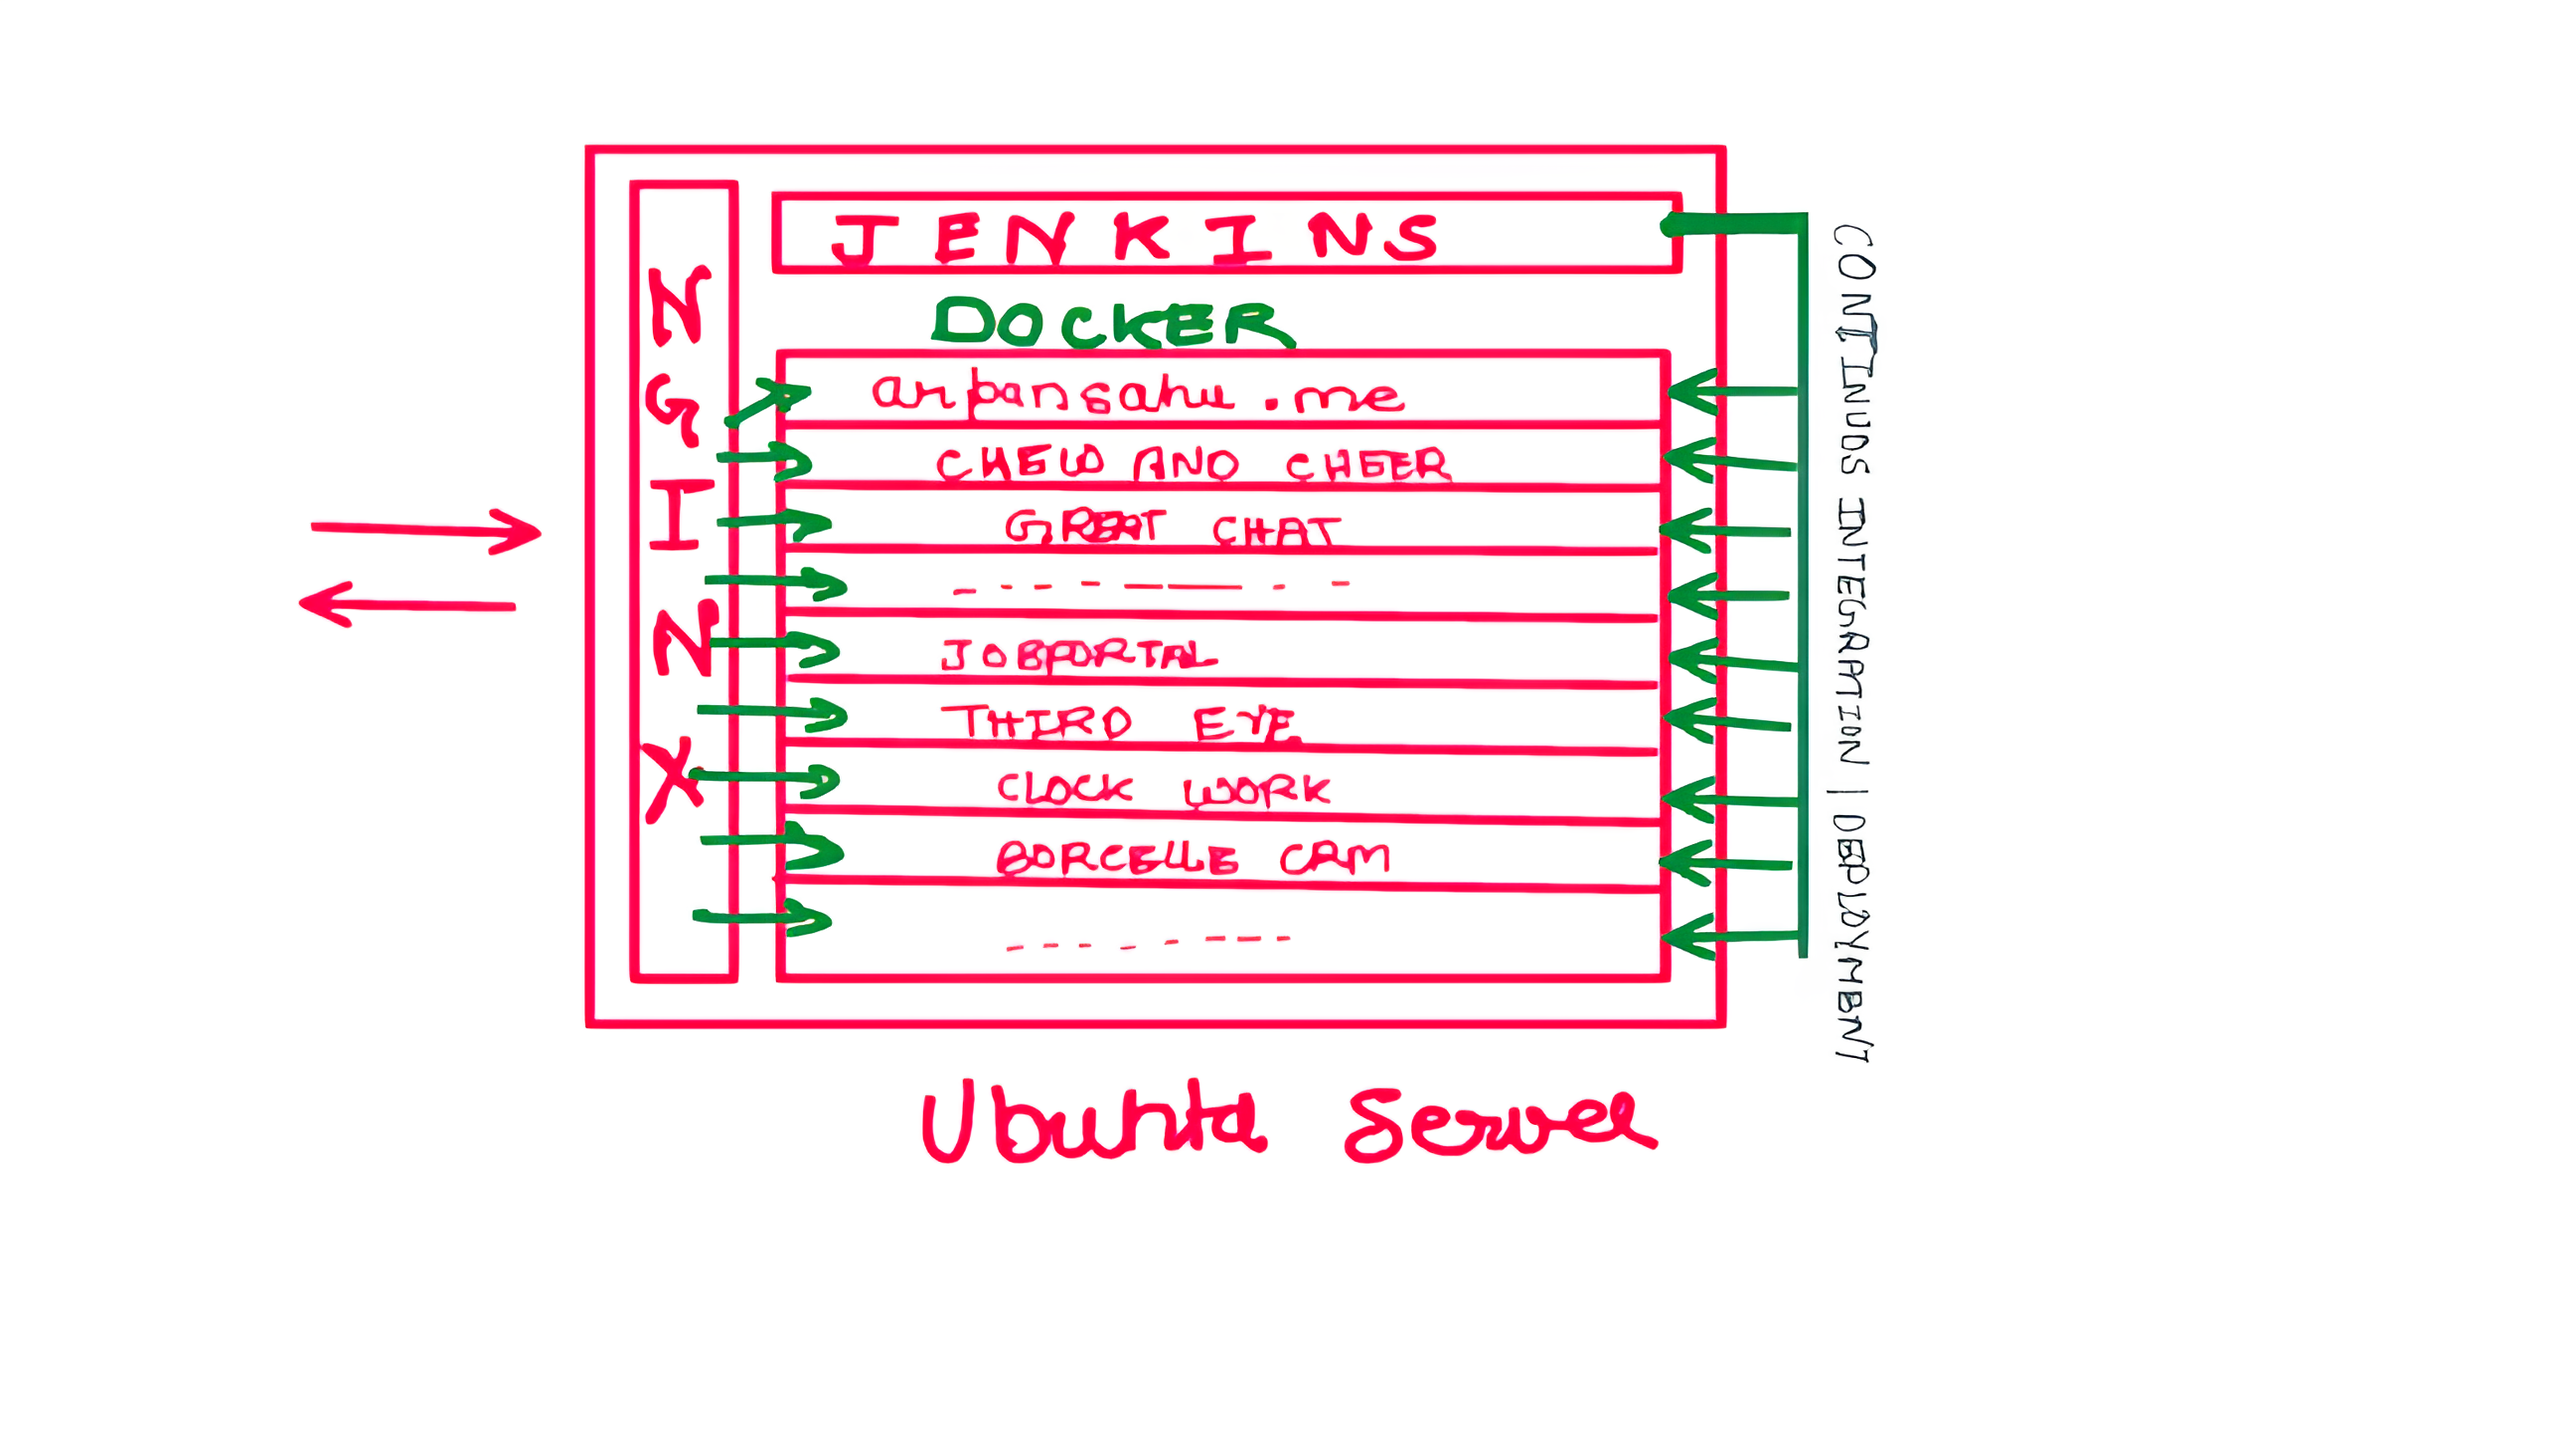
Phase 3: Single EC2 Server (Aug 2023)
- Consolidated all projects to single EC2 instance
- Started with t2.medium (~$40/month)
- Optimized to t2.small (~$15/month)
- Better reliability, higher costs
Phase 4: Hostinger VPS (Jan 2024)
- Migrated to Hostinger VPS for cost optimization
- Better pricing than EC2
- Good balance of cost and reliability
Phase 5: Home Server (Current - 2026)
- Back to Home Server with improved setup
- Leveraging lessons learned from previous attempts
- Modern infrastructure with Kubernetes, proper monitoring
- Significant cost savings with better reliability measures
Three Deployment Options
This documentation supports all three deployment strategies:
1. AWS EC2
Advantages:
- High reliability (99.99% uptime SLA)
- Global infrastructure and CDN integration
- Scalable on demand
- Professional-grade monitoring and support
- No dependency on home internet/power
Disadvantages:
- Higher cost (~$15-40/month depending on instance)
- Ongoing monthly expenses
- Limited by instance size without additional cost
Best For:
- Production applications requiring maximum uptime
- Applications needing global reach
- When budget allows for convenience
- Business-critical services
2. Hostinger VPS
Advantages:
- Cost-effective (~$8-12/month)
- Good performance for price
- Managed infrastructure options
- Reliable uptime
- Easy scaling
Disadvantages:
- Still recurring monthly cost
- Less control than EC2
- Limited to Hostinger's infrastructure
Best For:
- Budget-conscious deployments
- Personal projects requiring good uptime
- When you want managed services at lower cost
- Small to medium applications
3. Home Server
Advantages:
-
Zero recurring costs
(only electricity)
- Full hardware control and unlimited resources
- Privacy and data sovereignty
- Learning opportunity for infrastructure management
- Can repurpose old laptops/desktops
- Ideal for development and testing
Disadvantages (and Mitigations):
-
ISP downtime
→ Use UPS + mobile hotspot backup
-
Power cuts
→ UPS with sufficient backup time
-
Weather issues
→ Redundant internet connection
-
Hardware failure
→ Regular backups, spare parts
-
Remote troubleshooting
→ Proper monitoring, remote access tools
-
Dynamic IP
→ Dynamic DNS services (afraid.org, No-IP)
Best For:
- Personal projects and portfolios
- Development and testing environments
- Learning DevOps and system administration
- When you have reliable power and internet
- Cost-sensitive deployments
Current Architecture (Home Server - Hybrid Approach)
Current Setup (February 2026):
Internet
   │
   ├─ arpansahu.space (Home Server with Static IP)
   │   │
   │   └─ Nginx 1.18.0 (systemd) - TLS Termination & Reverse Proxy
   │        │
   │        ├─ System Services (systemd) - Core Infrastructure
   │        │   ├─ PostgreSQL 14.20 - Primary database
   │        │   ├─ Redis 6.0.16 - Cache and sessions
   │        │   ├─ RabbitMQ - Message broker for Celery
   │        │   ├─ Kafka 3.9.0 - Event streaming (KRaft mode)
   │        │   ├─ MinIO - S3-compatible object storage
   │        │   ├─ Jenkins 2.541.1 - CI/CD automation
   │        │   ├─ ElasticSearch - Search and logging
   │        │   └─ K3s - Kubernetes for app orchestration
   │        │
   │        ├─ Docker Containers (Management UIs only)
   │        │   ├─ Portainer - Docker & K3s management
   │        │   ├─ PgAdmin - PostgreSQL admin interface
   │        │   ├─ Redis Commander - Redis admin interface
   │        │   ├─ Harbor - Private Docker registry
   │        │   ├─ AKHQ - Kafka management UI
   │        │   ├─ Kibana - ElasticSearch UI
   │        │   └─ PMM - PostgreSQL monitoring
   │        │
   │        └─ K3s Deployments (Django Applications)
   │             ├─ arpansahu.space
   │             ├─ borcelle.arpansahu.space
   │             ├─ chew.arpansahu.space
   │             └─ django-starter.arpansahu.space
Why Hybrid Architecture?
This evolved architecture uses the best deployment method for each service type:
- System Services for Core Infrastructure
- Better performance (no containerization overhead)
- Production-grade reliability via systemd
- Direct system access and monitoring (journalctl)
- Native backup/restore tools
-
Lower resource usage
-
Docker for Management UIs
- Easy updates (docker pull)
- Isolated dependencies
- Lower priority - can restart without affecting core services
-
Quick rollback if updates fail
-
K3s for Applications
- Container orchestration benefits
- Easy scaling and rolling updates
- Service discovery
- Resource limits and quotas
- Health checks and auto-restart
Performance Impact:
- Core services run 10-15% faster vs Docker
- Better memory utilization (no container overhead for heavy services)
- Easier to tune PostgreSQL, Redis performance parameters
- Direct disk I/O for databases and object storage
Home Server Improvements (2026)
Lessons learned from 2022-2023 experience have been addressed:
Reliability Enhancements:
1. UPS with 2-4 hour backup capacity
2. Redundant internet (primary broadband + 4G backup)
3. Hardware RAID for data redundancy
4. Automated monitoring and alerting
5. Remote management tools (SSH, VPN)
6. Automated backup to cloud storage
Monitoring Stack:
- Uptime monitoring (UptimeRobot, Healthchecks.io)
- System monitoring (Prometheus + Grafana)
- Log aggregation (Loki)
- Alert notifications (Email, Telegram)
Infrastructure:
- Kubernetes (k3s) for orchestration
- Docker for containerization
- PM2 for process management
- Nginx for reverse proxy and HTTPS
- Automated deployments via Jenkins
Comparison Matrix
| Feature | EC2 | Hostinger VPS | Home Server |
|---|---|---|---|
| Monthly Cost | $15-40 | $8-12 | ~$5 (electricity) |
| Uptime SLA | 99.99% | 99.9% | 95-98% (with improvements) |
| Setup Time | Medium | Easy | Complex |
| Scalability | Excellent | Good | Limited by hardware |
| Control | High | Medium | Full |
| Learning Value | Medium | Low | Very High |
| Remote Access | Built-in | Built-in | Requires setup |
| Backup | Easy | Easy | Manual setup needed |
| Privacy | Low | Medium | Complete |
Recommended Setup by Use Case
For Production/Business:
- Use EC2 or Hostinger VPS
- Follow all documentation except home server specific sections
- Implement proper backup and disaster recovery
For Personal Projects:
- Home Server is ideal
- Follow complete documentation including home server setup
- Implement monitoring and backup strategies
For Learning:
- Home Server provides maximum learning opportunity
- Experiment with all services and configurations
- Break things and fix them safely
Infrastructure Components
All deployment options use the same software stack:
Core Services:
- Docker Engine with docker-compose-plugin
- Nginx with wildcard SSL (acme.sh)
- Kubernetes (k3s) without Traefik
- Portainer for container management
Application Services:
- PostgreSQL 16 with SCRAM-SHA-256
- Redis for caching
- RabbitMQ for message queuing
- Kafka with KRaft mode for event streaming
- MinIO for object storage
- PgAdmin for database administration
- AKHQ for Kafka management
DevOps Tools:
- Jenkins for CI/CD
- Git for version control
- PM2 for process management
Monitoring (Home Server):
- System metrics and health checks
- Automated alerting
- Log aggregation
Documentation Structure
This repository provides step-by-step guides for:
- SSH Key Setup (Do This First!) ← IMPORTANT
- Installation Order & Dependencies ← Start Here
- Docker Installation
- Nginx Setup (HTTP + HTTPS)
- Kubernetes with Portainer
- PostgreSQL Setup
- Redis Setup
- Redis Commander
- RabbitMQ
- Kafka with KRaft
- AKHQ (Kafka UI)
- Portainer
- PgAdmin
- MinIO Object Storage
- Jenkins CI/CD
- Harbor Private Registry
- Home Server Setup ← Complete laptop-to-server guide
- SSH Web Terminal ← Browser-based SSH access
- Airtel Router Admin ← Secure router management
Getting Started
For EC2/VPS Deployment:
1. Provision Ubuntu 22.04 server
2. Follow
Installation Order Guide
3. Install Docker and Docker Compose
4. Set up Nginx with HTTPS
5. Install required services in sequence
For Home Server Deployment:
1. Follow
Home Server Setup Guide
2. Install Ubuntu Server 22.04
3. Configure UPS and backup internet
4. Follow
Installation Order Guide
5. Set up monitoring and alerting
All projects are dockerized and run on predefined ports specified in Dockerfile and docker-compose.yml.
Architecture Diagrams
Historical Setup (2022-2023):
Single Server Setup (2023-2024):
Current Home Server Setup (2026):
- Updated architecture with Kubernetes
- Improved reliability and monitoring
- All services behind Nginx with HTTPS
- Dynamic DNS for domain management
My Current Setup
As of January 2026, I'm running a home server setup with:
- Repurposed laptop as primary server
- Ubuntu 22.04 LTS Server
- 16GB RAM, 500GB SSD
- UPS backup power
- Dual internet connections (broadband + 4G)
- All services accessible via arpansahu.space
- Automated backups to cloud storage
Live projects: https://arpansahu.spacee/projects
Next Steps
Choose your deployment strategy and follow the relevant guides:
-
EC2/VPS
: Skip home server setup, start with Docker installation
-
Home Server
: Start with
Home Server Setup Guide
All guides are production-tested and follow the same format for consistency.
Note:
For complete setup guides:
-
Home Server
:
Home Server Setup Guide
-
Installation Order
:
Installation Order Guide
-
SSH Web Terminal
:
SSH Web Terminal Setup
-
Airtel Router Access
:
Airtel Router Admin Setup
Step 1: Dockerize
🐳 Docker Engine Installation (Updated for 2026)
Reference: https://docs.docker.com/engine/install/ubuntu/
Current Server Versions:
- Docker: 29.2.0 (February 2026)
- Docker Compose: v5.0.2 (plugin, not standalone)
1️⃣ Prerequisites & Repository Setup
1.1 Update apt and install required packages
sudo apt-get update
sudo apt-get install -y \
  ca-certificates \
  curl \
  gnupg \
  lsb-release
1.2 Add Docker's official GPG key (modern keyring approach)
sudo mkdir -p /etc/apt/keyrings

curl -fsSL https://download.docker.com/linux/ubuntu/gpg \
  | sudo gpg --dearmor -o /etc/apt/keyrings/docker.gpg

# Important: avoid GPG permission issues
sudo chmod a+r /etc/apt/keyrings/docker.gpg
🔹 Why this matters:
Earlier READMEs often skippedchmod a+r, which now causes GPG errors on newer Ubuntu versions.
1.3 Add Docker repository
echo "deb [arch=$(dpkg --print-architecture) signed-by=/etc/apt/keyrings/docker.gpg] \
https://download.docker.com/linux/ubuntu \
$(lsb_release -cs) stable" \
| sudo tee /etc/apt/sources.list.d/docker.list > /dev/null
2️⃣ Install Docker Engine
2.1 Update package index
sudo apt-get update
If you still see GPG errors:
sudo chmod a+r /etc/apt/keyrings/docker.gpg
sudo apt-get update
2.2 Install Docker Engine + Compose plugin
sudo apt-get install -y \
  docker-ce \
  docker-ce-cli \
  containerd.io \
  docker-compose-plugin
✅ Change vs old README:
-
docker-compose-pluginreplaces olddocker-composebinary -
Use
docker compose(space) instead ofdocker-compose(hyphen)
3️⃣ Start & Enable Docker
sudo systemctl start docker
sudo systemctl enable docker
4️⃣ Verify Installation
sudo docker run hello-world
✅ If you see "Hello from Docker!" , Docker is installed correctly.
Verify versions:
docker --version
# Expected: Docker version 29.x or later

docker compose version
# Expected: Docker Compose version v5.x or later
Important:
Notice
docker compose
(with space), NOT
docker-compose
(with hyphen). The old
docker-compose
standalone binary is deprecated and not installed.
5️⃣ (Recommended) Run Docker Without sudo
sudo usermod -aG docker $USER
newgrp docker
Verify:
docker ps
✅ Final Notes (Important Changes from Old Setup)
| Old Setup (Pre-2024) | Current Setup (2026) |
|---|---|
docker-compose
(hyphen)
|
docker compose
(space) -
plugin
|
| Docker v24.x | Docker v29.2.0 |
| Compose v2.23.x | Compose v5.0.2 |
| No key permission fix |
Explicit
chmod a+r docker.gpg
|
| Older install style | Keyring-based (required now) |
| Manual Compose install | Bundled via plugin |
Critical:
All docker-compose.yml files work with
docker compose
(space). Simply replace:
# Old way (deprecated):
docker-compose up -d

# New way (current):
docker compose up -d
📝 Common Docker Compose Commands
# Start services
docker compose up -d

# Stop services
docker compose down

# View logs
docker compose logs -f

# Restart services
docker compose restart

# Pull latest images
docker compose pull

# Check status
docker compose ps
🔧 Troubleshooting
"docker compose: command not found"
This means
docker-compose-plugin
is not installed. Install it:
sudo apt-get install docker-compose-plugin
Old docker-compose.yml files not working
All old
docker-compose
files are compatible with
docker compose
(plugin). No changes needed to YAML files, just change the command.
✅ Next Steps
After Docker installation, you can install:
-
Portainer
- Docker management UI
-
PostgreSQL
- Database server
-
Redis
- Cache server
-
MinIO
- Object storage
-
Harbor
- Container registry
See INSTALLATION_ORDER.md for recommended sequence.
Now in your Git Repository
Create a file named Dockerfile with no extension and add following lines in it
Step 2: Private Docker Registry
Harbor (Self-Hosted Private Docker Registry)
Harbor is an open-source container image registry that secures images with role-based access control, scans images for vulnerabilities, and signs images as trusted. It extends Docker Distribution by adding enterprise features like security, identity management, and image replication. This guide provides a complete, production-ready setup with Nginx reverse proxy.
Prerequisites
Before installing Harbor, ensure you have:
- Ubuntu Server 22.04 LTS
- Docker Engine installed (see docker_installation.md)
- Nginx with SSL certificates configured
- Domain name (example: harbor.arpansahu.space)
- Wildcard SSL certificate already issued (via acme.sh)
- Minimum 4GB RAM, 40GB disk space
- Root or sudo access
Architecture Overview
Internet (HTTPS)
   │
   └─ Nginx (Port 443) - TLS Termination
        │
        └─ harbor.arpansahu.space
             │
             └─ Harbor Internal Nginx (localhost:8080)
                  │
                  ├─ Harbor Core
                  ├─ Harbor Registry
                  ├─ Harbor Portal (Web UI)
                  ├─ Trivy (Vulnerability Scanner)
                  ├─ Notary (Image Signing)
                  └─ ChartMuseum (Helm Charts)
Key Principles:
- Harbor runs on localhost only
- System Nginx handles all external TLS
- Harbor has its own internal Nginx
- All data persisted in Docker volumes
- Automatic restart via systemd
Why Harbor
Advantages:
- Role-based access control (RBAC)
- Vulnerability scanning with Trivy
- Image signing and trust (Notary)
- Helm chart repository
- Image replication
- Garbage collection
- Web UI for management
- Docker Hub proxy cache
Use Cases:
- Private Docker registry for organization
- Secure image storage
- Vulnerability assessment
- Compliance and auditing
- Multi-project isolation
- Image lifecycle management
Part 1: Download and Extract Harbor
- Download latest Harbor release
    cd /opt
    sudo wget https://github.com/goharbor/harbor/releases/download/v2.11.0/harbor-offline-installer-v2.11.0.tgz
Check for latest version at: https://github.com/goharbor/harbor/releases
- Extract Harbor installer
    sudo tar -xzvf harbor-offline-installer-v2.11.0.tgz
    cd harbor
- Verify extracted files
ls -la
Expected files:
- harbor.yml.tmpl
- install.sh
- prepare
- common.sh
- harbor.*.tar.gz (images)
Part 2: Configure Harbor
- Copy template configuration
sudo cp harbor.yml.tmpl harbor.yml
- Edit Harbor configuration
sudo nano harbor.yml
-
Configure essential settings
Find and modify these lines:
    # Hostname for Harbor
    hostname: harbor.arpansahu.space

    # HTTP settings (used for internal communication)
    http:
      port: 8080

    # HTTPS settings (disabled - Nginx handles this)
    # Comment out or remove the https section completely
    # https:
    #   port: 443
    #   certificate: /path/to/cert
    #   private_key: /path/to/key

    # Harbor admin password
    harbor_admin_password: YourStrongPasswordHere

    # Database settings (PostgreSQL)
    database:
      password: ChangeDatabasePassword
      max_idle_conns: 100
      max_open_conns: 900

    # Data volume location
    data_volume: /data

    # Trivy (vulnerability scanner)
    trivy:
      ignore_unfixed: false
      skip_update: false
      offline_scan: false
      insecure: false

    # Job service
    jobservice:
      max_job_workers: 10

    # Notification webhook job
    notification:
      webhook_job_max_retry: 3

    # Log settings
    log:
      level: info
      local:
        rotate_count: 50
        rotate_size: 200M
        location: /var/log/harbor
Important changes:
- Set `hostname` to your domain
- Set `http.port` to 8080 (internal)
- Comment out entire `https` section
- Change `harbor_admin_password`
- Change `database.password`
- Keep `data_volume: /data` for persistence
-
Save and exit
In nano:
Ctrl + O,Enter,Ctrl + X
Part 3: Install Harbor
- Run Harbor installer with all components
sudo ./install.sh --with-notary --with-trivy --with-chartmuseum
This will:
- Load Harbor Docker images
- Generate docker-compose.yml
- Create necessary directories
- Start all Harbor services

Installation takes 5-10 minutes depending on system.
- Verify installation
sudo docker compose ps
Expected services (all should be "Up"):
- harbor-core
- harbor-db (PostgreSQL)
- harbor-jobservice
- harbor-log
- harbor-portal (Web UI)
- nginx (Harbor's internal)
- redis
- registry
- registryctl
- trivy-adapter
- notary-server
- notary-signer
- chartmuseum
- Check Harbor logs
sudo docker compose logs -f
Press `Ctrl + C` to exit logs.
Part 4: Configure System Nginx
- Edit Nginx configuration
sudo nano /etc/nginx/sites-available/services
- Add Harbor server block
    # Harbor Registry - HTTP → HTTPS
    server {
        listen 80;
        listen [::]:80;
        server_name harbor.arpansahu.space;
        return 301 https://$host$request_uri;
    }

    # Harbor Registry - HTTPS
    server {
        listen 443 ssl http2;
        listen [::]:443 ssl http2;
        server_name harbor.arpansahu.space;

        ssl_certificate     /etc/nginx/ssl/arpansahu.space/fullchain.pem;
        ssl_certificate_key /etc/nginx/ssl/arpansahu.space/privkey.pem;

        ssl_protocols TLSv1.2 TLSv1.3;

        location / {
            # Allow large image uploads (2GB recommended, 0 for unlimited)
            # Note: Set to at least 2G for typical Docker images
            client_max_body_size 2G;

            proxy_pass http://127.0.0.1:8080;

            proxy_set_header Host $host;
            proxy_set_header X-Real-IP $remote_addr;
            proxy_set_header X-Forwarded-For $proxy_add_x_forwarded_for;
            proxy_set_header X-Forwarded-Proto https;

            # WebSocket support
            proxy_http_version 1.1;
            proxy_set_header Upgrade $http_upgrade;
            proxy_set_header Connection "upgrade";

            # Timeouts for large image pushes
            proxy_connect_timeout 300;
            proxy_send_timeout 300;
            proxy_read_timeout 300;
        }
    }
- Test Nginx configuration
sudo nginx -t
- Reload Nginx
sudo systemctl reload nginx
Part 5: Configure Auto-Start with Systemd
Harbor needs to start automatically after reboot. Docker Compose alone doesn't provide this.
- Create systemd service file
sudo nano /etc/systemd/system/harbor.service
- Add service configuration
    [Unit]
    Description=Harbor Container Registry
    After=docker.service
    Requires=docker.service

    [Service]
    Type=oneshot
    RemainAfterExit=yes
    WorkingDirectory=/opt/harbor
    ExecStart=/usr/bin/docker compose up -d
    ExecStop=/usr/bin/docker compose down
    Restart=on-failure
    RestartSec=10

    [Install]
    WantedBy=multi-user.target
- Reload systemd daemon
sudo systemctl daemon-reload
- Enable Harbor service
sudo systemctl enable harbor
- Verify service status
sudo systemctl status harbor
Expected: Loaded and active
Part 6: Configure Firewall and Port Forwarding
- Configure UFW firewall
    # Allow HTTP/HTTPS (if not already allowed)
    sudo ufw allow 80/tcp
    sudo ufw allow 443/tcp

    # Block direct access to Harbor port
    sudo ufw deny 8080/tcp

    # Reload firewall
    sudo ufw reload
-
Configure router port forwarding
Access router admin: https://airtel.arpansahu.space (or http://192.168.1.1:81)
Add port forwarding rules:
Service External Port Internal IP Internal Port Protocol Harbor HTTP 80 192.168.1.200 80 TCP Harbor HTTPS 443 192.168.1.200 443 TCP Note: Do NOT forward port 8080 (Harbor internal port).
Part 7: Test Harbor Installation
- Check all containers are running
sudo docker compose ps
All should show "Up" status.
- Test local access
curl -I http://127.0.0.1:8080
Expected: HTTP 200 or 301
- Test external HTTPS access
curl -I https://harbor.arpansahu.space
Expected: HTTP 200
-
Access Harbor Web UI
Go to: https://harbor.arpansahu.space
-
Login with admin credentials
-
Username:
admin - Password: (from harbor.yml harbor_admin_password)
-
Username:
Part 8: Initial Harbor Configuration
-
Change admin password
- Click admin (top right) → Change Password
- Set strong password
- Save
-
Create project
- Go to: Projects → New Project
-
Project Name:
library(default) or custom name - Access Level: Private (recommended)
- Click: OK
-
Create robot account for CI/CD
- Go to: Projects → library → Robot Accounts
- Click: New Robot Account
-
Name:
ci-bot - Expiration: Never (or set expiry)
- Permissions: Push Artifact, Pull Artifact
- Click: Add
- Save token securely (shown only once)
Part 9: Using Harbor as Docker Registry
Login to Harbor
- Login from Docker client
docker login harbor.arpansahu.space
Enter:
- Username: `admin` (or your username)
- Password: (your Harbor password)

Expected: Login Succeeded
- Login with robot account (for CI/CD)
docker login harbor.arpansahu.space -u robot$ci-bot -p YOUR_ROBOT_TOKEN
Push Images to Harbor
- Tag existing image
docker tag nginx:latest harbor.arpansahu.space/library/nginx:latest
Format: `harbor.domain.com/project/image:tag`
- Push image to Harbor
docker push harbor.arpansahu.space/library/nginx:latest
-
Verify in Harbor UI
- Go to: Projects → library → Repositories
- You should see: nginx repository
Pull Images from Harbor
- Pull image from Harbor
docker pull harbor.arpansahu.space/library/nginx:latest
- Use in docker-compose.yml
    services:
      web:
        image: harbor.arpansahu.space/library/nginx:latest
Part 10: Configure Image Retention Policy
Retention policies automatically delete old images to save space.
-
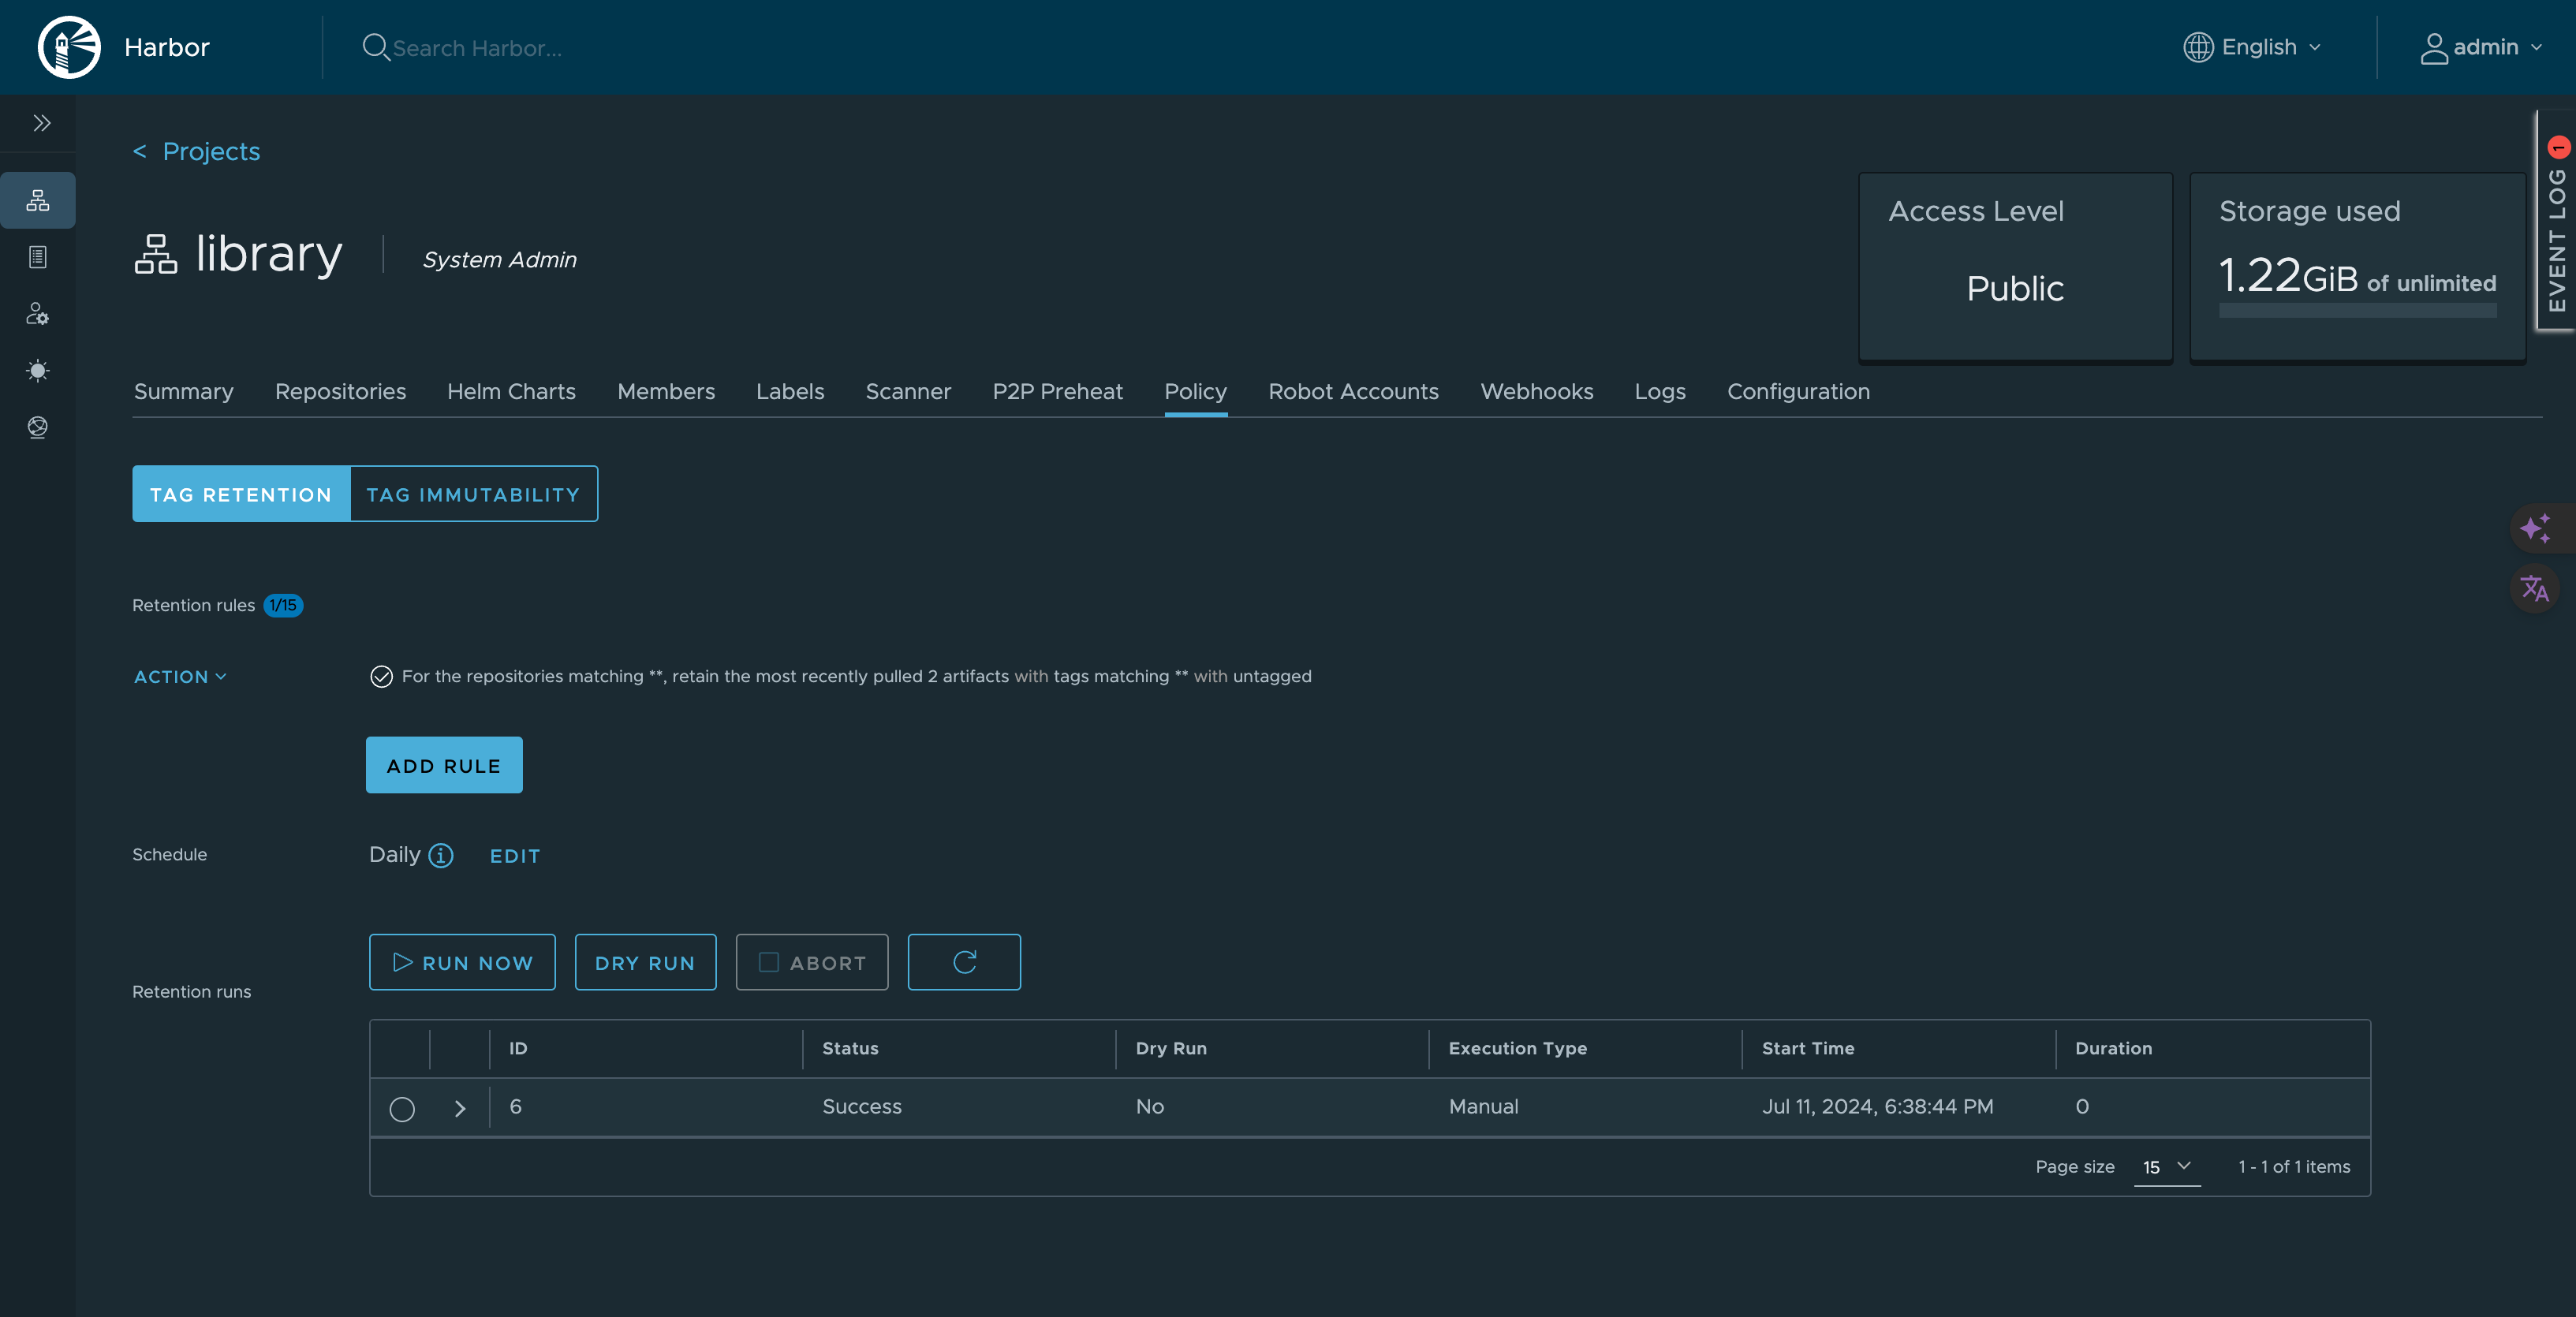
Navigate to project
- Projects → library → Policy
-
Add retention rule
Click: Add Rule
Configure:
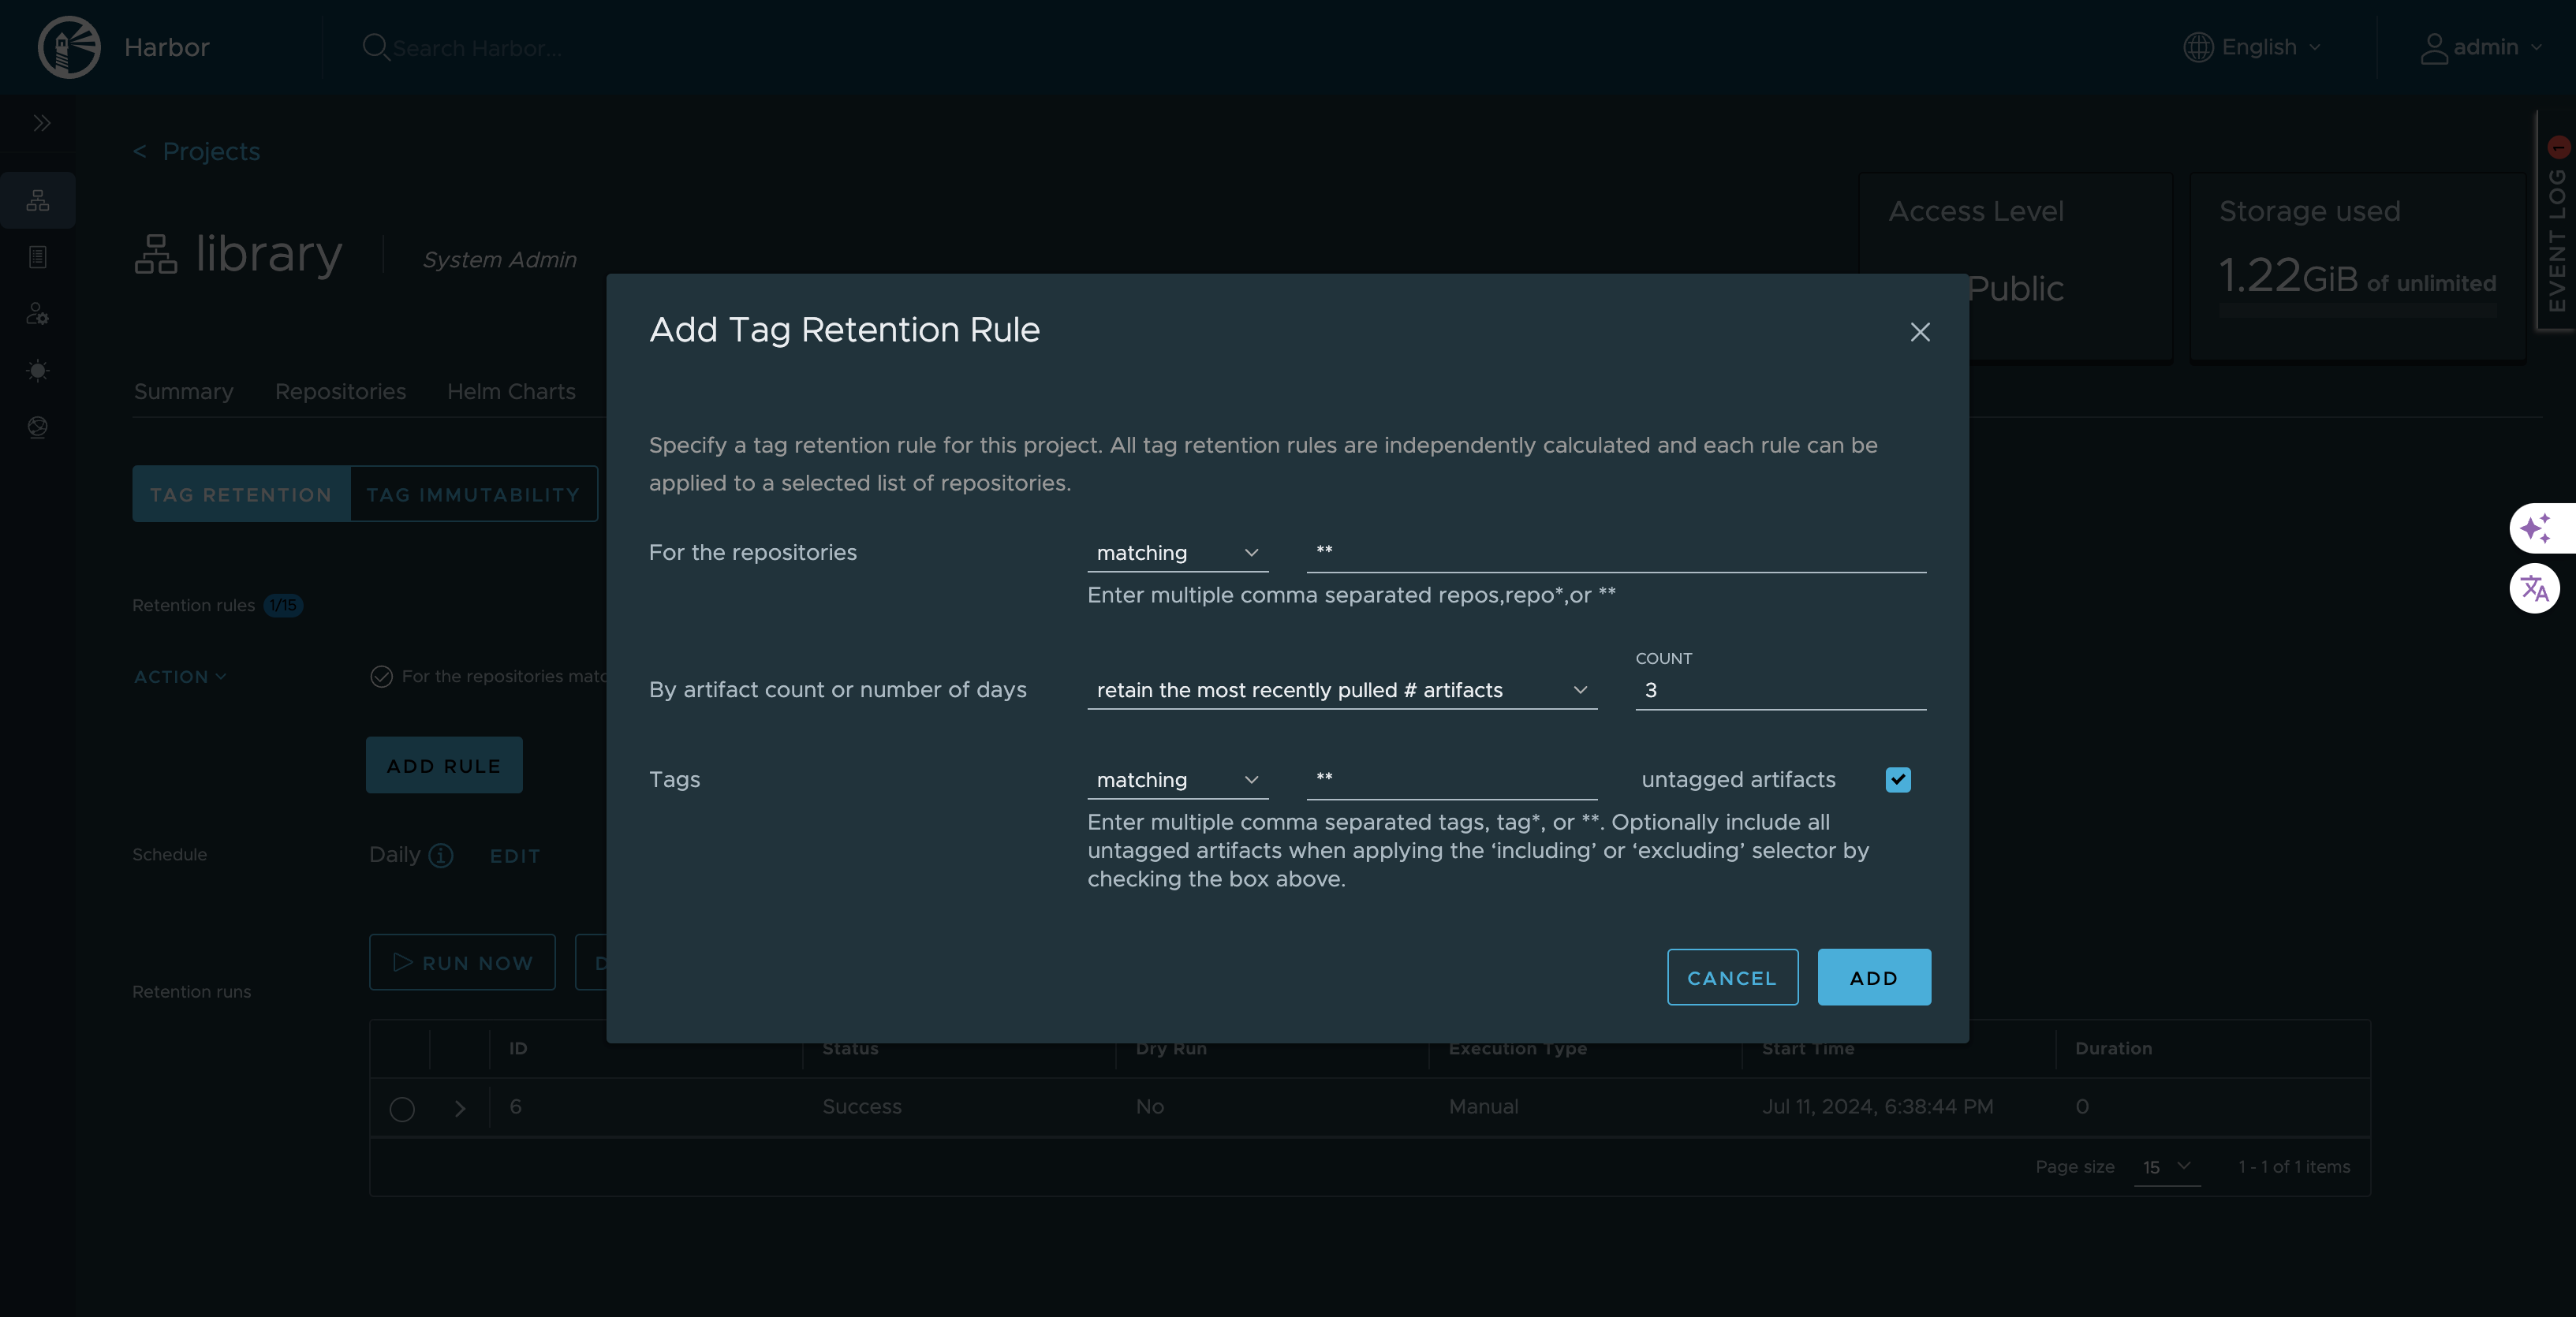
- Repositories : matching**(all repositories)
- By artifact count : Retain the most recently pulled3artifacts
- Tags : matching**(all tags)
- Untagged artifacts : ✓ Checked (delete untagged)This keeps last 3 pulled images and deletes others.
-
Schedule retention policy
Click: Add Retention Rule → Schedule
Configure schedule:
- Type : Daily / Weekly / Monthly
- Time : 02:00 AM (off-peak)
- Cron :0 2 * * *(2 AM daily)Click: Save
-
Test retention policy
Click: Dry Run
This shows what would be deleted without actually deleting.
Part 11: Enable Vulnerability Scanning
Harbor uses Trivy to scan images for vulnerabilities.
-
Configure automatic scanning
- Go to: Projects → library → Configuration
- Enable: Automatically scan images on push
- Click: Save
-
Manual scan existing image
- Go to: Projects → library → Repositories → nginx
- Select tag: latest
- Click: Scan
-
View scan results
- Click on tag
- View: Vulnerabilities tab
- See: Critical, High, Medium, Low vulnerabilities
-
Set CVE allowlist (optional)
- Go to: Projects → library → Configuration
- Add CVE IDs to allow despite vulnerabilities
- Use for false positives or accepted risks
Managing Harbor Service
- Check Harbor status
sudo systemctl status harbor
- Stop Harbor
sudo systemctl stop harbor
or
    cd /opt/harbor
    sudo docker compose down
- Start Harbor
sudo systemctl start harbor
or
    cd /opt/harbor
    sudo docker compose up -d
- Restart Harbor
sudo systemctl restart harbor
- View Harbor logs
    cd /opt/harbor
    sudo docker compose logs -f
- View specific service logs
sudo docker compose logs -f harbor-core
Backup and Restore
- Backup Harbor data
    # Stop Harbor
    sudo systemctl stop harbor

    # Backup data directory
    sudo tar -czf harbor-data-backup-$(date +%Y%m%d).tar.gz /data

    # Backup configuration
    sudo cp /opt/harbor/harbor.yml /backup/harbor-config-$(date +%Y%m%d).yml

    # Backup database
    sudo docker exec harbor-db pg_dumpall -U postgres > harbor-db-backup-$(date +%Y%m%d).sql

    # Start Harbor
    sudo systemctl start harbor
- Restore Harbor data
    # Stop Harbor
    sudo systemctl stop harbor

    # Restore data directory
    sudo tar -xzf harbor-data-backup-YYYYMMDD.tar.gz -C /

    # Restore configuration
    sudo cp /backup/harbor-config-YYYYMMDD.yml /opt/harbor/harbor.yml

    # Restore database
    sudo docker exec -i harbor-db psql -U postgres < harbor-db-backup-YYYYMMDD.sql

    # Start Harbor
    sudo systemctl start harbor
Common Issues and Fixes
-
Harbor containers not starting
Cause: Port conflict or insufficient resources
Fix:
    # Check if port 8080 is in use
    sudo ss -tulnp | grep 8080

    # Check Docker logs
    cd /opt/harbor
    sudo docker compose logs

    # Check system resources
    free -h
    df -h
-
Cannot login to Harbor
Cause: Wrong credentials or database issue
Fix:
- Verify admin password in harbor.yml
- Reset admin password:
      cd /opt/harbor
      sudo docker compose exec harbor-core harbor-core password-reset
-
Image push fails
Cause: Storage full or permission issues
Fix:
    # Check disk space
    df -h /data

    # Check Harbor logs
    sudo docker compose logs -f registry

    # Check data directory permissions
    sudo ls -la /data
-
SSL certificate errors
Cause: Nginx certificate misconfigured
Fix:
    # Verify certificate
    openssl x509 -in /etc/nginx/ssl/arpansahu.space/fullchain.pem -noout -dates

    # Check Nginx configuration
    sudo nginx -t

    # Reload Nginx
    sudo systemctl reload nginx
-
Vulnerability scanning not working
Cause: Trivy adapter not running or internet connectivity
Fix:
    # Check Trivy adapter
    sudo docker compose ps trivy-adapter

    # Check Trivy logs
    sudo docker compose logs trivy-adapter

    # Update Trivy database manually
    sudo docker compose exec trivy-adapter /home/scanner/trivy --download-db-only
Security Best Practices
-
Use strong passwords
- Admin password: minimum 16 characters
- Database password: minimum 16 characters
- Robot account tokens: treat as secrets
-
Enable HTTPS only
- Never use HTTP for Harbor
- Always proxy through Nginx with TLS
-
Implement RBAC
- Create projects with limited access
- Use robot accounts for automation
- Assign minimal required permissions
-
Enable vulnerability scanning
- Automatically scan on push
- Set CVE severity thresholds
- Block deployment of vulnerable images
-
Configure image retention
- Automatically delete old images
- Keep only necessary image versions
- Schedule during off-peak hours
-
Regular backups
    # Automate with cron
    sudo crontab -e
Add:
0 2 * * * /usr/local/bin/backup-harbor.sh
- Monitor logs
    # Regular log review
    sudo docker compose logs --since 24h | grep ERROR
Performance Optimization
-
Configure garbage collection
- Go to: Administration → Garbage Collection
- Schedule: Weekly at 2 AM
- This removes unreferenced image layers
-
Optimize database
    # Run vacuum on PostgreSQL
    sudo docker compose exec harbor-db vacuumdb -U postgres -d registry
-
Configure resource limits
Edit docker-compose.yml (auto-generated):
    services:
      registry:
        deploy:
          resources:
            limits:
              memory: 2G
            reservations:
              memory: 512M
-
Enable Redis cache
Harbor uses Redis by default for caching.
Increase Redis memory if needed.
Monitoring Harbor
- Check Harbor health
curl -k https://harbor.arpansahu.space/api/v2.0/health
- Monitor Docker resources
sudo docker stats
- Check disk usage
du -sh /data/*
- View system logs
sudo journalctl -u harbor -f
Updating Harbor
-
Backup current installation
Follow backup procedure above.
-
Download new Harbor version
    cd /opt
    sudo wget https://github.com/goharbor/harbor/releases/download/vX.Y.Z/harbor-offline-installer-vX.Y.Z.tgz
- Stop current Harbor
sudo systemctl stop harbor
- Extract new version
    sudo tar -xzvf harbor-offline-installer-vX.Y.Z.tgz
    sudo mv harbor harbor-old
    sudo mv harbor-new harbor
- Copy configuration
sudo cp harbor-old/harbor.yml harbor/harbor.yml
- Run migration
    cd /opt/harbor
    sudo ./install.sh --with-notary --with-trivy --with-chartmuseum
- Start Harbor
sudo systemctl start harbor
Final Verification Checklist
Run these commands to verify Harbor is working:
# Check all containers
sudo docker compose ps

# Check systemd service
sudo systemctl status harbor

# Check local access
curl -I http://127.0.0.1:8080

# Check HTTPS access
curl -I https://harbor.arpansahu.space

# Check Nginx config
sudo nginx -t

# Check firewall
sudo ufw status | grep -E '(80|443)'

# Test Docker login
docker login harbor.arpansahu.space
Then test in browser:
- Access: https://harbor.arpansahu.space
- Login with admin credentials
- Create test project
- Push test image
- Scan image for vulnerabilities
- Verify retention policy configured
What This Setup Provides
After following this guide, you will have:
- Self-hosted private Docker registry
- HTTPS access via Nginx reverse proxy
- Automatic startup with systemd
- Vulnerability scanning with Trivy
- Image signing with Notary
- Helm chart repository
- Automatic image retention
- Web UI for management
- Robot accounts for CI/CD
- Production-ready configuration
Example Configuration Summary
| Component | Value |
|---|---|
| Harbor URL | https://harbor.arpansahu.space |
| Internal Port | 8080 (localhost only) |
| Admin User | admin |
| Default Project | library |
| Data Directory | /data |
| Config File | /opt/harbor/harbor.yml |
| Service File | /etc/systemd/system/harbor.service |
Architecture Summary
Internet (HTTPS)
   │
   └─ Nginx (TLS Termination)
        │ [Wildcard Certificate: *.arpansahu.space]
        │
        └─ harbor.arpansahu.space (Port 443 → 8080)
             │
             └─ Harbor Stack (Docker Compose)
                  ├─ Harbor Core (API + Logic)
                  ├─ Harbor Portal (Web UI)
                  ├─ Registry (Image Storage)
                  ├─ PostgreSQL (Metadata)
                  ├─ Redis (Cache)
                  ├─ Trivy (Vulnerability Scanner)
                  ├─ Notary (Image Signing)
                  └─ ChartMuseum (Helm Charts)
Key Rules to Remember
- Harbor internal port (8080) never exposed externally
- System Nginx handles all TLS termination
- Use systemd for automatic startup
- Robot accounts for CI/CD pipelines
- Configure retention to manage storage
- Enable vulnerability scanning on push
- Regular backups of /data directory
- Monitor disk usage in /data
- Use RBAC for multi-tenant access
- Keep Harbor updated
Troubleshooting
1. 413 Request Entity Too Large Error
Symptom:
Docker push fails with
413 Request Entity Too Large
when pushing large images.
Cause:
Nginx
client_max_body_size
limit is too small (default is 1MB).
Solution:
- Edit system nginx configuration:
sudo nano /etc/nginx/sites-available/services
- Find the Harbor location block and add/update:
   location / {
       client_max_body_size 2G;  # Adjust as needed
       proxy_pass http://127.0.0.1:8080;
       # ... rest of config
   }
- Test and reload nginx:
   sudo nginx -t
   sudo systemctl reload nginx
Note:
Harbor's internal nginx is already set to
client_max_body_size 0;
(unlimited) in its
/etc/nginx/nginx.conf
, so you only need to fix the external/system nginx configuration at
/etc/nginx/sites-available/services
.
Verify Harbor's internal nginx (optional):
docker exec nginx cat /etc/nginx/nginx.conf | grep client_max_body_size
# Should show: client_max_body_size 0;
2. Cannot Connect to Harbor
Check these:
# 1. Is Harbor running?
sudo systemctl status harbor
docker ps | grep harbor

# 2. Is nginx running?
sudo systemctl status nginx

# 3. Check logs
sudo journalctl -u harbor -n 50
docker logs nginx
3. Login Issues
# Reset admin password
cd /opt/harbor
sudo docker-compose stop
sudo ./prepare
sudo docker-compose up -d
4. Disk Space Full
# Check disk usage
df -h /data

# Run garbage collection
docker exec harbor-core harbor-gc

# Or via UI: Administration → Garbage Collection → Run Now
5. Slow Image Pushes
Check nginx configuration for these settings:
proxy_buffering off;
proxy_request_buffering off;
proxy_connect_timeout 300;
proxy_send_timeout 300;
proxy_read_timeout 300;
Next Steps
After setting up Harbor:
- Create projects for different teams
- Configure robot accounts for CI/CD
- Set up vulnerability scan policies
- Configure image retention rules
- Enable garbage collection
- Set up replication (if multi-site)
- Integrate with CI/CD pipelines
My Harbor instance: https://harbor.arpansahu.space
For CI/CD integration, see Jenkins documentation.
FROM python:3.10.7

WORKDIR /app

# Copy only requirements.txt first to leverage Docker cache
COPY requirements.txt .

# Install dependencies
RUN pip3 install --no-cache-dir -r requirements.txt

# Install supervisord
RUN apt-get update && apt-get install -y supervisor

# Copy the rest of the application
COPY . .

# Copy supervisord configuration file
COPY supervisord.conf /etc/supervisor/conf.d/supervisord.conf

# Expose necessary ports
EXPOSE 8016 8054

# Start supervisord to manage the processes
# Note: For Kubernetes deployments, migrations are handled by Jenkins (see Jenkinsfile-deploy)
#       For Docker Compose deployments, migrations run here on container startup
CMD python manage.py migrate --noinput && \
    echo "Running collectstatic..." && \
    python manage.py collectstatic --noinput --verbosity 2 && \
    echo "✅ Collectstatic completed successfully" && \
    supervisord -c /etc/supervisor/conf.d/supervisord.conf
Create a file named docker-compose.yml and add following lines in it
services:
  web:
    build:  # This section will be used when running locally
      context: .
      dockerfile: Dockerfile
    image: harbor.arpansahu.space/library/django_starter:latest
    env_file: ./.env
    container_name: django_starter
    # volumes:
    #   - .:/app  # Only for local development, commented out for production deployment
    ports:
      - "8016:8016"
      - "8054:8054"
    restart: unless-stopped
What is Difference in Dockerfile and docker-compose.yml?
A Dockerfile is a simple text file that contains the commands a user could call to assemble an image whereas Docker Compose is a tool for defining and running multi-container Docker applications.
Docker Compose define the services that make up your app in docker-compose.yml so they can be run together in an isolated environment. It gets an app running in one command by just running docker-compose up. Docker compose uses the Dockerfile if you add the build command to your project’s docker-compose.yml. Your Docker workflow should be to build a suitable Dockerfile for each image you wish to create, then use compose to assemble the images using the build command.
Running Docker
docker compose up --build --detach
--detach tag is for running the docker even if terminal is closed
if you remove this tag it will be attached to terminal, and you will be able to see the logs too
--build tag with docker compose up will force image to be rebuild every time before starting the container
Step 3: Containerizing with Kubernetes
K3s Kubernetes with Portainer Agent
Lightweight Kubernetes cluster using K3s with Portainer Agent for centralized management through your existing Portainer instance.
Prerequisites
- Ubuntu Server 22.04+
- At least 1 CPU core and 512MB RAM (2GB recommended)
- Existing Portainer instance (https://portainer.arpansahu.space)
- Root or sudo access
Quick Start
# 1. Copy files to server
scp -r kubernetes_k3s/ user@server:"AWS Deployment/"

# 2. SSH to server
ssh user@server
cd "AWS Deployment/kubernetes_k3s"

# 3. Create .env from example
cp .env.example .env
nano .env  # Edit if needed

# 4. Install K3s
chmod +x install.sh
sudo ./install.sh

# 5. Deploy Portainer Agent
export KUBECONFIG=/home/$USER/.kube/config
kubectl apply -n portainer -f https://downloads.portainer.io/ce2-19/portainer-agent-k8s-nodeport.yaml

# 6. Get agent port
kubectl get svc -n portainer portainer-agent

# 7. Connect to Portainer
# Login to: https://portainer.arpansahu.space
# Go to: Environments → Add Environment → Agent
# Enter: <server-ip>:<nodeport>
Configuration
.env.example
:
K3S_VERSION=stable
K3S_CLUSTER_NAME=arpansahu-k3s
PORTAINER_AGENT_NAMESPACE=portainer
PORTAINER_AGENT_PORT=9001
PORTAINER_URL=https://portainer.arpansahu.space
K3S_DATA_DIR=/var/lib/rancher/k3s
K3S_DISABLE_TRAEFIK=true
Installation Details
kubectl Installation
The
install.sh
script first installs kubectl if not already present:
- Downloads latest stable kubectl binary
- Installs to
/usr/local/bin/kubectl
- Skips if kubectl already exists
K3s Installation
The
install.sh
script:
1. Installs K3s (lightweight Kubernetes)
2. Waits for cluster to be ready
3. Sets up kubeconfig for non-root user (
~/.kube/config
)
4. Creates portainer namespace
Portainer Agent Deployment
Deploy the agent manually after K3s installation:
# Set kubeconfig
export KUBECONFIG=/home/$USER/.kube/config

# Deploy agent
kubectl apply -n portainer -f https://downloads.portainer.io/ce2-19/portainer-agent-k8s-nodeport.yaml

# Verify deployment
kubectl get pods -n portainer
kubectl get svc -n portainer
Connecting to Portainer
Get Connection Details
# Get server IP
hostname -I | awk '{print $1}'

# Get NodePort
kubectl get svc -n portainer portainer-agent -o jsonpath='{.spec.ports[0].nodePort}'

# Example endpoint: 192.168.1.200:30778
Add Environment in Portainer
- Login: https://portainer.arpansahu.space
- Environments → Add environment
- Select Agent
- Environment details:
-
Name:
K3s Cluster -
Environment URL:
192.168.1.200:30778(use your IP and port) - Click Connect
Verify Connection
# Check agent status
kubectl get pods -n portainer

# View agent logs
kubectl logs -n portainer -l app=portainer-agent

# Test connectivity
curl http://localhost:<nodeport>
Managing Applications
Via Portainer UI
- Select K3s environment in Portainer
- Applications → Add application
- Configure deployment settings
- Click Deploy
Via kubectl
# Create deployment
kubectl create deployment nginx --image=nginx:alpine

# Expose as service
kubectl expose deployment nginx --port=80 --type=NodePort

# Check resources
kubectl get all
kubectl get pods
kubectl get services

# Get service URL
kubectl get svc nginx -o jsonpath='{.spec.ports[0].nodePort}'
# Access: http://<server-ip>:<nodeport>
Via YAML Manifests
apiVersion: apps/v1
kind: Deployment
metadata:
  name: my-app
spec:
  replicas: 2
  selector:
    matchLabels:
      app: my-app
  template:
    metadata:
      labels:
        app: my-app
    spec:
      containers:
      - name: my-app
        image: nginx:alpine
        ports:
        - containerPort: 80
---
apiVersion: v1
kind: Service
metadata:
  name: my-app
spec:
  type: NodePort
  selector:
    app: my-app
  ports:
    - port: 80
      targetPort: 80
      nodePort: 30080
Apply:
kubectl apply -f deployment.yaml
kubectl Commands
Basic Operations
# Cluster information
kubectl cluster-info
kubectl get nodes

# View resources
kubectl get all -A
kubectl get pods -A
kubectl get services -A
kubectl get namespaces

# Describe resources
kubectl describe pod <pod-name>
kubectl describe svc <service-name>

# Logs
kubectl logs <pod-name>
kubectl logs -f <pod-name>  # Follow logs
kubectl logs <pod-name> --previous  # Previous container logs

# Execute commands
kubectl exec -it <pod-name> -- /bin/sh
kubectl exec <pod-name> -- ls /app

# Port forwarding
kubectl port-forward pod/<pod-name> 8080:80
kubectl port-forward svc/<service-name> 8080:80
Deployment Management
# Scale deployment
kubectl scale deployment <name> --replicas=3

# Update image
kubectl set image deployment/<name> container-name=new-image:tag

# Restart deployment
kubectl rollout restart deployment/<name>

# Rollout history
kubectl rollout history deployment/<name>

# Rollback
kubectl rollout undo deployment/<name>

# Delete resources
kubectl delete deployment <name>
kubectl delete service <name>
kubectl delete -f deployment.yaml
Namespace Management
# List namespaces
kubectl get namespaces

# Create namespace
kubectl create namespace my-namespace

# Switch context to namespace
kubectl config set-context --current --namespace=my-namespace

# Delete namespace
kubectl delete namespace my-namespace
Backup and Restore
Backup Script
#!/bin/bash
# backup-k3s.sh

BACKUP_DIR="/backup/k3s/$(date +%Y%m%d_%H%M%S)"
mkdir -p "$BACKUP_DIR"

# Backup K3s data directory
sudo tar czf "$BACKUP_DIR/k3s-data.tar.gz" /var/lib/rancher/k3s

# Backup all Kubernetes resources
kubectl get all -A -o yaml > "$BACKUP_DIR/all-resources.yaml"

# Backup persistent volumes
kubectl get pv,pvc -A -o yaml > "$BACKUP_DIR/volumes.yaml"

# Backup namespaces and configs
kubectl get namespaces -o yaml > "$BACKUP_DIR/namespaces.yaml"
kubectl get configmaps -A -o yaml > "$BACKUP_DIR/configmaps.yaml"
kubectl get secrets -A -o yaml > "$BACKUP_DIR/secrets.yaml"

echo "Backup completed: $BACKUP_DIR"
Restore Script
#!/bin/bash
# restore-k3s.sh

BACKUP_DIR="/backup/k3s/20260201_100000"

# Stop K3s
sudo systemctl stop k3s

# Restore K3s data
sudo tar xzf "$BACKUP_DIR/k3s-data.tar.gz" -C /

# Start K3s
sudo systemctl start k3s
sleep 30

# Wait for cluster to be ready
until kubectl get nodes | grep -q "Ready"; do
    echo "Waiting for cluster..."
    sleep 5
done

# Restore resources
kubectl apply -f "$BACKUP_DIR/all-resources.yaml"

echo "Restore completed"
Troubleshooting
K3s Issues
# Check K3s status
sudo systemctl status k3s

# View K3s logs
sudo journalctl -u k3s -n 100 --no-pager
sudo journalctl -u k3s -f  # Follow logs

# Restart K3s
sudo systemctl restart k3s

# Check K3s version
k3s --version

# Check ports
sudo netstat -tlnp | grep -E '6443|10250'
Portainer Agent Issues
# Check agent pod status
kubectl get pods -n portainer

# View agent logs
kubectl logs -n portainer -l app=portainer-agent
kubectl logs -n portainer -l app=portainer-agent -f  # Follow

# Check agent service
kubectl get svc -n portainer

# Describe agent pod
kubectl describe pod -n portainer -l app=portainer-agent

# Test agent port
kubectl get svc -n portainer portainer-agent -o jsonpath='{.spec.ports[0].nodePort}'
curl http://localhost:<nodeport>

# Restart agent
kubectl rollout restart deployment -n portainer portainer-agent
Pod Issues
# Check pod status
kubectl get pods -n <namespace>

# Describe pod (shows events)
kubectl describe pod <pod-name> -n <namespace>

# View pod logs
kubectl logs <pod-name> -n <namespace>

# Check events
kubectl get events -A --sort-by='.lastTimestamp'

# Check node resources
kubectl top nodes
kubectl describe nodes
Network Issues
# Check CoreDNS pods
kubectl get pods -n kube-system -l k8s-app=kube-dns

# Test DNS resolution
kubectl run -it --rm debug --image=busybox --restart=Never -- nslookup kubernetes.default

# Check network pods
kubectl get pods -n kube-system

# Restart CoreDNS
kubectl rollout restart deployment -n kube-system coredns
Storage Issues
# Check persistent volumes
kubectl get pv
kubectl get pvc -A

# Describe PVC
kubectl describe pvc <pvc-name> -n <namespace>

# Check disk space
df -h
du -sh /var/lib/rancher/k3s/*
Connection Issues from Portainer
# From Portainer server, test connection
telnet <k3s-server-ip> <nodeport>
curl http://<k3s-server-ip>:<nodeport>

# Check firewall
sudo ufw status
sudo ufw allow <nodeport>/tcp

# Check if agent is listening
sudo netstat -tlnp | grep <nodeport>
Performance Issues
# Check resource usage
kubectl top nodes
kubectl top pods -A

# Check system resources
free -h
df -h
vmstat 5

# Check K3s resource limits
sudo cat /etc/systemd/system/k3s.service
Uninstall K3s
# Complete uninstall
sudo /usr/local/bin/k3s-uninstall.sh

# Verify removal
which k3s
which kubectl
ls /var/lib/rancher/k3s
Security Best Practices
-
Kubeconfig Permissions
: Ensure
~/.kube/confighas proper permissions (600) - RBAC : Use role-based access control for users and services
- Network Policies : Implement network policies for pod communication
- Secrets Management : Use Kubernetes secrets for sensitive data
- Regular Updates : Keep K3s and container images updated
- Resource Limits : Set CPU/memory limits on pods
- Security Context : Define security contexts for pods
Resources
- K3s Official Documentation
- Portainer Agent Documentation
- kubectl Cheat Sheet
- Kubernetes Documentation
Support
For issues:
1. Check
Troubleshooting
section
2. View K3s logs:
sudo journalctl -u k3s -f
3. View agent logs:
kubectl logs -n portainer -l app=portainer-agent
4.
K3s GitHub Issues
5.
Portainer Community Forums
SSL Certificates for Kubernetes
Overview
K3s requires SSL certificates for TLS Ingress and secure pod communication (Java apps, Kafka, etc.). Certificates are automatically managed - see SSL Automation Documentation .
Quick Reference
Automated Certificate Management:
- ✅ K3s secrets updated after SSL renewal (arpansahu-tls, kafka-ssl-keystore)
- ✅ Keystores stored in
/var/lib/rancher/k3s/ssl/keystores/
- ✅ Uploaded to MinIO for Django projects
- ✅ See
Django Integration Guide
Manual testing:
# On server
cd ~/k3s_scripts
./1_renew_k3s_ssl_keystores.sh   # Update K3s secrets
./2_upload_keystores_to_minio.sh # Upload to MinIO
Using Certificates in Deployments
Ingress with TLS
apiVersion: networking.k8s.io/v1
kind: Ingress
metadata:
  name: app-ingress
spec:
  tls:
  - hosts:
    - app.arpansahu.space
    secretName: arpansahu-tls  # Auto-managed secret
  rules:
  - host: app.arpansahu.space
    http:
      paths:
      - path: /
        pathType: Prefix
        backend:
          service:
            name: app-service
            port:
              number: 80
Kafka Pod with SSL
apiVersion: apps/v1
kind: Deployment
metadata:
  name: kafka
spec:
  template:
    spec:
      containers:
      - name: kafka
        image: confluentinc/cp-kafka:7.8.0
        env:
        - name: KAFKA_SSL_KEYSTORE_LOCATION
          value: /etc/kafka/secrets/kafka.keystore.jks
        - name: KAFKA_SSL_KEYSTORE_PASSWORD
          valueFrom:
            secretKeyRef:
              name: kafka-ssl-keystore  # Auto-managed secret
              key: keystore-password
        volumeMounts:
        - name: kafka-ssl
          mountPath: /etc/kafka/secrets
          readOnly: true
      volumes:
      - name: kafka-ssl
        secret:
          secretName: kafka-ssl-keystore
Monitoring
# List secrets
kubectl get secrets

# Check certificate expiry
kubectl get secret arpansahu-tls -o jsonpath='{.data.tls\.crt}' | \
  base64 -d | openssl x509 -noout -dates

# View keystore secret
kubectl describe secret kafka-ssl-keystore
Troubleshooting
Pods not using new certificates:
- Restart deployment:
kubectl rollout restart deployment/your-app
- K8s doesn't auto-reload secrets - manual restart required
Certificate verification failed:
- Check secret exists:
kubectl get secret arpansahu-tls
- Verify expiry date (see Monitoring above)
- Force renewal: See
SSL Automation
For complete automation details, troubleshooting, and manual procedures: SSL Automation Documentation
Step 4: Serving the requests from Nginx
Nginx - Web Server & Reverse Proxy
Nginx is a high-performance web server and reverse proxy used to route HTTPS traffic to all services.
Access Details
- HTTP Port: 80 (redirects to HTTPS)
- HTTPS Port: 443
-
Config Directory:
/etc/nginx/sites-available/ -
Enabled Sites:
/etc/nginx/sites-enabled/ -
SSL Certificates:
/etc/nginx/ssl/arpansahu.space/ -
Logs:
/var/log/nginx/
Quick Install
cd "AWS Deployment/nginx"
chmod +x install.sh
./install.sh
Installation Script
```bash file=install.sh
### SSL Certificate Installation

```bash file=install-ssl.sh
Prerequisites for SSL:
1. Namecheap account with API access enabled
2. Server IP whitelisted in Namecheap API settings
3. Environment variables set:
export NAMECHEAP_USERNAME="your_username"
export NAMECHEAP_API_KEY="your_api_key"
export NAMECHEAP_SOURCEIP="your_server_ip"
./install-ssl.sh
Manual Installation
1. Install Nginx
sudo apt update
sudo apt install -y nginx
sudo systemctl start nginx
sudo systemctl enable nginx
2. Configure Firewall
sudo ufw allow 80/tcp
sudo ufw allow 443/tcp
sudo ufw reload
3. Configure DNS
Add A records to your DNS provider:
Type: A Record
Name: @
Value: YOUR_SERVER_IP

Type: A Record
Name: *
Value: YOUR_SERVER_IP
This allows all subdomains (*.arpansahu.space) to point to your server.
4. Create Service Configuration
sudo nano /etc/nginx/sites-available/services
Add server blocks for each service (see individual service nginx configs).
5. Enable Configuration
sudo ln -sf /etc/nginx/sites-available/services /etc/nginx/sites-enabled/
sudo nginx -t
sudo systemctl reload nginx
SSL Certificate Setup (acme.sh)
Why acme.sh?
- Native DNS-01 challenge support
- Works perfectly with Namecheap
- Automatic renewal via cron
- Supports wildcard certificates
- Simpler than Certbot for DNS challenges
Install acme.sh
curl https://get.acme.sh | sh
source ~/.bashrc
acme.sh --set-default-ca --server letsencrypt
Configure Namecheap API
- Login to Namecheap → Profile → Tools → API Access
- Enable API Access
- Whitelist your server's public IP
- Get API credentials
Issue Wildcard Certificate
export NAMECHEAP_USERNAME="your_username"
export NAMECHEAP_API_KEY="your_api_key"
export NAMECHEAP_SOURCEIP="your_server_ip"

acme.sh --issue \
  --dns dns_namecheap \
  -d arpansahu.space \
  -d "*.arpansahu.space" \
  --server letsencrypt
Install Certificate for Nginx
sudo mkdir -p /etc/nginx/ssl/arpansahu.space

acme.sh --install-cert \
  -d arpansahu.space \
  -d "*.arpansahu.space" \
  --key-file /etc/nginx/ssl/arpansahu.space/privkey.pem \
  --fullchain-file /etc/nginx/ssl/arpansahu.space/fullchain.pem \
  --reloadcmd "systemctl reload nginx"
Setup Auto-Renewal
crontab -e
Add:
0 0 * * * ~/.acme.sh/acme.sh --cron --home ~/.acme.sh > /dev/null
Nginx Configuration Structure
Each service has its own nginx config with this pattern:
# HTTP to HTTPS redirect
server {
    listen 80;
    listen [::]:80;
    server_name service.arpansahu.space;
    return 301 https://$host$request_uri;
}

# HTTPS server block
server {
    listen 443 ssl http2;
    listen [::]:443 ssl http2;
    server_name service.arpansahu.space;

    # SSL Configuration
    ssl_certificate /etc/nginx/ssl/arpansahu.space/fullchain.pem;
    ssl_certificate_key /etc/nginx/ssl/arpansahu.space/privkey.pem;
    ssl_protocols TLSv1.2 TLSv1.3;

    # Proxy to backend service
    location / {
        proxy_pass http://127.0.0.1:PORT;
        proxy_set_header Host $host;
        proxy_set_header X-Real-IP $remote_addr;
        proxy_set_header X-Forwarded-For $proxy_add_x_forwarded_for;
        proxy_set_header X-Forwarded-Proto https;
    }
}
Service Routing Table
| Service | Domain | Backend Port |
|---|---|---|
| Harbor | harbor.arpansahu.space | 8888 |
| RabbitMQ | rabbitmq.arpansahu.space | 15672 |
| PgAdmin | pgadmin.arpansahu.space | 5050 |
| SSH Terminal | ssh.arpansahu.space | 8084 |
| Jenkins | jenkins.arpansahu.space | 8080 |
| Portainer | portainer.arpansahu.space | 9443 |
| Redis (stream) | redis.arpansahu.space | 6380 (TCP) |
Common Commands
Test configuration:
sudo nginx -t
Reload (no downtime):
sudo systemctl reload nginx
Restart:
sudo systemctl restart nginx
View status:
sudo systemctl status nginx
View logs:
# Access logs
sudo tail -f /var/log/nginx/access.log

# Error logs
sudo tail -f /var/log/nginx/error.log

# Service-specific
sudo tail -f /var/log/nginx/services.access.log
Check active connections:
sudo ss -tuln | grep -E ':80|:443'
List enabled sites:
ls -la /etc/nginx/sites-enabled/
Redis TCP Stream Configuration
Redis requires TCP stream instead of HTTP proxy:
stream {
    upstream redis_backend {
        server 127.0.0.1:6380;
    }

    server {
        listen 6379 ssl;
        proxy_pass redis_backend;
        proxy_connect_timeout 1s;

        ssl_certificate /etc/nginx/ssl/arpansahu.space/fullchain.pem;
        ssl_certificate_key /etc/nginx/ssl/arpansahu.space/privkey.pem;
        ssl_protocols TLSv1.2 TLSv1.3;
    }
}
This goes in
/etc/nginx/nginx.conf
at the root level (outside http block).
Troubleshooting
502 Bad Gateway:
# Check backend service is running
sudo ss -tuln | grep PORT

# Check nginx can connect
curl http://127.0.0.1:PORT

# Check logs
sudo tail -f /var/log/nginx/error.log
Certificate errors:
# Check certificate files exist
ls -la /etc/nginx/ssl/arpansahu.space/

# Check certificate validity
openssl x509 -in /etc/nginx/ssl/arpansahu.space/fullchain.pem -text -noout

# Check acme.sh status
acme.sh --list
Configuration not loading:
# Test syntax
sudo nginx -t

# Check enabled sites
ls -la /etc/nginx/sites-enabled/

# Reload nginx
sudo systemctl reload nginx
Port already in use:
# Find what's using port 80/443
sudo ss -tuln | grep -E ':80|:443'
sudo lsof -i :80
Security Best Practices
- Hide server version:
server_tokens off;
- Enable HTTP/2:
listen 443 ssl http2;
- Strong SSL protocols:
   ssl_protocols TLSv1.2 TLSv1.3;
   ssl_prefer_server_ciphers off;
- Security headers:
   add_header X-Frame-Options "SAMEORIGIN" always;
   add_header X-Content-Type-Options "nosniff" always;
   add_header X-XSS-Protection "1; mode=block" always;
- Rate limiting:
   limit_req_zone $binary_remote_addr zone=general:10m rate=10r/s;
   limit_req zone=general burst=20 nodelay;
Certificate Renewal
acme.sh automatically renews certificates via cron. To manually renew:
acme.sh --renew -d arpansahu.space -d "*.arpansahu.space" --force
Check renewal log:
cat ~/.acme.sh/arpansahu.space/arpansahu.space.log
SSL Certificate Automation & Renewal
Complete SSL automation is now centralized. See SSL Automation Documentation for:
- ✅ Automated renewal (acme.sh + deploy_certs.sh)
- ✅ Nginx certificate deployment
- ✅ Kafka keystore regeneration
- ✅ Kubernetes secret updates
- ✅ MinIO upload for Django projects
- ✅ Complete troubleshooting guide
Quick verification:
# Check certificate expiry
openssl x509 -in /etc/nginx/ssl/arpansahu.space/fullchain.pem -noout -dates

# Test automation
ssh arpansahu@arpansahu.space '~/deploy_certs.sh'
Backup Configuration
# Backup nginx configs
sudo tar -czf nginx-backup-$(date +%Y%m%d).tar.gz \
  /etc/nginx/sites-available/ \
  /etc/nginx/sites-enabled/ \
  /etc/nginx/nginx.conf \
  /etc/nginx/ssl/

# Backup SSL certificates
tar -czf ssl-backup-$(date +%Y%m%d).tar.gz ~/.acme.sh/
Migration to New Server
- Backup on old server (see above)
- Install nginx on new server
- Restore configs
- Issue new certificates (acme.sh requires DNS validation)
- Update DNS records to new server IP
Architecture Diagram
Internet (Client)
   │
   ▼
[ Nginx - Port 443 (SSL/TLS Termination) ]
   │
   ├──▶ Harbor (8888)
   ├──▶ RabbitMQ (15672)
   ├──▶ PgAdmin (5050)
   ├──▶ SSH Terminal (8084)
   ├──▶ Jenkins (8080)
   └──▶ Portainer (9443)
Key Points:
- Nginx handles all SSL/TLS
- Backend services run on localhost (secure)
- Single wildcard certificate covers all subdomains
- Automatic certificate renewal
- Zero downtime reloads
Configuration Files
-
Installation:
install.sh -
SSL setup:
install-ssl.sh -
Main config:
/etc/nginx/nginx.conf -
Sites:
/etc/nginx/sites-available/ -
SSL certs:
/etc/nginx/ssl/arpansahu.space/ - Service configs: See individual service folders
Performance Tuning
# /etc/nginx/nginx.conf
worker_processes auto;
worker_connections 1024;

# Enable gzip
gzip on;
gzip_vary on;
gzip_proxied any;
gzip_types text/plain text/css application/json application/javascript;

# Buffer sizes
client_body_buffer_size 128k;
client_max_body_size 500M;
Monitoring
# Active connections
sudo ss -s

# Request rate
sudo tail -f /var/log/nginx/access.log | pv -l -i1 -r > /dev/null

# Error rate
sudo grep error /var/log/nginx/error.log | tail -20
After all these steps your Nginx configuration file located at /etc/nginx/sites-available/django_starter will be looking similar to this
# ================= SERVICE PROXY TEMPLATE =================

# HTTP → HTTPS redirect
server {
    listen 80;
    listen [::]:80;

    server_name django-starter.arpansahu.space;
    return 301 https://$host$request_uri;
}

# HTTPS reverse proxy
server {
    listen 443 ssl http2;
    listen [::]:443 ssl http2;

    server_name django-starter.arpansahu.space;

    # 🔐 Wildcard SSL (acme.sh + Namecheap DNS-01)
    ssl_certificate     /etc/nginx/ssl/arpansahu.space/fullchain.pem;
    ssl_certificate_key /etc/nginx/ssl/arpansahu.space/privkey.pem;

    ssl_protocols TLSv1.2 TLSv1.3;
    ssl_prefer_server_ciphers off;

    location / {
        proxy_pass http://0.0.0.0:8016;

        proxy_http_version 1.1;

        # Required headers
        proxy_set_header Host              $host;
        proxy_set_header X-Real-IP         $remote_addr;
        proxy_set_header X-Forwarded-For   $proxy_add_x_forwarded_for;
        proxy_set_header X-Forwarded-Proto https;

        # WebSocket support (safe for all services)
        proxy_set_header Upgrade $http_upgrade;
        proxy_set_header Connection "upgrade";
    }
}
Step 6: CI/CD using Jenkins
Jenkins (CI/CD Automation Server)
Jenkins is an open-source automation server that enables developers to build, test, and deploy applications through continuous integration and continuous delivery (CI/CD). This guide provides a complete, production-ready setup with Java 21, Jenkins LTS, Nginx reverse proxy, and comprehensive credential management.
Prerequisites
Before installing Jenkins, ensure you have:
- Ubuntu Server 22.04 LTS
- Nginx with SSL certificates configured
- Domain name (example: jenkins.arpansahu.space)
- Wildcard SSL certificate already issued (via acme.sh)
- Minimum 2GB RAM, 20GB disk space
- Root or sudo access
- Docker installed (for containerized builds)
Architecture Overview
Internet (HTTPS)
   │
   └─ Nginx (Port 443) - TLS Termination
        │
        └─ jenkins.arpansahu.space
             │
             └─ Jenkins (localhost:8080)
                  │
                  ├─ Jenkins Controller (Web UI + API)
                  ├─ Build Agents (local/remote)
                  ├─ Workspace (/var/lib/jenkins)
                  └─ Credentials Store
Key Principles:
- Jenkins runs on localhost only (port 8080)
- Nginx handles all TLS termination
- Credentials stored in Jenkins encrypted store
- Pipelines defined as code (Jenkinsfile)
- Docker-based builds for isolation
Why Jenkins
Advantages:
- Open-source and free
- Extensive plugin ecosystem (1800+)
- Pipeline as Code (Jenkinsfile)
- Distributed builds
- Docker integration
- GitHub/GitLab integration
- Email notifications
- Role-based access control
Use Cases:
- Automated builds on commit
- Automated testing
- Docker image building
- Deployment automation
- Scheduled jobs
- Integration with Harbor registry
- Multi-branch pipelines
Part 1: Install Java 21
Jenkins requires Java to run. We'll install OpenJDK 21 (latest LTS).
⚠️ Important: Java 17 support ends March 31, 2026. Use Java 21 for continued support.
Check Current Java Version
java -version
If you see Java 17 or older, follow the upgrade steps below.
Upgrade from Java 17 to Java 21 (If Needed)
If Jenkins is already installed on Java 17:
- Install Java 21
    sudo apt update
    sudo apt install -y openjdk-21-jdk
- Check Jenkins service status
sudo systemctl status jenkins
- Update Jenkins to use Java 21
    sudo systemctl stop jenkins
    sudo update-alternatives --config java
Select Java 21 from the list (e.g., `/usr/lib/jvm/java-21-openjdk-amd64/bin/java`)
- Verify Java version
java -version
Should show: `openjdk version "21.0.x"`
- Update JAVA_HOME for Jenkins
sudo nano /etc/default/jenkins
Add or update:
    JAVA_HOME="/usr/lib/jvm/java-21-openjdk-amd64"
    JENKINS_JAVA_CMD="$JAVA_HOME/bin/java"
- Restart Jenkins
    sudo systemctl start jenkins
    sudo systemctl status jenkins
-
Verify in Jenkins UI
Dashboard → Manage Jenkins → System Information → Look for
java.version(should be 21.x)
Fresh Installation of Java 21
For new installations:
- Update system packages
sudo apt update
- Install OpenJDK 21
sudo apt install -y openjdk-21-jdk
- Verify Java installation
java -version
Expected output:
    openjdk version "21.0.x" 2024-xx-xx
    OpenJDK Runtime Environment (build 21.0.x+x)
    OpenJDK 64-Bit Server VM (build 21.0.x+x, mixed mode, sharing)
- Set JAVA_HOME (optional but recommended)
sudo nano /etc/environment
Add:
JAVA_HOME="/usr/lib/jvm/java-21-openjdk-amd64"
Apply changes:
    source /etc/environment
    echo $JAVA_HOME
Part 2: Install Jenkins LTS
Jenkins Long-Term Support (LTS) releases are recommended for production environments. Current LTS: 2.528.3
- Add Jenkins repository key (both legacy and modern format for compatibility)
    # Modern keyring format (recommended)
    curl -fsSL https://pkg.jenkins.io/debian-stable/jenkins.io-2023.key | sudo gpg --dearmor -o /usr/share/keyrings/jenkins-archive-keyring.gpg

    # Also add legacy key for repository compatibility
    gpg --keyserver keyserver.ubuntu.com --recv-keys 7198F4B714ABFC68
    gpg --export 7198F4B714ABFC68 > /tmp/jenkins-key.gpg
    sudo gpg --dearmor < /tmp/jenkins-key.gpg > /usr/share/keyrings/jenkins-old-keyring.gpg
- Add Jenkins repository
echo "deb [signed-by=/usr/share/keyrings/jenkins-old-keyring.gpg] https://pkg.jenkins.io/debian-stable binary/" | sudo tee /etc/apt/sources.list.d/jenkins.list > /dev/null
- Update package list
sudo apt update
- Install Jenkins (latest LTS)
    # Install latest LTS version
    sudo apt install -y jenkins

    # Or install specific LTS version
    # sudo apt install -y jenkins=2.528.3
- Check installed version
jenkins --version
Expected: `2.528.3` or newer LTS
- Enable Jenkins service
sudo systemctl enable jenkins
- Start Jenkins service
sudo systemctl start jenkins
- Verify Jenkins is running
sudo systemctl status jenkins
Expected: Active (running)
- Check Jenkins is listening on port 8080
sudo ss -tulnp | grep 8080
Expected: Jenkins listening on 127.0.0.1:8080
Part 2.1: Upgrade Jenkins to Latest LTS
To upgrade an existing Jenkins installation:
- Check current version
    jenkins --version
    # Or via API:
    curl -s -I https://jenkins.arpansahu.space/api/json | grep X-Jenkins
- Check available versions
apt-cache policy jenkins | head -30
Note: Look for versions 2.xxx.x (LTS releases), not 2.5xx+ (weekly releases)
- Backup Jenkins before upgrade
sudo tar -czf /tmp/jenkins-backup-$(date +%Y%m%d-%H%M%S).tar.gz /var/lib/jenkins/
- Stop Jenkins
sudo systemctl stop jenkins
- Upgrade to latest LTS
    sudo apt update
    sudo apt install --only-upgrade jenkins -y

    # Or install specific LTS version:
    # sudo apt install jenkins=2.528.3 -y
- Start Jenkins
sudo systemctl start jenkins
- Verify upgrade
    jenkins --version
    sudo systemctl status jenkins
-
Check Jenkins UI
https://jenkins.arpansahu.space → Manage Jenkins → About Jenkins
Part 3: Configure Nginx Reverse Proxy
- Edit Nginx configuration
sudo nano /etc/nginx/sites-available/services
- Add Jenkins server block
    # Jenkins CI/CD - HTTP → HTTPS
    server {
        listen 80;
        listen [::]:80;
        server_name jenkins.arpansahu.space;
        return 301 https://$host$request_uri;
    }

    # Jenkins CI/CD - HTTPS
    server {
        listen 443 ssl http2;
        listen [::]:443 ssl http2;
        server_name jenkins.arpansahu.space;

        ssl_certificate     /etc/nginx/ssl/arpansahu.space/fullchain.pem;
        ssl_certificate_key /etc/nginx/ssl/arpansahu.space/privkey.pem;

        ssl_protocols TLSv1.2 TLSv1.3;

        # Jenkins-specific timeouts
        proxy_read_timeout 300;
        proxy_connect_timeout 300;
        proxy_send_timeout 300;

        location / {
            proxy_pass http://127.0.0.1:8080;

            proxy_set_header Host $host;
            proxy_set_header X-Real-IP $remote_addr;
            proxy_set_header X-Forwarded-For $proxy_add_x_forwarded_for;
            proxy_set_header X-Forwarded-Proto https;

            # Required for Jenkins CLI and agent connections
            proxy_http_version 1.1;
            proxy_request_buffering off;
        }
    }
- Test Nginx configuration
sudo nginx -t
- Reload Nginx
sudo systemctl reload nginx
Part 4: Initial Jenkins Setup
- Get initial admin password
sudo cat /var/lib/jenkins/secrets/initialAdminPassword
Copy this password (example: a1b2c3d4e5f6...)
-
Access Jenkins Web UI
Go to: https://jenkins.arpansahu.space
-
Enter initial admin password
Paste the password from step 1.
-
Install suggested plugins
- Click: Install suggested plugins
- Wait for plugin installation (5-10 minutes)
-
Create admin user
Configure:
- Username:admin
- Password: (your strong password)
- Full name:Admin User
- Email: your-email@example.comClick: Save and Continue
-
Configure Jenkins URL
Jenkins URL:
https://jenkins.arpansahu.spaceClick: Save and Finish
-
Start using Jenkins
Click: Start using Jenkins
Part 5: Configure Jenkins Credentials
Jenkins stores credentials securely for use in pipelines. We'll configure 4 essential credentials.
5.1: GitHub Authentication Credentials
-
Navigate to credentials
Dashboard → Manage Jenkins → Credentials → System → Global credentials → Add Credentials
-
Configure GitHub credentials
- Kind : Username with password
- Scope : Global
-
Username
:
arpansahu(your GitHub username) -
Password
:
ghp_xxxxxxxxxxxx(GitHub Personal Access Token) -
ID
:
github-auth -
Description
:
Github Auth
Click: Create
Note: Generate GitHub PAT at https://github.com/settings/tokens with scopes: repo, admin:repo_hook
5.2: Harbor Registry Credentials
-
Add Harbor credentials
Dashboard → Manage Jenkins → Credentials → System → Global credentials → Add Credentials
-
Configure Harbor credentials
- Kind : Username with password
- Scope : Global
-
Username
:
admin(or robot account:robot$ci-bot) - Password : (Harbor password or robot token)
-
ID
:
harbor-credentials -
Description
:
harbor-credentials
Click: Create
5.3: Jenkins Admin API Credentials
-
Add Jenkins admin credentials
Dashboard → Manage Jenkins → Credentials → System → Global credentials → Add Credentials
-
Configure Jenkins API credentials
- Kind : Username with password
- Scope : Global
-
Username
:
admin(Jenkins admin username) - Password : (Jenkins admin password)
-
ID
:
jenkins-admin-credentials -
Description
:
Jenkins admin credentials for API authentication and pipeline usage
Click: Create
Use case: Pipeline triggers, REST API calls, remote job execution
5.4: Sentry Authentication Token
-
Add Sentry CLI token
Dashboard → Manage Jenkins → Credentials → System → Global credentials → Add Credentials
-
Configure Sentry credentials
- Kind : Secret text
- Scope : Global
- Secret : (Sentry auth token from https://sentry.io/settings/account/api/auth-tokens/)
-
ID
:
sentry-auth-token -
Description
:
Sentry CLI Authentication Token
Click: Create
Use case: Sentry release tracking, source map uploads, error monitoring integration
5.5: GitHub Authentication Credentials
-
Add GitHub credentials
Dashboard → Manage Jenkins → Credentials → System → Global credentials → Add Credentials
-
Configure GitHub credentials
- Kind : Username with password
- Scope : Global
- Username : (GitHub username)
- Password : (GitHub Personal Access Token with repo permissions)
-
ID
:
github_auth -
Description
:
GitHub authentication for branch merging and repository operations
Click: Create
How to generate GitHub PAT:
1. Go to GitHub → Settings → Developer settings → Personal access tokens → Tokens (classic)
2. Generate new token with permissions:repo(Full control of private repositories)
3. Copy token immediately (shown only once)Use case: Automated branch merging, repository operations, deployment workflows
Part 6: Configure Global Jenkins Variables
Global variables are available to all Jenkins pipelines.
-
Navigate to system configuration
Dashboard → Manage Jenkins → System
-
Scroll to Global properties
Check: Environment variables
-
Add global variables
Click: Add (for each variable)
Name Value Description MAIL_JET_API_KEY (your Mailjet API key) Email notification service MAIL_JET_API_SECRET (your Mailjet secret) Email notification service MAIL_JET_EMAIL_ADDRESS noreply@arpansahu.space Sender email address MY_EMAIL_ADDRESS your-email@example.com Notification recipient -
Save configuration
Scroll down and click: Save
Part 7: Configure Jenkins for Docker Builds
Jenkins needs Docker access to build containerized applications.
- Add Jenkins user to Docker group
sudo usermod -aG docker jenkins
- Restart Jenkins to apply group changes
sudo systemctl restart jenkins
- Verify Jenkins can access Docker
sudo -u jenkins docker ps
Expected: Docker container list (even if empty)
Part 8: Configure Jenkins Sudo Access (Optional)
Required if pipelines need to copy files from protected directories.
- Edit sudoers file
sudo visudo
-
Add Jenkins sudo permissions
Add at end of file:
    # Allow Jenkins to run specific commands without password
    jenkins ALL=(ALL) NOPASSWD: /bin/cp, /bin/mkdir, /bin/chown
Or for full sudo access (less secure):
jenkins ALL=(ALL) NOPASSWD: ALL
-
Save and exit
In nano:
Ctrl + O,Enter,Ctrl + X
In vi:Esc,:wq,Enter -
Verify sudo access
sudo -u jenkins sudo -l
Part 9: Create Project Nginx Configuration
Each project needs its own Nginx configuration for deployment.
- Create project Nginx configuration
sudo nano /etc/nginx/sites-available/my-django-app
- Add project server block (Docker deployment)
    # Django App - HTTP → HTTPS
    server {
        listen 80;
        listen [::]:80;
        server_name myapp.arpansahu.space;
        return 301 https://$host$request_uri;
    }

    # Django App - HTTPS
    server {
        listen 443 ssl http2;
        listen [::]:443 ssl http2;
        server_name myapp.arpansahu.space;

        ssl_certificate     /etc/nginx/ssl/arpansahu.space/fullchain.pem;
        ssl_certificate_key /etc/nginx/ssl/arpansahu.space/privkey.pem;

        ssl_protocols TLSv1.2 TLSv1.3;

        location / {
            proxy_pass http://127.0.0.1:8000;

            proxy_set_header Host $host;
            proxy_set_header X-Real-IP $remote_addr;
            proxy_set_header X-Forwarded-For $proxy_add_x_forwarded_for;
            proxy_set_header X-Forwarded-Proto https;

            # WebSocket support
            proxy_http_version 1.1;
            proxy_set_header Upgrade $http_upgrade;
            proxy_set_header Connection "upgrade";
        }
    }
-
For Kubernetes deployment (alternative)
Replace
proxy_passline:
proxy_pass http://<CLUSTER_IP>:30080;
- Enable site configuration
sudo ln -s /etc/nginx/sites-available/my-django-app /etc/nginx/sites-enabled/
- Test Nginx configuration
sudo nginx -t
- Reload Nginx
sudo systemctl reload nginx
Part 10: Create Jenkinsfile for Build Pipeline
Create
Jenkinsfile-build
in your project repository root.
Example Jenkinsfile-build:
pipeline {
    agent { label 'local' }

    environment {
        HARBOR_URL = 'harbor.arpansahu.space'
        HARBOR_PROJECT = 'library'
        IMAGE_NAME = 'my-django-app'
        IMAGE_TAG = "${env.BUILD_NUMBER}"
    }

    stages {
        stage('Checkout') {
            steps {
                checkout scm
            }
        }

        stage('Build Docker Image') {
            steps {
                script {
                    docker.build("${HARBOR_URL}/${HARBOR_PROJECT}/${IMAGE_NAME}:${IMAGE_TAG}")
                }
            }
        }

        stage('Push to Harbor') {
            steps {
                script {
                    docker.withRegistry("https://${HARBOR_URL}", 'harbor-credentials') {
                        docker.image("${HARBOR_URL}/${HARBOR_PROJECT}/${IMAGE_NAME}:${IMAGE_TAG}").push()
                        docker.image("${HARBOR_URL}/${HARBOR_PROJECT}/${IMAGE_NAME}:${IMAGE_TAG}").push('latest')
                    }
                }
            }
        }

        stage('Trigger Deploy') {
            steps {
                build job: 'my-django-app-deploy', wait: false
            }
        }
    }

    post {
        success {
            emailext(
                subject: "Build Success: ${env.JOB_NAME} #${env.BUILD_NUMBER}",
                body: "Build completed successfully.",
                to: "${env.MY_EMAIL_ADDRESS}"
            )
        }
        failure {
            emailext(
                subject: "Build Failed: ${env.JOB_NAME} #${env.BUILD_NUMBER}",
                body: "Build failed. Check Jenkins console output.",
                to: "${env.MY_EMAIL_ADDRESS}"
            )
        }
    }
}
Part 11: Create Jenkinsfile for Deploy Pipeline
Create
Jenkinsfile-deploy
in your project repository root.
Example Jenkinsfile-deploy:
pipeline {
    agent { label 'local' }

    environment {
        HARBOR_URL = 'harbor.arpansahu.space'
        HARBOR_PROJECT = 'library'
        IMAGE_NAME = 'my-django-app'
        CONTAINER_NAME = 'my-django-app'
        CONTAINER_PORT = '8000'
    }

    stages {
        stage('Stop Old Container') {
            steps {
                script {
                    sh """
                        docker stop ${CONTAINER_NAME} || true
                        docker rm ${CONTAINER_NAME} || true
                    """
                }
            }
        }

        stage('Pull Latest Image') {
            steps {
                script {
                    docker.withRegistry("https://${HARBOR_URL}", 'harbor-credentials') {
                        docker.image("${HARBOR_URL}/${HARBOR_PROJECT}/${IMAGE_NAME}:latest").pull()
                    }
                }
            }
        }

        stage('Deploy Container') {
            steps {
                script {
                    sh """
                        docker run -d \
                          --name ${CONTAINER_NAME} \
                          --restart unless-stopped \
                          -p ${CONTAINER_PORT}:8000 \
                          --env-file /var/lib/jenkins/.env/${IMAGE_NAME} \
                          ${HARBOR_URL}/${HARBOR_PROJECT}/${IMAGE_NAME}:latest
                    """
                }
            }
        }

        stage('Health Check') {
            steps {
                script {
                    sleep(time: 10, unit: 'SECONDS')
                    sh "curl -f http://localhost:${CONTAINER_PORT}/health || exit 1"
                }
            }
        }
    }

    post {
        success {
            emailext(
                subject: "Deploy Success: ${env.JOB_NAME}",
                body: "Deployment completed successfully.",
                to: "${env.MY_EMAIL_ADDRESS}"
            )
        }
        failure {
            emailext(
                subject: "Deploy Failed: ${env.JOB_NAME}",
                body: "Deployment failed. Check Jenkins console output.",
                to: "${env.MY_EMAIL_ADDRESS}"
            )
        }
    }
}
Part 12: Create Jenkins Pipeline Projects
12.1: Create Build Pipeline
-
Create new pipeline
Dashboard → New Item
-
Configure pipeline
-
Name
:
my-django-app-build - Type : Pipeline
- Click: OK
-
Name
:
-
Configure pipeline settings
- Description : Build and push Docker image to Harbor
- GitHub project : (check and add your repo URL)
- Build Triggers : GitHub hook trigger for GITScm polling
-
Configure Pipeline definition
- Definition : Pipeline script from SCM
- SCM : Git
-
Repository URL
:
https://github.com/arpansahu/my-django-app.git -
Credentials
:
github-auth -
Branch
:
*/build -
Script Path
:
Jenkinsfile-build
-
Save pipeline
Click: Save
12.2: Create Deploy Pipeline
-
Create new pipeline
Dashboard → New Item
-
Configure pipeline
-
Name
:
my-django-app-deploy - Type : Pipeline
- Click: OK
-
Name
:
-
Configure pipeline settings
- Description : Deploy Docker container from Harbor
- Build Triggers : None (triggered by build pipeline)
-
Configure Pipeline definition
- Definition : Pipeline script from SCM
- SCM : Git
-
Repository URL
:
https://github.com/arpansahu/my-django-app.git -
Credentials
:
github-auth -
Branch
:
*/main -
Script Path
:
Jenkinsfile-deploy
-
Save pipeline
Click: Save
Part 13: Configure Environment Files
Store sensitive environment variables outside the repository.
- Create environment file directory
    sudo mkdir -p /var/lib/jenkins/.env
    sudo chown jenkins:jenkins /var/lib/jenkins/.env
- Create project environment file
sudo nano /var/lib/jenkins/.env/my-django-app
- Add environment variables
    # Django settings
    SECRET_KEY=your-secret-key-here
    DEBUG=False
    ALLOWED_HOSTS=myapp.arpansahu.space

    # Database
    DATABASE_URL=postgresql://user:pass@db:5432/myapp

    # Redis
    REDIS_URL=redis://redis:6379/0

    # Email
    EMAIL_BACKEND=django.core.mail.backends.smtp.EmailBackend
    EMAIL_HOST=smtp.mailjet.com
    EMAIL_PORT=587
    EMAIL_USE_TLS=True
    EMAIL_HOST_USER=your-mailjet-api-key
    EMAIL_HOST_PASSWORD=your-mailjet-secret

    # Sentry
    SENTRY_DSN=https://xxx@sentry.io/xxx
- Set proper permissions
    sudo chown jenkins:jenkins /var/lib/jenkins/.env/my-django-app
    sudo chmod 600 /var/lib/jenkins/.env/my-django-app
Part 14: Configure Email Notifications
-
Install Email Extension Plugin
Dashboard → Manage Jenkins → Plugins → Available plugins
Search:
Email Extension PluginClick: Install
-
Configure SMTP settings
Dashboard → Manage Jenkins → System → Extended E-mail Notification
Configure:
- SMTP server :in-v3.mailjet.com
- SMTP port :587
- Use SMTP Authentication : ✓ Checked
- User Name :${MAIL_JET_API_KEY}
- Password :${MAIL_JET_API_SECRET}
- Use TLS : ✓ Checked
- Default user e-mail suffix :@arpansahu.space -
Test email configuration
Click: Test configuration by sending test e-mail
Enter:
${MY_EMAIL_ADDRESS}Expected: Email received
-
Save configuration
Click: Save
Managing Jenkins Service
- Check Jenkins status
sudo systemctl status jenkins
- Stop Jenkins
sudo systemctl stop jenkins
- Start Jenkins
sudo systemctl start jenkins
- Restart Jenkins
sudo systemctl restart jenkins
- View Jenkins logs
sudo journalctl -u jenkins -f
- View Jenkins application logs
sudo tail -f /var/log/jenkins/jenkins.log
Backup and Restore
- Backup Jenkins home directory
    # Stop Jenkins
    sudo systemctl stop jenkins

    # Backup Jenkins home
    sudo tar -czf jenkins-backup-$(date +%Y%m%d).tar.gz /var/lib/jenkins

    # Start Jenkins
    sudo systemctl start jenkins
- Backup only critical data
    sudo tar -czf jenkins-config-backup-$(date +%Y%m%d).tar.gz \
      /var/lib/jenkins/config.xml \
      /var/lib/jenkins/jobs/ \
      /var/lib/jenkins/users/ \
      /var/lib/jenkins/credentials.xml \
      /var/lib/jenkins/secrets/
- Restore Jenkins backup
    # Stop Jenkins
    sudo systemctl stop jenkins

    # Restore backup
    sudo tar -xzf jenkins-backup-YYYYMMDD.tar.gz -C /

    # Set ownership
    sudo chown -R jenkins:jenkins /var/lib/jenkins

    # Start Jenkins
    sudo systemctl start jenkins
Common Issues and Fixes
-
Jenkins not starting
Cause: Java not found or port conflict
Fix:
    # Check Java installation
    java -version

    # Check if port 8080 is in use
    sudo ss -tulnp | grep 8080

    # Check Jenkins logs
    sudo journalctl -u jenkins -n 50
-
Cannot push to Harbor from Jenkins
Cause: Docker credentials or network issue
Fix:
    # Test Docker login as Jenkins user
    sudo -u jenkins docker login harbor.arpansahu.space

    # Check Jenkins can reach Harbor
    sudo -u jenkins curl -I https://harbor.arpansahu.space
-
Pipeline fails with permission denied
Cause: Jenkins doesn't have Docker access
Fix:
    # Add Jenkins to Docker group
    sudo usermod -aG docker jenkins

    # Restart Jenkins
    sudo systemctl restart jenkins

    # Verify
    sudo -u jenkins docker ps
-
Email notifications not working
Cause: SMTP configuration incorrect
Fix:
- Verify Mailjet API credentials in global variables
- Check SMTP settings in Email Extension configuration
- Send test email from Jenkins
- Check Mailjet dashboard for send logs
-
GitHub webhook not triggering builds
Cause: Webhook not configured or firewall blocking
Fix:
    # Verify Jenkins is accessible from internet
    curl -I https://jenkins.arpansahu.space

    # Configure GitHub webhook
    # Repository → Settings → Webhooks → Add webhook
    # Payload URL: https://jenkins.arpansahu.space/github-webhook/
    # Content type: application/json
    # Events: Just the push event
Security Best Practices
-
Use HTTPS only
- Never access Jenkins over HTTP
- Always use Nginx reverse proxy with TLS
-
Strong authentication
    # Enable security realm
    Dashboard → Manage Jenkins → Security → Security Realm
    Select: Jenkins' own user database
-
Enable CSRF protection
Dashboard → Manage Jenkins → Security → CSRF Protection
Check: Enable CSRF Protection -
Limit build agent connections
Dashboard → Manage Jenkins → Security → Agents
Set: Fixed port (50000) or disable -
Use credentials store
- Never hardcode credentials in Jenkinsfile
- Always use Jenkins credentials store
- Rotate credentials regularly
-
Regular updates
    # Check for Jenkins updates
    Dashboard → Manage Jenkins → System Information

    # Update Jenkins
    sudo apt update
    sudo apt upgrade jenkins
- Backup regularly
    # Automate with cron
    sudo crontab -e
Add:
0 2 * * * /usr/local/bin/backup-jenkins.sh
Performance Optimization
- Increase Java heap size
sudo nano /etc/default/jenkins
Add/modify:
JAVA_ARGS="-Xmx2048m -Xms1024m"
Restart Jenkins:
sudo systemctl restart jenkins
-
Clean old builds
Configure in project:
- Discard old builds
- Keep max 10 builds
- Keep builds for 7 days -
Use build agents
Distribute builds across multiple machines instead of building everything on controller.
Monitoring Jenkins
-
Check Jenkins system info
Dashboard → Manage Jenkins → System Information
-
Monitor disk usage
du -sh /var/lib/jenkins/*
-
Monitor build queue
Dashboard → Build Queue (left sidebar)
-
View build history
Dashboard → Build History (left sidebar)
Final Verification Checklist
Run these commands to verify Jenkins is working:
# Check Jenkins service
sudo systemctl status jenkins

# Check Java version
java -version

# Check port binding
sudo ss -tulnp | grep 8080

# Check Nginx config
sudo nginx -t

# Test HTTPS access
curl -I https://jenkins.arpansahu.space

# Verify Docker access
sudo -u jenkins docker ps
Then test in browser:
- Access: https://jenkins.arpansahu.space
- Login with admin credentials
- Verify all 4 credentials exist
- Create test pipeline
- Run manual build
- Check email notification received
What This Setup Provides
After following this guide, you will have:
- Jenkins LTS with Java 21
- HTTPS access via Nginx reverse proxy
- 4 configured credentials (GitHub, Harbor, Jenkins API, Sentry)
- Global environment variables for emails
- Docker integration for builds
- Email notifications via Mailjet
- Build and deploy pipeline examples
- Production-ready configuration
- Automatic startup with systemd
- Comprehensive monitoring and logging
Example Configuration Summary
| Component | Value |
|---|---|
| Jenkins URL | https://jenkins.arpansahu.space |
| Jenkins Port | 8080 (localhost only) |
| Jenkins Home | /var/lib/jenkins |
| Java Version | OpenJDK 21 |
| Admin User | admin |
| Nginx Config | /etc/nginx/sites-available/services |
Architecture Summary
Internet (HTTPS)
   │
   └─ Nginx (TLS Termination)
        │ [Wildcard Certificate: *.arpansahu.space]
        │
        └─ jenkins.arpansahu.space (Port 443 → 8080)
             │
             └─ Jenkins Controller
                  │
                  ├─ Credentials Store
                  │   ├─ github-auth
                  │   ├─ harbor-credentials
                  │   ├─ jenkins-admin-credentials
                  │   └─ sentry-auth-token
                  │
                  ├─ Build Pipelines
                  │   ├─ Jenkinsfile-build (Docker build + push)
                  │   └─ Jenkinsfile-deploy (Docker deploy)
                  │
                  └─ Integration
                      ├─ GitHub (webhooks)
                      ├─ Harbor (registry)
                      ├─ Docker (builds)
                      ├─ Mailjet (notifications)
                      └─ Sentry (error tracking)
Key Rules to Remember
- Jenkins port 8080 never exposed externally
- Always use credentials store, never hardcode
- Use Jenkinsfile for pipeline as code
- Separate build and deploy pipelines
- Store .env files outside repository
- Enable email notifications for failures
- Regular backups of /var/lib/jenkins
- Keep Jenkins and plugins updated
- Use Harbor for private registry
- Monitor build queue and disk usage
Next Steps
After setting up Jenkins:
- Configure GitHub webhooks for automatic builds
- Create pipelines for each project
- Set up build agents for distributed builds
- Configure Slack/Teams notifications
- Implement automated testing in pipelines
- Set up deployment approvals
- Configure Jenkins metrics monitoring
My Jenkins instance: https://jenkins.arpansahu.space
For Harbor integration, see harbor.md documentation.
Backend Services Used
PostgreSQL Server (System Service)
PostgreSQL is a powerful, open-source relational database system. This setup installs PostgreSQL as a native system service with remote access enabled.
Test Files Overview
| Test File | Where to Run | Connection Type | Purpose |
|---|---|---|---|
test_postgres_localhost.py
|
On Server | localhost:5432 | Test PostgreSQL on server without TLS |
test_postgres_mac.sh
|
From Mac | 192.168.1.200:5432 | Test PostgreSQL from Mac (direct IP, no TLS) |
test_postgres_domain_tls.sh
|
From Mac | postgres.arpansahu.space:9552 | Test PostgreSQL from Mac with TLS via domain |
Quick Test Commands:
# On Server (localhost)
python3 test_postgres_localhost.py

# From Mac (direct IP, no TLS)
PG_PASSWORD=your_password ./test_postgres_mac.sh

# From Mac (domain with TLS)
PG_PASSWORD=your_password ./test_postgres_domain_tls.sh
CLI Testing (psql):
# On Server (localhost) - As postgres superuser
sudo -u postgres psql -c "SELECT version();"
sudo -u postgres psql -c "\l"  # List databases

# On Server (localhost) - With password auth
psql -h localhost -U postgres -d postgres -c "SELECT current_database(), current_user, version();"

# From Mac (direct IP, no TLS)
export PGPASSWORD=your_password
psql -h 192.168.1.200 -p 5432 -U postgres -d postgres -c "SELECT version();"

# From Mac (domain with TLS)
export PGPASSWORD=your_password
psql "host=postgres.arpansahu.space port=9552 user=postgres dbname=postgres sslmode=require" -c "SELECT version();"

# Interactive connection with TLS
psql "host=postgres.arpansahu.space port=9552 user=postgres dbname=postgres sslmode=require"
Step-by-Step Installation Guide
Step 1: Create Environment Configuration
First, create the environment configuration file that will store your PostgreSQL password.
Create
.env.example
(Template file):
# PostgreSQL Configuration
POSTGRES_PASSWORD=your_secure_password_here
Create your actual
.env
file:
cd "AWS Deployment/Postgres"
cp .env.example .env
nano .env
Your
.env
file should look like this (with your actual password):
# PostgreSQL Configuration
POSTGRES_PASSWORD=${POSTGRES_PASSWORD}
⚠️ Important:
- Always use a strong password in production!
- Never commit your
.env
file to version control
- Keep the
.env.example
file as a template
Step 2: Create Installation Script
The
install.sh
script installs PostgreSQL and configures it for remote access.
Content of
install.sh
:
#!/bin/bash
set -e

echo "=== PostgreSQL Installation Script ==="

# Colors
GREEN='\033[0;32m'
YELLOW='\033[1;33m'
NC='\033[0m'

# Load environment variables
SCRIPT_DIR="$(cd "$(dirname "${BASH_SOURCE[0]}")" && pwd)"
if [ -f "$SCRIPT_DIR/.env" ]; then
    export $(grep -v '^#' "$SCRIPT_DIR/.env" | xargs)
    echo -e "${GREEN}Loaded configuration from .env file${NC}"
else
    echo -e "${YELLOW}Warning: .env file not found. Using defaults.${NC}"
    echo -e "${YELLOW}Please copy .env.example to .env and configure it.${NC}"
fi

# Configuration with defaults
POSTGRES_PASSWORD="${POSTGRES_PASSWORD:-changeme}"

echo -e "${YELLOW}Step 1: Installing PostgreSQL${NC}"
sudo apt update
sudo apt install -y postgresql postgresql-contrib

echo -e "${YELLOW}Step 2: Starting PostgreSQL${NC}"
sudo systemctl start postgresql
sudo systemctl enable postgresql

echo -e "${YELLOW}Step 3: Setting postgres user password${NC}"
sudo -u postgres psql -c "ALTER USER postgres WITH PASSWORD '$POSTGRES_PASSWORD';"

echo -e "${YELLOW}Step 4: Configuring PostgreSQL for remote connections${NC}"
# Backup original config
sudo cp /etc/postgresql/*/main/postgresql.conf /etc/postgresql/*/main/postgresql.conf.bak
sudo cp /etc/postgresql/*/main/pg_hba.conf /etc/postgresql/*/main/pg_hba.conf.bak

# Allow remote connections
PG_VERSION=$(ls /etc/postgresql/)
echo "listen_addresses = '*'" | sudo tee -a /etc/postgresql/$PG_VERSION/main/postgresql.conf

# Allow password authentication
echo "host    all             all             0.0.0.0/0               md5" | sudo tee -a /etc/postgresql/$PG_VERSION/main/pg_hba.conf
echo "host    all             all             ::/0                    md5" | sudo tee -a /etc/postgresql/$PG_VERSION/main/pg_hba.conf

echo -e "${YELLOW}Step 5: Restarting PostgreSQL${NC}"
sudo systemctl restart postgresql

echo -e "${YELLOW}Step 6: Verifying Installation${NC}"
sudo -u postgres psql -c "SELECT version();"

echo -e "${GREEN}PostgreSQL installed successfully!${NC}"
echo -e "Connection details:"
echo -e "  Host: localhost (or 192.168.1.200)"
echo -e "  Port: 5432"
echo -e "  User: postgres"
echo -e "  Password: $POSTGRES_PASSWORD"
echo ""
echo -e "${YELLOW}Test connection:${NC}"
echo "  psql -h localhost -U postgres -d postgres"
What this script does:
- Installs PostgreSQL and contrib packages
- Enables PostgreSQL service to start on boot
- Sets password for
postgres
superuser
- Configures PostgreSQL to accept remote connections
- Updates authentication to use password (md5)
- Backs up original configuration files
Run the installation:
chmod +x install.sh
./install.sh
Expected output:
=== PostgreSQL Installation Script ===
Loaded configuration from .env file
Step 1: Installing PostgreSQL
Step 2: Starting PostgreSQL
Step 3: Setting postgres user password
ALTER ROLE
Step 4: Configuring PostgreSQL for remote connections
Step 5: Restarting PostgreSQL
Step 6: Verifying Installation
PostgreSQL installed successfully!
Testing Your PostgreSQL Installation
Test 1: Check Service Status
Verify that PostgreSQL service is running:
# Check service status
sudo systemctl status postgresql

# Check if port is listening
sudo ss -lntp | grep 5432
Expected output:
Active: active (exited) since ...
LISTEN 0 244 0.0.0.0:5432 0.0.0.0:*
Test 2: Connect Locally
Test PostgreSQL connection from the server:
# Connect as postgres user
sudo -u postgres psql

# Or with password authentication
psql -h localhost -U postgres -d postgres
# Enter password when prompted
Test 3: Check Version and Databases
# Check version
sudo -u postgres psql -c "SELECT version();"

# List databases
sudo -u postgres psql -c "\l"

# List users
sudo -u postgres psql -c "\du"
Automated Connection Testing
Test Script 1: Server Connection Test (Python)
This script tests PostgreSQL connectivity from the server using psycopg2.
Create
test_postgres_server.py
file:
#!/usr/bin/env python3
"""
PostgreSQL Server Connection Test
Tests PostgreSQL connectivity from the server using psycopg2
"""

import sys

try:
    import psycopg2
except ImportError:
    print("✗ Error: psycopg2 not installed")
    print("Install with: pip3 install psycopg2-binary")
    sys.exit(1)

def test_postgres():
    try:
        print("=== Testing PostgreSQL Connection from Server ===\n")

        # Connection parameters
        conn_params = {
            'host': 'localhost',
            'port': 5432,
            'user': 'postgres',
            'password': '${POSTGRES_PASSWORD}',
            'database': 'postgres'
        }

        print(f"Connecting to PostgreSQL at {conn_params['host']}:{conn_params['port']}...")
        conn = psycopg2.connect(**conn_params)
        print("✓ Connection successful\n")

        # Get version
        cursor = conn.cursor()
        cursor.execute("SELECT version();")
        version = cursor.fetchone()[0]
        print(f"✓ PostgreSQL version: {version.split(',')[0]}\n")

        # Test database operations
        cursor.execute("CREATE TABLE IF NOT EXISTS test_table (id SERIAL PRIMARY KEY, data TEXT);")
        print("✓ Table created: test_table\n")

        cursor.execute("INSERT INTO test_table (data) VALUES (%s) RETURNING id;", ("Hello from Server!",))
        test_id = cursor.fetchone()[0]
        conn.commit()
        print(f"✓ Record inserted with ID: {test_id}\n")

        cursor.execute("SELECT * FROM test_table WHERE id = %s;", (test_id,))
        record = cursor.fetchone()
        print(f"✓ Record retrieved: ID={record[0]}, Data={record[1]}\n")

        # Clean up
        cursor.execute("DROP TABLE test_table;")
        conn.commit()
        print("✓ Test table dropped\n")

        cursor.close()
        conn.close()

        print("✓ All tests passed!")
        print("✓ PostgreSQL is working correctly\n")
        return 0

    except psycopg2.OperationalError as e:
        print(f"✗ Connection Error: {e}")
        print("  Check if PostgreSQL is running: sudo systemctl status postgresql")
        return 1
    except psycopg2.Error as e:
        print(f"✗ Database Error: {e}")
        return 1
    except Exception as e:
        print(f"✗ Error: {e}")
        return 1

if __name__ == "__main__":
    sys.exit(test_postgres())
Run on server:
# Install psycopg2 if not already installed
pip3 install psycopg2-binary

# Run the test
python3 test_postgres_server.py
Expected output:
=== Testing PostgreSQL Connection from Server ===

Connecting to PostgreSQL at localhost:5432...
✓ Connection successful

✓ PostgreSQL version: PostgreSQL 14.x

✓ Table created: test_table

✓ Record inserted with ID: 1

✓ Record retrieved: ID=1, Data=Hello from Server!

✓ Test table dropped

✓ All tests passed!
✓ PostgreSQL is working correctly
Test Script 2: Mac Connection Test (Shell Script)
This script tests PostgreSQL connectivity from your Mac.
Create
test_postgres_mac.sh
file:
#!/bin/bash

# PostgreSQL Mac Connection Test
# Tests PostgreSQL connectivity from your Mac

set -e

echo "=== Testing PostgreSQL Connection from Mac ==="
echo ""

# Colors
GREEN='\033[0;32m'
RED='\033[0;31m'
YELLOW='\033[1;33m'
NC='\033[0m' # No Color

# Configuration
PG_HOST="${PG_HOST:-192.168.1.200}"
PG_PORT="${PG_PORT:-5432}"
PG_USER="${PG_USER:-postgres}"
PG_PASSWORD="${PG_PASSWORD:-changeme}"
PG_DATABASE="${PG_DATABASE:-postgres}"

# Test 1: Check if PostgreSQL is accessible
echo -e "${YELLOW}Test 1: Checking PostgreSQL accessibility...${NC}"
if command -v psql &> /dev/null; then
    export PGPASSWORD="$PG_PASSWORD"
    if psql -h "$PG_HOST" -p "$PG_PORT" -U "$PG_USER" -d "$PG_DATABASE" -c "SELECT 1;" > /dev/null 2>&1; then
        echo -e "${GREEN}✓ PostgreSQL is accessible${NC}"
    else
        echo -e "${RED}✗ Failed to connect to PostgreSQL${NC}"
        echo "  Make sure PostgreSQL is configured to allow remote connections"
        exit 1
    fi
else
    echo -e "${RED}✗ psql command not found${NC}"
    echo "  Install with: brew install postgresql"
    exit 1
fi
echo ""

# Test 2: Get PostgreSQL version
echo -e "${YELLOW}Test 2: Getting PostgreSQL version...${NC}"
VERSION=$(psql -h "$PG_HOST" -p "$PG_PORT" -U "$PG_USER" -d "$PG_DATABASE" -t -c "SELECT version();" 2>/dev/null | xargs)
echo -e "${GREEN}✓ PostgreSQL version: ${VERSION:0:50}...${NC}"
echo ""

# Test 3: List databases
echo -e "${YELLOW}Test 3: Listing databases...${NC}"
DATABASES=$(psql -h "$PG_HOST" -p "$PG_PORT" -U "$PG_USER" -d "$PG_DATABASE" -t -c "\l" 2>/dev/null | grep -c "|")
echo -e "${GREEN}✓ Found $DATABASES databases${NC}"
echo ""

# Test 4: Create test table
echo -e "${YELLOW}Test 4: Creating test table...${NC}"
psql -h "$PG_HOST" -p "$PG_PORT" -U "$PG_USER" -d "$PG_DATABASE" -c "CREATE TABLE IF NOT EXISTS mac_test_table (id SERIAL PRIMARY KEY, data TEXT, created_at TIMESTAMP DEFAULT NOW());" > /dev/null 2>&1
echo -e "${GREEN}✓ Test table created${NC}"
echo ""

# Test 5: Insert and retrieve data
echo -e "${YELLOW}Test 5: Testing data operations...${NC}"
psql -h "$PG_HOST" -p "$PG_PORT" -U "$PG_USER" -d "$PG_DATABASE" -c "INSERT INTO mac_test_table (data) VALUES ('Hello from Mac!');" > /dev/null 2>&1
RECORD=$(psql -h "$PG_HOST" -p "$PG_PORT" -U "$PG_USER" -d "$PG_DATABASE" -t -c "SELECT data FROM mac_test_table ORDER BY id DESC LIMIT 1;" 2>/dev/null | xargs)
echo -e "${GREEN}✓ Record inserted and retrieved: '$RECORD'${NC}"
echo ""

# Test 6: Clean up
echo -e "${YELLOW}Test 6: Cleaning up test table...${NC}"
psql -h "$PG_HOST" -p "$PG_PORT" -U "$PG_USER" -d "$PG_DATABASE" -c "DROP TABLE IF EXISTS mac_test_table;" > /dev/null 2>&1
echo -e "${GREEN}✓ Test table dropped${NC}"
echo ""

# Unset password
unset PGPASSWORD

echo -e "${GREEN}========================================${NC}"
echo -e "${GREEN}✓ All tests passed!${NC}"
echo -e "${GREEN}✓ PostgreSQL is working correctly${NC}"
echo -e "${GREEN}========================================${NC}"
Run from your Mac:
# Make script executable
chmod +x test_postgres_mac.sh

# Set environment variables (optional)
export PG_HOST=192.168.1.200
export PG_USER=postgres
export PG_PASSWORD=your_password

# Run the test
./test_postgres_mac.sh
Expected output:
=== Testing PostgreSQL Connection from Mac ===

Test 1: Checking PostgreSQL accessibility...
✓ PostgreSQL is accessible

Test 2: Getting PostgreSQL version...
✓ PostgreSQL version: PostgreSQL 14.x (Ubuntu 14.x-1.pgdg22.04+1) on x86...

Test 3: Listing databases...
✓ Found 3 databases

Test 4: Creating test table...
✓ Test table created

Test 5: Testing data operations...
✓ Record inserted and retrieved: 'Hello from Mac!'

Test 6: Cleaning up test table...
✓ Test table dropped

========================================
✓ All tests passed!
✓ PostgreSQL is working correctly
========================================
Secure Remote Access via Nginx TLS
For secure connections from outside your local network, you can set up an nginx stream proxy with TLS encryption.
Step 1: Create Nginx Stream Configuration
Create
nginx-stream.conf
file:
# Add this to the stream block in /etc/nginx/nginx.conf

    # PostgreSQL TCP Passthrough (PostgreSQL handles SSL itself)
    # Note: Unlike Redis, PostgreSQL uses binary protocol that cannot work
    # through nginx SSL termination. We use TCP passthrough instead.
    upstream postgres_backend {
        server 127.0.0.1:5432;
    }

    server {
        listen 9552;
        proxy_pass postgres_backend;
        proxy_connect_timeout 10s;
        proxy_timeout 300s;
    }
Important: Why TCP Passthrough Instead of SSL Termination?
PostgreSQL uses a complex binary protocol with specific handshake requirements that get corrupted when nginx terminates SSL and forwards plain TCP. This is different from Redis, which uses a simple text-based protocol that works fine with nginx SSL termination.
With TCP passthrough:
- Nginx simply forwards TCP packets without decryption (no SSL configuration on nginx)
- PostgreSQL handles SSL/TLS encryption itself (already configured in
postgresql.conf
with
ssl=on
)
- Connection is still encrypted end-to-end using PostgreSQL's native SSL
- Port 9552 is used instead of default 5432 for security (avoiding bot scans on standard ports)
Step 2: Configure Router Port Forwarding
⚠️ Required for external access (from outside your home network)
If you want to access PostgreSQL from outside your local network (e.g., from mobile data, other locations), you need to configure port forwarding on your router.
Steps for Airtel Router:
- Login to router admin panel:
-
Open browser and go to:
http://192.168.1.1 -
Enter admin credentials
-
Navigate to Port Forwarding:
-
Go to
NAT→Port Forwardingtab -
Click "Add new rule"
-
Configure port forwarding rule:
- Service Name: User Define
- External Start Port: 9552
- External End Port: 9552
- Internal Start Port: 9552
- Internal End Port: 9552
- Server IP Address: 192.168.1.200 (your server's local IP)
-
Protocol: TCP (or TCP/UDP)
-
Activate the rule:
- Click save/apply
- The rule should appear in the port forwarding list with status "Active"
Verify port forwarding:
# From external network (mobile data or different location)
psql "host=postgres.arpansahu.space port=9552 user=postgres dbname=postgres sslmode=require" -c "SELECT version();"
Note: Port forwarding is NOT required if you only access PostgreSQL from devices on the same local network (192.168.1.x).
Step 3: Create Automated Setup Script
Create
add-nginx-stream.sh
file:
#!/bin/bash
set -e

echo "=== PostgreSQL Nginx Stream Configuration Script ==="

# Colors
GREEN='\033[0;32m'
YELLOW='\033[1;33m'
RED='\033[0;31m'
NC='\033[0m'

# Check if running as root
if [ "$EUID" -ne 0 ]; then
    echo -e "${RED}Please run with sudo${NC}"
    exit 1
fi

echo -e "${YELLOW}Step 1: Backing up nginx.conf${NC}"
cp /etc/nginx/nginx.conf /etc/nginx/nginx.conf.backup-postgres-$(date +%Y%m%d-%H%M%S)

echo -e "${YELLOW}Step 2: Adding PostgreSQL stream configuration${NC}"
# Check if stream block already exists
if ! grep -q "stream {" /etc/nginx/nginx.conf; then
    echo -e "${YELLOW}Stream block not found, adding it to nginx.conf${NC}"
    cat >> /etc/nginx/nginx.conf << 'EOF'

# Stream configuration for TCP/UDP load balancing
stream {
    # PostgreSQL TCP Passthrough (PostgreSQL handles SSL itself)
    upstream postgres_backend {
        server 127.0.0.1:5432;
    }

    server {
        listen 9552;
        proxy_pass postgres_backend;
        proxy_connect_timeout 10s;
        proxy_timeout 300s;
    }
}
EOF
    echo -e "${GREEN}Stream block with PostgreSQL configuration added${NC}"
else
    # Check if PostgreSQL stream config already exists
    if grep -q "# PostgreSQL" /etc/nginx/nginx.conf; then
        echo -e "${YELLOW}PostgreSQL stream configuration already exists, skipping...${NC}"
    else
        # Get the script directory
        SCRIPT_DIR="$(cd "$(dirname "${BASH_SOURCE[0]}")" && pwd)"

        # Insert the configuration before the closing brace of the stream block
        # Read the stream config and append it
        grep -v "^# Add this to" "$SCRIPT_DIR/nginx-stream.conf" | \
            sed -i '/^stream {/r /dev/stdin' /etc/nginx/nginx.conf

        echo -e "${GREEN}PostgreSQL stream configuration added${NC}"
    fi
fi

echo -e "${YELLOW}Step 3: Testing nginx configuration${NC}"
if nginx -t; then
    echo -e "${GREEN}Nginx configuration is valid${NC}"
else
    echo -e "${RED}Nginx configuration test failed!${NC}"
    echo "Restoring backup..."
    cp /etc/nginx/nginx.conf.backup-postgres-$(date +%Y%m%d-%H%M%S) /etc/nginx/nginx.conf
    exit 1
fi

echo -e "${YELLOW}Step 4: Reloading nginx${NC}"
systemctl reload nginx

echo -e "${YELLOW}Step 5: Checking if port 9552 is listening${NC}"
sleep 2
if ss -lntp | grep -q ":9552"; then
    echo -e "${GREEN}✓ Nginx is listening on port 9552${NC}"
else
    echo -e "${RED}✗ Port 9552 is not listening${NC}"
    exit 1
fi

echo -e "${GREEN}========================================${NC}"
echo -e "${GREEN}PostgreSQL Nginx Stream Setup Complete!${NC}"
echo -e "${GREEN}========================================${NC}"
echo ""
echo "PostgreSQL is now accessible via:"
echo "  - Local: localhost:5432"
echo "  - TLS (via nginx): postgres.arpansahu.space:9552"
echo ""
echo "Test connection:"
echo "  psql 'host=postgres.arpansahu.space port=9552 user=postgres dbname=postgres sslmode=require'"
Run the setup:
chmod +x add-nginx-stream.sh
sudo ./add-nginx-stream.sh
Step 4: Test TLS Connection from Mac
Create
test_postgres_mac_tls.sh
file:
#!/bin/bash

# PostgreSQL Mac TLS Connection Test (via Nginx)
# Tests PostgreSQL connectivity from your Mac through nginx TLS proxy

set -e

echo "=== Testing PostgreSQL TLS Connection from Mac (via Nginx) ==="
echo ""

# Colors
GREEN='\033[0;32m'
RED='\033[0;31m'
YELLOW='\033[1;33m'
NC='\033[0m' # No Color

# Configuration
PG_HOST="${PG_HOST:-postgres.arpansahu.space}"
PG_PORT="${PG_PORT:-9552}"
PG_USER="${PG_USER:-postgres}"
PG_PASSWORD="${PG_PASSWORD:-changeme}"
PG_DATABASE="${PG_DATABASE:-postgres}"

# Test 1: Check if PostgreSQL is accessible via TLS
echo -e "${YELLOW}Test 1: Checking PostgreSQL TLS accessibility...${NC}"
if command -v psql &> /dev/null; then
    export PGPASSWORD="$PG_PASSWORD"
    if psql "host=$PG_HOST port=$PG_PORT user=$PG_USER dbname=$PG_DATABASE sslmode=require" -c "SELECT 1;" > /dev/null 2>&1; then
        echo -e "${GREEN}✓ PostgreSQL is accessible via TLS (nginx proxy)${NC}"
    else
        echo -e "${RED}✗ Failed to connect to PostgreSQL via TLS${NC}"
        echo "  Make sure nginx stream is configured and port 9552 is open"
        exit 1
    fi
else
    echo -e "${RED}✗ psql command not found${NC}"
    echo "  Install with: brew install postgresql"
    exit 1
fi
echo ""

# Test 2: Verify TLS connection is being used
echo -e "${YELLOW}Test 2: Verifying TLS connection...${NC}"
CONNECTION_INFO=$(psql "host=$PG_HOST port=$PG_PORT user=$PG_USER dbname=$PG_DATABASE sslmode=require" -t -c "SELECT 'Connected via TLS on port $PG_PORT';" 2>/dev/null | xargs)
echo -e "${GREEN}✓ $CONNECTION_INFO${NC}"
echo ""

# Test 3: Get PostgreSQL version via TLS
echo -e "${YELLOW}Test 3: Getting PostgreSQL version via TLS...${NC}"
VERSION=$(psql "host=$PG_HOST port=$PG_PORT user=$PG_USER dbname=$PG_DATABASE sslmode=require" -t -c "SELECT version();" 2>/dev/null | xargs)
echo -e "${GREEN}✓ PostgreSQL version: ${VERSION:0:50}...${NC}"
echo ""

# Test 4: List databases via TLS
echo -e "${YELLOW}Test 4: Listing databases via TLS...${NC}"
DATABASES=$(psql "host=$PG_HOST port=$PG_PORT user=$PG_USER dbname=$PG_DATABASE sslmode=require" -t -c "\l" 2>/dev/null | grep -c "|")
echo -e "${GREEN}✓ Found $DATABASES databases${NC}"
echo ""

# Test 5: Create test table via TLS
echo -e "${YELLOW}Test 5: Creating test table via TLS...${NC}"
psql "host=$PG_HOST port=$PG_PORT user=$PG_USER dbname=$PG_DATABASE sslmode=require" -c "CREATE TABLE IF NOT EXISTS mac_tls_test_table (id SERIAL PRIMARY KEY, data TEXT, created_at TIMESTAMP DEFAULT NOW());" > /dev/null 2>&1
echo -e "${GREEN}✓ Test table created via TLS${NC}"
echo ""

# Test 6: Insert and retrieve data via TLS
echo -e "${YELLOW}Test 6: Testing data operations via TLS...${NC}"
psql "host=$PG_HOST port=$PG_PORT user=$PG_USER dbname=$PG_DATABASE sslmode=require" -c "INSERT INTO mac_tls_test_table (data) VALUES ('Hello from Mac via TLS!');" > /dev/null 2>&1
RECORD=$(psql "host=$PG_HOST port=$PG_PORT user=$PG_USER dbname=$PG_DATABASE sslmode=require" -t -c "SELECT data FROM mac_tls_test_table ORDER BY id DESC LIMIT 1;" 2>/dev/null | xargs)
echo -e "${GREEN}✓ Record inserted and retrieved via TLS: '$RECORD'${NC}"
echo ""

# Test 7: Clean up
echo -e "${YELLOW}Test 7: Cleaning up test table...${NC}"
psql "host=$PG_HOST port=$PG_PORT user=$PG_USER dbname=$PG_DATABASE sslmode=require" -c "DROP TABLE IF EXISTS mac_tls_test_table;" > /dev/null 2>&1
echo -e "${GREEN}✓ Test table dropped${NC}"
echo ""

# Unset password
unset PGPASSWORD

echo -e "${GREEN}========================================${NC}"
echo -e "${GREEN}✓ All TLS tests passed!${NC}"
echo -e "${GREEN}✓ PostgreSQL is working correctly via Nginx TLS proxy${NC}"
echo -e "${GREEN}========================================${NC}"
echo ""
echo "Connection used:"
echo "  Host: $PG_HOST"
echo "  Port: $PG_PORT (TLS via nginx)"
echo "  SSL Mode: require"
Run from your Mac:
# Make script executable
chmod +x test_postgres_mac_tls.sh

# Set password and run
PG_PASSWORD=your_password ./test_postgres_mac_tls.sh
Expected output:
=== Testing PostgreSQL TLS Connection from Mac (via Nginx) ===

Test 1: Checking PostgreSQL TLS accessibility...
✓ PostgreSQL is accessible via TLS (nginx proxy)

Test 2: Verifying TLS connection...
✓ Connected via TLS on port 9552

Test 3: Getting PostgreSQL version via TLS...
✓ PostgreSQL version: PostgreSQL 14.x (Ubuntu 14.x-1.pgdg22.04+1) on x86...

Test 4: Listing databases via TLS...
✓ Found 3 databases

Test 5: Creating test table via TLS...
✓ Test table created via TLS

Test 6: Testing data operations via TLS...
✓ Record inserted and retrieved via TLS: 'Hello from Mac via TLS!'

Test 7: Cleaning up test table...
✓ Test table dropped

========================================
✓ All TLS tests passed!
✓ PostgreSQL is working correctly via Nginx TLS proxy
========================================

Connection used:
  Host: postgres.arpansahu.space
  Port: 9552 (TLS via nginx)
  SSL Mode: require
Connection Details Summary
After successful installation, your PostgreSQL setup will have:
- Service Type: Native system service (not Docker)
-
Host (Local):
192.168.1.200orlocalhost -
Port (Local):
5432 -
Host (TLS/Remote):
postgres.arpansahu.space -
Port (TLS/Remote):
9552(via nginx) -
Superuser:
postgres -
Password:
${POSTGRES_PASSWORD}(from your .env file) - Remote Access: Enabled (direct and via TLS proxy)
- Authentication: MD5 password authentication
- TLS Encryption: Available via nginx stream on port 9552
Database Management
Create Database
# Method 1: Using createdb command
sudo -u postgres createdb myapp_db

# Method 2: Using SQL
sudo -u postgres psql -c "CREATE DATABASE myapp_db;"
Create User and Grant Permissions
sudo -u postgres psql << EOF
CREATE USER myapp_user WITH PASSWORD 'myapp_password';
GRANT ALL PRIVILEGES ON DATABASE myapp_db TO myapp_user;
ALTER DATABASE myapp_db OWNER TO myapp_user;
EOF
Connect to Database
# As postgres superuser
sudo -u postgres psql -d myapp_db

# As custom user
psql -h localhost -U myapp_user -d myapp_db

# From remote machine
psql -h 192.168.1.200 -U myapp_user -d myapp_db
Backup Database
# Backup single database
sudo -u postgres pg_dump myapp_db > myapp_db_backup_$(date +%Y%m%d).sql

# Backup all databases
sudo -u postgres pg_dumpall > all_databases_backup_$(date +%Y%m%d).sql

# Compressed backup
sudo -u postgres pg_dump myapp_db | gzip > myapp_db_backup_$(date +%Y%m%d).sql.gz
Restore Database
# Restore from backup
sudo -u postgres psql myapp_db < myapp_db_backup_20240101.sql

# Restore compressed backup
gunzip < myapp_db_backup_20240101.sql.gz | sudo -u postgres psql myapp_db

# Restore all databases
sudo -u postgres psql < all_databases_backup_20240101.sql
Using PostgreSQL in Your Applications
Python Connection Example
Install the psycopg2 library:
pip install psycopg2-binary
Basic connection:
import psycopg2

# Connection parameters
conn = psycopg2.connect(
    host='192.168.1.200',
    port=5432,
    database='myapp_db',
    user='myapp_user',
    password='myapp_password'
)

# Create cursor
cursor = conn.cursor()

# Execute query
cursor.execute("SELECT * FROM users;")
rows = cursor.fetchall()

for row in rows:
    print(row)

# Close connection
cursor.close()
conn.close()
Django Configuration
Add PostgreSQL configuration in
settings.py
:
DATABASES = {
    'default': {
        'ENGINE': 'django.db.backends.postgresql',
        'NAME': 'myapp_db',
        'USER': 'myapp_user',
        'PASSWORD': 'myapp_password',
        'HOST': '192.168.1.200',
        'PORT': '5432',
    }
}
Install psycopg2:
pip install psycopg2-binary
Run migrations:
python manage.py migrate
Troubleshooting
Service Issues
If PostgreSQL service is not running:
# Check service status
sudo systemctl status postgresql

# Start service
sudo systemctl start postgresql

# Restart service
sudo systemctl restart postgresql

# View logs
sudo journalctl -u postgresql -n 50
Connection Refused
If you cannot connect remotely:
# Check if PostgreSQL is listening on all interfaces
sudo ss -lntp | grep 5432
# Should show: 0.0.0.0:5432

# Check postgresql.conf
PG_VERSION=$(ls /etc/postgresql/)
sudo grep listen_addresses /etc/postgresql/$PG_VERSION/main/postgresql.conf
# Should show: listen_addresses = '*'

# Check pg_hba.conf for remote access rules
sudo cat /etc/postgresql/$PG_VERSION/main/pg_hba.conf | grep "0.0.0.0/0"
# Should show: host    all             all             0.0.0.0/0               md5

# Restart after changes
sudo systemctl restart postgresql
Authentication Failed
If you get "authentication failed" errors:
# Reset postgres password
sudo -u postgres psql -c "ALTER USER postgres WITH PASSWORD 'new_password';"

# Check pg_hba.conf authentication method
PG_VERSION=$(ls /etc/postgresql/)
sudo cat /etc/postgresql/$PG_VERSION/main/pg_hba.conf

# Ensure md5 authentication is enabled (not peer or ident)
Nginx Connection Issues (Port 9552)
"Server closed connection unexpectedly" error:
This occurs when trying to use nginx SSL termination with PostgreSQL. Unlike Redis (text protocol), PostgreSQL uses a binary protocol that cannot work through nginx SSL termination.
Solution:
Use TCP passthrough configuration (already configured in our setup):
- Nginx configuration should NOT have SSL directives (
listen 9552;
instead of
listen 9552 ssl;
)
- PostgreSQL handles SSL encryption itself (configured with
ssl=on
in postgresql.conf)
- Connection is still encrypted end-to-end, just by PostgreSQL instead of nginx
Verify configuration:
# Check nginx stream configuration
sudo grep -A 10 "postgres_backend" /etc/nginx/nginx.conf
# Should NOT show ssl_certificate or ssl_certificate_key

# Check if port 9552 is listening
sudo ss -lntp | grep 9552
# Should show nginx listening on port 9552

# Test connection from Mac
psql "host=postgres.arpansahu.space port=9552 user=postgres dbname=postgres sslmode=prefer"
Why TCP passthrough instead of SSL termination?
-
Redis:
Simple text-based protocol → Works with nginx SSL termination
-
PostgreSQL:
Complex binary protocol with handshake → Requires TCP passthrough
- Both methods provide end-to-end encryption, just handled at different layers
Port Already in Use
If port 5432 is already in use:
# Check what's using the port
sudo ss -lntp | grep 5432

# Kill the process if needed
sudo kill -9 <PID>

# Or change PostgreSQL port in postgresql.conf
Security Best Practices
- Strong Passwords: Always use strong passwords for database users
- Limited Access: Only allow remote access from trusted IPs
- Regular Backups: Schedule automated backups
- Update Regularly: Keep PostgreSQL updated
- User Permissions: Follow principle of least privilege
-
TLS Encryption:
PostgreSQL handles its own SSL/TLS (configured with
ssl=on) - Non-Standard Ports: Use port 9552 via nginx to avoid bot scanning of default port 5432
- Firewall Rules: Close external access to port 5432, only expose port 9552
- Monitor Logs: Regularly check PostgreSQL logs for suspicious activity
Quick Reference
Important Files
-
Environment template:
.env.example -
Environment config:
.env(create from .env.example) -
Installation script:
install.sh -
Nginx stream config:
nginx-stream.conf -
Nginx setup script:
add-nginx-stream.sh -
Test script (localhost):
test_postgres_localhost.py- Run on server -
Test script (direct IP):
test_postgres_mac.sh- Run from Mac -
Test script (domain TLS):
test_postgres_domain_tls.sh- Run from Mac
Important Commands
# Install PostgreSQL
./install.sh

# Set up nginx TLS proxy (optional)
sudo ./add-nginx-stream.sh

# Service management
sudo systemctl start postgresql
sudo systemctl stop postgresql
sudo systemctl restart postgresql
sudo systemctl status postgresql

# Connect to database
sudo -u postgres psql
psql -h localhost -U postgres -d postgres

# Connect via TLS (from remote)
psql 'host=postgres.arpansahu.space port=9552 user=postgres dbname=postgres sslmode=require'

# Create database
sudo -u postgres createdb myapp_db

# Backup database
sudo -u postgres pg_dump myapp_db > backup.sql

# Test connections
python3 test_postgres_localhost.py       # On server
PG_PASSWORD=password ./test_postgres_mac.sh           # From Mac (direct)
PG_PASSWORD=password ./test_postgres_domain_tls.sh    # From Mac (TLS)

# View logs
sudo journalctl -u postgresql -f
Configuration Files
-
Main config:
/etc/postgresql/*/main/postgresql.conf -
Auth config:
/etc/postgresql/*/main/pg_hba.conf -
Data directory:
/var/lib/postgresql/*/main/ -
Log files:
/var/log/postgresql/
PgAdmin Integration
Use PgAdmin for GUI management:
- URL: https://pgadmin.arpansahu.space
- Add server with: Host=192.168.1.200, Port=5432, User=postgres
- See
PgAdmin README
for details
Architecture Diagram
[Your Application] ──────────────────────┐
       │                                 │
       │ Direct: Port 5432 (TCP)         │ TLS: Port 9552 (TCP)
       ↓                                 ↓
[PostgreSQL Server]            [Nginx Stream Proxy]
(Native system service)         (TLS Termination)
       ↓                                 │
[/var/lib/postgresql/data]               │
       ↑                                 │
       └─────────────────────────────────┘
                localhost:5432
Access Methods:
-
Local/Direct:
Connect directly to 192.168.1.200:5432 (no encryption)
-
Remote/TLS:
Connect via postgres.arpansahu.space:9552 (TLS encrypted via nginx)
-
No Proxy Layer:
Direct database access on port 5432
-
TLS Proxy:
Nginx stream proxies TLS connections to PostgreSQL
Redis Server (Docker + Nginx STREAM + TLS)
Redis is a high-performance in-memory data store. This setup provides secure Redis with TLS encryption via Nginx.
Test Files Overview
| Test File | Where to Run | Connection Type | Purpose |
|---|---|---|---|
test_redis_localhost.py
|
On Server | localhost:6380 | Test Redis on server without TLS |
test_redis_domain_tls.py
|
From Mac | redis.arpansahu.space:9551 | Test Redis from Mac with TLS via domain |
Quick Test Commands:
# On Server (localhost)
python3 test_redis_localhost.py

# From Mac (domain with TLS)
python3 test_redis_domain_tls.py
CLI Testing (redis-cli):
# On Server (localhost) - Basic commands
redis-cli -h 127.0.0.1 -p 6380 -a ${REDIS_PASSWORD} ping
redis-cli -h 127.0.0.1 -p 6380 -a ${REDIS_PASSWORD} SET test "hello"
redis-cli -h 127.0.0.1 -p 6380 -a ${REDIS_PASSWORD} GET test

# From Mac (domain with TLS) - Requires redis-cli with TLS support
redis-cli -h redis.arpansahu.space -p 9551 --tls --insecure -a ${REDIS_PASSWORD} ping
redis-cli -h redis.arpansahu.space -p 9551 --tls --insecure -a ${REDIS_PASSWORD} INFO server
Step-by-Step Installation Guide
Step 1: Create Environment Configuration
First, create the environment configuration file that will store your Redis password and port.
Create
.env.example
(Template file):
# Redis Configuration
REDIS_PASSWORD=your_secure_password_here
REDIS_PORT=6380
Create your actual
.env
file:
cd "AWS Deployment/redis"
cp .env.example .env
nano .env
Your
.env
file should look like this (with your actual password):
# Redis Configuration
REDIS_PASSWORD=Kesar302redis
REDIS_PORT=6380
⚠️ Important:
- Always change the default password in production!
- Never commit your
.env
file to version control
- Keep the
.env.example
file as a template
Step 2: Create Installation Script
Create the
install.sh
script that will automatically install Redis using the environment variables.
Create
install.sh
file:
#!/bin/bash
set -e

echo "=== Redis Installation Script ==="

# Colors
GREEN='\033[0;32m'
YELLOW='\033[1;33m'
NC='\033[0m'

# Load environment variables
SCRIPT_DIR="$(cd "$(dirname "${BASH_SOURCE[0]}")" && pwd)"
if [ -f "$SCRIPT_DIR/.env" ]; then
    export $(grep -v '^#' "$SCRIPT_DIR/.env" | xargs)
    echo -e "${GREEN}Loaded configuration from .env file${NC}"
else
    echo -e "${YELLOW}Warning: .env file not found. Using defaults.${NC}"
    echo -e "${YELLOW}Please copy .env.example to .env and configure it.${NC}"
fi

# Configuration with defaults
REDIS_PASSWORD="${REDIS_PASSWORD:-Kesar302redis}"
REDIS_PORT="${REDIS_PORT:-6380}"

echo -e "${YELLOW}Step 1: Running Redis Container${NC}"
docker run -d \
  --name redis-external \
  --restart unless-stopped \
  -p 127.0.0.1:${REDIS_PORT}:6379 \
  redis:7 \
  redis-server --requirepass "$REDIS_PASSWORD"

echo -e "${YELLOW}Step 2: Waiting for Redis to start...${NC}"
sleep 3

echo -e "${YELLOW}Step 3: Verifying Installation${NC}"
docker ps | grep redis-external

echo -e "${GREEN}Redis installed successfully!${NC}"
echo -e "Container: redis-external"
echo -e "Port: 127.0.0.1:${REDIS_PORT}"
echo -e "Password: $REDIS_PASSWORD"
echo ""
echo -e "${YELLOW}Test connection:${NC}"
echo "redis-cli -h 127.0.0.1 -p ${REDIS_PORT} -a $REDIS_PASSWORD ping"
echo ""
echo -e "${YELLOW}Next steps for HTTPS access:${NC}"
echo "1. Configure Nginx stream block in /etc/nginx/nginx.conf"
echo "2. See nginx-stream.conf for configuration"
echo "3. Test and reload: sudo nginx -t && sudo systemctl reload nginx"
Make it executable and run:
chmod +x install.sh
./install.sh
Expected output:
=== Redis Installation Script ===
Loaded configuration from .env file
Step 1: Running Redis Container
Step 2: Waiting for Redis to start...
Step 3: Verifying Installation
redis-external
Redis installed successfully!
Container: redis-external
Port: 127.0.0.1:6380
Password: Kesar302redis
Step 3: Configure Nginx Stream for TLS Access
Redis uses TCP protocol, not HTTP, so we need to configure Nginx's stream module (Layer 4 proxy).
Create
nginx-stream.conf
file:
# Add this to the stream {} block in /etc/nginx/nginx.conf

stream {
    # Redis upstream
    upstream redis_upstream {
        server 127.0.0.1:6380;
    }

    # Redis with TLS
    server {
        listen 9551 ssl;
        proxy_pass redis_upstream;

        # SSL Configuration
        ssl_certificate /etc/nginx/ssl/arpansahu.space/fullchain.pem;
        ssl_certificate_key /etc/nginx/ssl/arpansahu.space/privkey.pem;
        ssl_protocols TLSv1.2 TLSv1.3;

        # Connection settings
        proxy_connect_timeout 5s;
        proxy_timeout 300s;
        proxy_buffer_size 16k;
    }
}
What this configuration does:
- Listens on port 9551 with SSL/TLS encryption
- Proxies TCP connections to Redis on localhost:6380
- Uses your wildcard SSL certificate for *.arpansahu.space
- Allows external TLS connections to redis.arpansahu.space:9551
Step 4: Apply Nginx Stream Configuration
You have two options to apply the stream configuration:
Option 1: Automated (Recommended)
Create
add-nginx-stream.sh
script:
#!/bin/bash
set -e

echo "=== Adding Redis Stream Block to Nginx ==="

# Colors
GREEN='\033[0;32m'
YELLOW='\033[1;33m'
NC='\033[0m'

# Get script directory
SCRIPT_DIR="$(cd "$(dirname "${BASH_SOURCE[0]}")" && pwd)"

echo -e "${YELLOW}Step 1: Backing up nginx.conf${NC}"
sudo cp /etc/nginx/nginx.conf /etc/nginx/nginx.conf.backup-$(date +%Y%m%d-%H%M%S)

echo -e "${YELLOW}Step 2: Adding stream block from nginx-stream.conf${NC}"
# Remove the comment line and add to nginx.conf
grep -v "^# Add this to" "$SCRIPT_DIR/nginx-stream.conf" | sudo tee -a /etc/nginx/nginx.conf > /dev/null

echo -e "${YELLOW}Step 3: Testing nginx configuration${NC}"
sudo nginx -t

echo -e "${YELLOW}Step 4: Reloading nginx${NC}"
sudo systemctl reload nginx

echo -e "${YELLOW}Step 5: Verifying port 9551${NC}"
ss -lntp | grep 9551 || echo "Port not yet visible (may need a moment)"

echo -e "${GREEN}Redis TLS stream configured successfully!${NC}"
echo -e "Test with: redis-cli -h redis.arpansahu.space -p 9551 --tls --insecure -a PASSWORD ping"
Run the script:
chmod +x add-nginx-stream.sh
sudo bash add-nginx-stream.sh
Expected output:
=== Adding Redis Stream Block to Nginx ===
Step 1: Backing up nginx.conf
Step 2: Adding stream block from nginx-stream.conf
Step 3: Testing nginx configuration
nginx: configuration file /etc/nginx/nginx.conf test is successful
Step 4: Reloading nginx
Step 5: Verifying port 9551
LISTEN 0 511 0.0.0.0:9551 0.0.0.0:*
Redis TLS stream configured successfully!
Option 2: Manual Configuration
# 1. Backup nginx.conf
sudo cp /etc/nginx/nginx.conf /etc/nginx/nginx.conf.backup

# 2. Edit nginx.conf
sudo nano /etc/nginx/nginx.conf

# 3. Add the stream block from nginx-stream.conf at the END of the file
# (outside the http block, at the same level)

# 4. Test configuration
sudo nginx -t

# 5. Reload nginx
sudo systemctl reload nginx

# 6. Verify port is listening
sudo ss -lntp | grep 9551
Testing Your Redis Installation
After installation and Nginx configuration, test Redis connectivity using multiple methods:
Test 1: From Docker Container
Test Redis directly inside the container:
# Simple ping test
docker exec redis-external redis-cli -a ${REDIS_PASSWORD} ping

# Set and get a value
docker exec redis-external redis-cli -a ${REDIS_PASSWORD} SET mykey "Hello Redis"
docker exec redis-external redis-cli -a ${REDIS_PASSWORD} GET mykey
Expected output:
PONG
OK
"Hello Redis"
Test 2: From Server (Local)
Test Redis from the server itself using redis-cli:
# Install redis-tools if not already installed
sudo apt install -y redis-tools

# Test connection
redis-cli -h 127.0.0.1 -p ${REDIS_PORT} -a ${REDIS_PASSWORD} ping

# Set and get a value
redis-cli -h 127.0.0.1 -p ${REDIS_PORT} -a ${REDIS_PASSWORD} SET testkey "Hello from Server"
redis-cli -h 127.0.0.1 -p ${REDIS_PORT} -a ${REDIS_PASSWORD} GET testkey
Expected output:
PONG
OK
"Hello from Server"
Test 3: From Your Mac (TLS Connection)
Test Redis from your local machine using TLS through Nginx:
# Install redis if not already installed
brew install redis

# Test connection via TLS (through nginx stream on port 9551)
redis-cli -h redis.arpansahu.space -p 9551 --tls --insecure -a ${REDIS_PASSWORD} ping

# Set and get a value
redis-cli -h redis.arpansahu.space -p 9551 --tls --insecure -a ${REDIS_PASSWORD} SET mackey "Hello from Mac"
redis-cli -h redis.arpansahu.space -p 9551 --tls --insecure -a ${REDIS_PASSWORD} GET mackey
Expected output:
PONG
OK
"Hello from Mac"
Note:
The
--insecure
flag skips certificate verification. For production, you should verify certificates properly.
Connection Details Summary
After successful installation, your Redis setup will have:
-
Container Name:
redis-external -
Local Connection:
127.0.0.1:${REDIS_PORT}(localhost only) -
TLS Connection:
redis.arpansahu.space:9551(accessible externally) -
Password:
${REDIS_PASSWORD}(from your .env file) -
Data Directory:
~/redis/data(if you add volumes)
Using Redis in Your Applications
Python Connection Example
Install the Redis Python client:
pip install redis
Local connection (from server):
import redis
# Local connection
r = redis.Redis(
host='127.0.0.1',
port=${REDIS_PORT},
password='${REDIS_PASSWORD}',
decode_responses=True
)
# Test connection
r.set('test', 'hello')
print(r.get('test')) # Output: hello
TLS connection (from anywhere):
import redis
# TLS connection
r = redis.Redis(
host='redis.arpansahu.space',
port=9551,
password='${REDIS_PASSWORD}',
ssl=True,
ssl_cert_reqs='required',
decode_responses=True
)
# Test connection
r.set('test', 'hello')
print(r.get('test')) # Output: hello
Router Port Forwarding Configuration
⚠️ Required for external access (from outside your home network)
If you want to access Redis from outside your local network (e.g., from mobile data, other locations), you need to configure port forwarding on your router.
Steps for Airtel Router:
- Login to router admin panel:
-
Open browser and go to:
http://192.168.1.1 -
Enter admin credentials
-
Navigate to Port Forwarding:
-
Go to
NAT→Port Forwardingtab -
Click "Add new rule"
-
Configure port forwarding rule:
- Service Name: User Define
- External Start Port: 9551
- External End Port: 9551
- Internal Start Port: 9551
- Internal End Port: 9551
- Server IP Address: 192.168.1.200 (your server's local IP)
-
Protocol: TCP (or TCP/UDP)
-
Activate the rule:
- Click save/apply
- The rule should appear in the port forwarding list with status "Active"
Verify port forwarding:
# From external network (mobile data or different location)
redis-cli -h redis.arpansahu.space -p 9551 --tls -a your_password PING
Note: Port forwarding is NOT required if you only access Redis from devices on the same local network (192.168.1.x).
Django Configuration
Add Redis as Django cache backend in
settings.py
:
CACHES = {
'default': {
'BACKEND': 'django_redis.cache.RedisCache',
'LOCATION': 'rediss://redis.arpansahu.space:9551/0',
'OPTIONS': {
'CLIENT_CLASS': 'django_redis.client.DefaultClient',
'PASSWORD': '${REDIS_PASSWORD}',
}
}
}
Install django-redis:
pip install django-redis
Use in your Django views:
from django.core.cache import cache
# Set a value
cache.set('my_key', 'my_value', timeout=300)
# Get a value
value = cache.get('my_key')
Troubleshooting
Container Issues
If Redis container is not running properly:
# Check container logs
docker logs redis-external
# Restart container
docker restart redis-external
# Remove and reinstall
docker stop redis-external
docker rm redis-external
./install.sh
Connection Test Failed
If you cannot connect to Redis:
For local connection:
# Check if container is running
docker ps | grep redis-external
# Check if port is listening
sudo ss -lntp | grep ${REDIS_PORT}
# Test connection
redis-cli -h 127.0.0.1 -p ${REDIS_PORT} -a ${REDIS_PASSWORD} ping
For TLS connection:
# Check if nginx is listening on port 9551
sudo ss -lntp | grep 9551
# Check nginx stream configuration
sudo nginx -T | grep -A 20 "stream {"
# Test with redis-cli
redis-cli -h redis.arpansahu.space -p 9551 -a ${REDIS_PASSWORD} --tls --insecure ping
Nginx Configuration Issues
If Nginx fails to start or reload:
# Test nginx configuration
sudo nginx -t
# Check nginx error logs
sudo tail -f /var/log/nginx/error.log
# Verify stream block exists
sudo grep -A 20 "stream {" /etc/nginx/nginx.conf
# Restore from backup if needed
sudo cp /etc/nginx/nginx.conf.backup-YYYYMMDD-HHMMSS /etc/nginx/nginx.conf
sudo nginx -t
sudo systemctl reload nginx
Maintenance Operations
View Real-time Logs
docker logs -f redis-external
Backup Redis Data
If you have persistence enabled (with volumes):
# Create backup
tar -czf redis-backup-$(date +%Y%m%d).tar.gz ~/redis/data
# List backups
ls -lh redis-backup-*.tar.gz
Update Redis
To update to the latest Redis version:
# Pull latest Redis image
docker pull redis:7
# Stop and remove old container
docker stop redis-external
docker rm redis-external
# Run installation again
./install.sh
Security Best Practices
-
Strong Password:
Always use a strong, unique password in your
.envfile - Localhost Binding: Redis container only binds to 127.0.0.1 (not accessible directly from internet)
- TLS Encryption: External access only through Nginx with TLS encryption
- Firewall Rules: Ensure port 6380 is not exposed to the internet, only port 9551 through Nginx
-
Environment Variables:
Never commit
.envfile to version control - Regular Updates: Keep Redis and Nginx updated to latest stable versions
Quick Reference
Important Files
-
Environment template:
.env.example -
Environment config:
.env(create from .env.example) -
Installation script:
install.sh -
Nginx stream config:
nginx-stream.conf -
Nginx setup script:
add-nginx-stream.sh -
Test script (localhost):
test_redis_localhost.py- Run on server -
Test script (domain TLS):
test_redis_domain_tls.py- Run from Mac
Important Commands
# Install Redis
./install.sh
# Configure Nginx stream
sudo bash add-nginx-stream.sh
# Test connections
python3 test_redis_localhost.py # On server
python3 test_redis_domain_tls.py # From Mac
# Test with redis-cli (manual)
redis-cli -h 127.0.0.1 -p ${REDIS_PORT} -a ${REDIS_PASSWORD} ping
redis-cli -h redis.arpansahu.space -p 9551 --tls --insecure -a ${REDIS_PASSWORD} ping
# View logs
docker logs -f redis-external
# Restart container
docker restart redis-external
# Check nginx stream
sudo nginx -T | grep -A 20 "stream {"
Architecture Diagram
[Your Application]
↓
[redis.arpansahu.space:9551] ← TLS encrypted
↓
[Nginx Stream Proxy] ← SSL termination
↓
[127.0.0.1:6380] ← Redis Container (localhost only)
Security layers:
1. Redis only accessible on localhost
2. Nginx provides TLS encryption for external access
3. Password authentication required for all connections
Django Integration with Redis TLS
Environment Variables
# Redis with TLS (rediss:// scheme)
REDIS_CLOUD_URL=rediss://:your_redis_password@redis.arpansahu.space:9551
Django Settings (settings.py)
Cache Configuration
import ssl
import os
REDIS_CLOUD_URL = os.getenv('REDIS_CLOUD_URL')
# Django Cache with Redis TLS
CACHES = {
'default': {
'BACKEND': 'django_redis.cache.RedisCache',
'LOCATION': REDIS_CLOUD_URL,
'OPTIONS': {
'CLIENT_CLASS': 'django_redis.client.DefaultClient',
'CONNECTION_POOL_KWARGS': {
'ssl_cert_reqs': ssl.CERT_REQUIRED # Verify Let's Encrypt cert
}
}
}
}
Celery Configuration
# Celery broker and result backend
CELERY_BROKER_URL = REDIS_CLOUD_URL
CELERY_RESULT_BACKEND = REDIS_CLOUD_URL
CELERY_ACCEPT_CONTENT = ['json']
CELERY_TASK_SERIALIZER = 'json'
CELERY_RESULT_SERIALIZER = 'json'
CELERY_TIMEZONE = 'UTC'
# Celery SSL Configuration
CELERY_REDIS_BACKEND_USE_SSL = {
'ssl_cert_reqs': ssl.CERT_REQUIRED # Verify SSL certificates
}
CELERY_BROKER_USE_SSL = {
'ssl_cert_reqs': ssl.CERT_REQUIRED # Verify SSL certificates
}
Celery App (celery.py)
import os
from celery import Celery
os.environ.setdefault('DJANGO_SETTINGS_MODULE', 'your_project.settings')
app = Celery('your_project')
app.config_from_object('django.conf:settings', namespace='CELERY')
app.autodiscover_tasks()
@app.task(bind=True)
def debug_task(self):
print(f'Request: {self.request!r}')
Requirements
django-redis>=5.2.0
redis>=4.5.0
celery>=5.2.0
Verification
# Test Django cache
python manage.py shell
>>> from django.core.cache import cache
>>> cache.set('test_key', 'test_value', 300)
>>> cache.get('test_key')
'test_value'
# Expected Celery worker logs
[INFO/MainProcess] Connected to rediss://:**@redis.arpansahu.space:9551//
[INFO/MainProcess] celery@your_project ready.
Common Issues
| Issue | Cause | Solution |
|---|---|---|
[SSL: CERTIFICATE_VERIFY_FAILED]
|
Wrong SSL verification setting |
Use
ssl.CERT_REQUIRED
- Let's Encrypt certs are trusted
|
| Connection timeout | Wrong port or host | Use port 9551, ensure nginx stream proxy is running |
| Authentication failed | Wrong password | Check REDIS_CLOUD_URL password matches Redis setup |
| Connection refused | Redis not running |
Check:
docker ps \| grep redis
|
SSL Certificate Verification
Important:
Use
ssl.CERT_REQUIRED
(secure) instead of
ssl.CERT_NONE
(insecure).
Let's Encrypt certificates at
/etc/nginx/ssl/arpansahu.space/
are automatically trusted by Python's SSL library. No need to disable certificate verification.
# ✅ CORRECT - Secure with certificate verification
'ssl_cert_reqs': ssl.CERT_REQUIRED
# ❌ WRONG - Insecure, don't use in production
'ssl_cert_reqs': ssl.CERT_NONE
MinIO - S3-Compatible Object Storage
MinIO is a high-performance, S3-compatible object storage solution perfect for storing static files, media uploads, backups, and any blob data.
🚀 Quick Start
Complete Installation (Recommended)
cd "AWS Deployment/Minio"
./install.sh && ./add-nginx-config.sh
This will:
- Load environment variables from
.env
- Create data directory
- Start MinIO container
- Configure nginx for both Console and API
- Reload nginx
📋 Prerequisites
- Docker installed
- Nginx installed
- Domain/subdomain configured:
-
minio.arpansahu.space→ 192.168.1.200 (Console) -
minioapi.arpansahu.space→ 192.168.1.200 (API) -
SSL certificates in
/etc/letsencrypt/live/arpansahu.space/ -
.envfile (see Configuration)
⚙️ Configuration
Environment Variables
Create
.env
from
.env.example
:
cp .env.example .env
Contents:
# MinIO Root Credentials
MINIO_ROOT_USER=arpansahu
MINIO_ROOT_PASSWORD=Gandu302@minio
# Port Configuration
MINIO_PORT=9000 # S3 API port (localhost only)
MINIO_CONSOLE_PORT=9002 # Console web UI port (localhost only)
# AWS/Django Access Keys (create these in MinIO console after installation)
AWS_ACCESS_KEY_ID=django_user
AWS_SECRET_ACCESS_KEY=Gandu302@djangominio
AWS_STORAGE_BUCKET_NAME=arpansahu-one-bucket
Note: The AWS credentials are for application access. Create these access keys via MinIO Console after installation.
📦 Installation
Option 1: Automated Install (Recommended)
./install.sh
This script:
1. Loads variables from
.env
2. Creates
~/minio/data
directory
3. Removes old container (if exists)
4. Starts new MinIO container
5. Exposes Console on port 9002 and API on port 9000 (localhost only)
Option 2: Manual Install
# Load environment variables
source .env
# Create data directory
mkdir -p ~/minio/data
# Run MinIO
docker run -d \
--name minio \
--restart unless-stopped \
-p 127.0.0.1:${MINIO_PORT}:9000 \
-p 127.0.0.1:${MINIO_CONSOLE_PORT}:9001 \
-e "MINIO_ROOT_USER=${MINIO_ROOT_USER}" \
-e "MINIO_ROOT_PASSWORD=${MINIO_ROOT_PASSWORD}" \
-v ~/minio/data:/data \
quay.io/minio/minio:latest \
server /data --console-address ":9001"
🌐 Nginx Configuration
Automated Setup
./add-nginx-config.sh
This configures:
-
Console (Web UI):
minio.arpansahu.space → localhost:9002
-
S3 API:
minioapi.arpansahu.space → localhost:9000
Key Features
- SSL termination with Let's Encrypt certificates
-
client_max_body_size 500Mfor large file uploads - Proper WebSocket support for Console
- Security headers configured
🌍 Router Configuration (External Access)
To access MinIO from outside your local network:
Port Forwarding Setup
- Access Router Admin Panel:
- URL: http://192.168.1.1 (or https://airtel.arpansahu.space/cgi-bin/login_advance.cgi)
-
Username:
admin -
Password:
Gandmara302@ -
Configure Port Forwarding:
-
Navigate to: Advanced Settings → NAT → Virtual Server
-
Add HTTPS Rule (443):
| Field | Value |
|-------|-------|
| Service Name | MinIO HTTPS |
| External Port | 443 |
| Internal Port | 443 |
| Internal IP | 192.168.1.200 |
| Protocol | TCP |
| Status | Enabled | -
Save and Apply
Note: Both
minio.arpansahu.spaceandminioapi.arpansahu.spaceuse port 443 (HTTPS), so only one port forwarding rule is needed.
🔐 Access Details
| Component | URL | Port (localhost) |
|---|---|---|
| Console (Web UI) | https://minio.arpansahu.space | 9002 |
| S3 API | https://minioapi.arpansahu.space | 9000 |
Root Credentials:
- Username:
arpansahu
- Password:
Gandu302@minio
📁 Initial Setup - Create Bucket & Access Keys
1. Login to Console
Visit https://minio.arpansahu.space and login with root credentials.
2. Create Buckets
For Django applications, you typically need separate buckets for different types of content:
Option 1: Single Bucket (Simple Setup)
- Navigate to Buckets → Create Bucket
-
Bucket Name:
arpansahu-one-bucket - Versioning: Enable (recommended for backup/recovery)
- Access Policy: Private (default)
- Click Create Bucket
Option 2: Multiple Buckets (Recommended for Production)
Create separate buckets for different access patterns:
A. Static Files Bucket (Public Read)
-
Name:
arpansahu-static
-
Purpose:
CSS, JS, fonts, images
-
Policy:
Public (download-only)
-
Why:
Static files need to be publicly accessible by browsers
B. Media Files Bucket (Private)
-
Name:
arpansahu-media
-
Purpose:
User uploads, documents, avatars
-
Policy:
Private (access via Django only)
-
Why:
User content should be access-controlled
C. Backups Bucket (Private)
-
Name:
arpansahu-backups
-
Purpose:
Database backups, snapshots
-
Policy:
Private (admin access only)
-
Why:
Sensitive data, no public access
3. Set Bucket Policies
Using MinIO Console (GUI)
- Navigate to Buckets → Select bucket → Access Policy
- Choose policy type:
| Policy Type | Description | Use Case |
|---|---|---|
| Private | No anonymous access | Media uploads, user files, backups |
| Public | Full anonymous read/write | ❌ Never use - security risk |
| Download | Anonymous read-only | ✅ Static files (CSS, JS, images) |
| Upload | Anonymous write-only | Rare use case |
| Custom | JSON policy rules | Fine-grained control |
Using MinIO Client (mc)
# Private (default) - no anonymous access
mc anonymous set none myminio/arpansahu-media
# Public download-only - for static files
mc anonymous set download myminio/arpansahu-static
# Check current policy
mc anonymous get myminio/arpansahu-static
Custom JSON Policy (Advanced)
For fine-grained control, create a custom policy:
{
"Version": "2012-10-17",
"Statement": [
{
"Effect": "Allow",
"Principal": {"AWS": ["*"]},
"Action": ["s3:GetObject"],
"Resource": ["arn:aws:s3:::arpansahu-static/*"]
}
]
}
Apply via Console: Buckets → Select bucket → Access Policy → Add Custom Policy
Automated Bucket Policy Application
For easier policy management, use the included scripts:
1. Create Policy File
Copy the example and customize for your bucket:
# Copy template
cp minio_bucket_policy.json.example minio_bucket_policy.json
# Edit to match your bucket name and paths
nano minio_bucket_policy.json
Example policy for multi-project setup:
{
"Version": "2012-10-17",
"Statement": [
{
"Effect": "Allow",
"Principal": {"AWS": ["*"]},
"Action": ["s3:GetObject"],
"Resource": [
"arn:aws:s3:::arpansahu-one-bucket/portfolio/*/static/*",
"arn:aws:s3:::arpansahu-one-bucket/portfolio/*/media/*"
]
}
]
}
2. Update .env File
Ensure your
.env
contains:
MINIO_ROOT_USER=arpansahu
MINIO_ROOT_PASSWORD=your_password_here
AWS_STORAGE_BUCKET_NAME=arpansahu-one-bucket
MINIO_ENDPOINT=https://minioapi.arpansahu.space
POLICY_FILE=minio_bucket_policy.json
3. Apply Policy Using Script
# Option 1: Interactive script (recommended)
chmod +x apply_minio_policy.sh
./apply_minio_policy.sh
# Option 2: Python script
pip install boto3 python-dotenv
python3 apply_policy.py
Available Methods:
| Method | Tool Required | Best For |
|---|---|---|
| MinIO Client (mc) |
brew install minio/stable/mc
|
Quick setup, simple policies |
| AWS CLI |
brew install awscli
|
AWS compatibility, automation |
| Python (boto3) |
pip install boto3
|
Complex policies, validation |
Verify Policy Applied:
# Using mc
mc anonymous get myminio/arpansahu-one-bucket
# Using AWS CLI
aws --endpoint-url=https://minioapi.arpansahu.space \
s3api get-bucket-policy \
--bucket arpansahu-one-bucket
# Test public access
curl https://minioapi.arpansahu.space/arpansahu-one-bucket/portfolio/django_starter/static/test.txt
Security Notes:
- ✅ Scripts use environment variables (safe to commit)
- ✅ Never commit
.env
or
minio_bucket_policy.json
with real credentials
- ✅
.gitignore
includes these files by default
- ✅ Use
.example
files as templates
Path-Based Policy (Single Bucket with Multiple Access Levels)
For one bucket with different paths having different access:
{
"Version": "2012-10-17",
"Statement": [
{
"Effect": "Allow",
"Principal": {"AWS": ["*"]},
"Action": ["s3:GetObject"],
"Resource": ["arn:aws:s3:::arpansahu-one-bucket/static/*"]
}
]
}
This policy makes:
-
static/*
→
Public read
(anyone can access)
-
media/*
→
Private
(requires authentication)
-
protected/*
→
Private
(requires authentication + ownership check in Django)
- Everything else →
Private
Folder Structure Option 1: Simple
arpansahu-one-bucket/
├── static/ # PUBLIC (anonymous read via bucket policy)
│ ├── css/
│ ├── js/
│ └── images/
├── media/ # PRIVATE (presigned URLs for authenticated users)
│ ├── avatars/
│ └── uploads/
└── protected/ # PROTECTED (presigned URLs + ownership check)
├── invoices/
└── private-docs/
Folder Structure Option 2: Multi-Project with Portfolio Prefix ⭐ Recommended
For hosting multiple Django projects in one bucket:
your-bucket-name/
└── portfolio/ # PUBLIC (anonymous read via bucket policy)
├── django_starter/
│ └── static/
│ ├── css/
│ ├── js/
│ └── admin/
├── borcelle_crm/
│ └── static/
├── chew_and_cheer/
│ └── static/
└── arpansahu_dot_me/
└── static/
Set public access for portfolio prefix using mc:
# Install MinIO client first (if not installed)
# See "Install MinIO Client" section below
# Set up alias (one-time)
mc alias set myminio http://localhost:9000 your_minio_root_user your_minio_root_password
# Set public read access for portfolio/* prefix
mc anonymous set public myminio/your-bucket-name/portfolio/
# Verify the policy
mc anonymous get myminio/your-bucket-name/portfolio/
# Should return: Access permission for `your-bucket-name/portfolio/` is `public`
Why use portfolio/ prefix?
- ✅ All projects share one bucket (cost-effective)
- ✅ Clear organization and separation
- ✅ Single bucket policy for all static files
- ✅ Easy to add new projects
- ✅ Consistent URL structure:
minioapi.arpansahu.space/your-bucket-name/portfolio/project-name/static/...
4. Create Access Keys for Applications
- Navigate to Access Keys → Create access key
- Fill in details:
-
Access Key:
django_user -
Secret Key:
Gandu302@djangominio -
Policy:
readwrite(or custom policy) - Click Create
- Save the credentials - they won't be shown again
Security Note: Never use root credentials in applications. Always create separate access keys with minimal required permissions.
🐍 Django Integration
Install Required Packages
pip install django-storages boto3
Django Settings
Option 1: Single Bucket (Simple)
# settings.py
# MinIO/S3 Configuration
AWS_S3_ENDPOINT_URL = "https://minioapi.arpansahu.space"
AWS_S3_VERIFY = True
AWS_ACCESS_KEY_ID = "django_user"
AWS_SECRET_ACCESS_KEY = "Gandu302@djangominio"
AWS_STORAGE_BUCKET_NAME = "arpansahu-one-bucket" # Single bucket for everything
AWS_S3_ADDRESSING_STYLE = "path"
AWS_DEFAULT_ACL = None
AWS_S3_OBJECT_PARAMETERS = {
'CacheControl': 'max-age=86400',
}
# Storage Backends (Django 4.2+)
STORAGES = {
"default": {
"BACKEND": "storages.backends.s3boto3.S3Boto3Storage",
},
"staticfiles": {
"BACKEND": "storages.backends.s3boto3.S3StaticStorage",
},
}
Note: With single bucket, set bucket policy to Private . Django will handle access control via presigned URLs.
Option 2: Multiple Buckets (Recommended)
# settings.py
# MinIO/S3 Configuration
AWS_S3_ENDPOINT_URL = "https://minioapi.arpansahu.space"
AWS_S3_VERIFY = True
AWS_ACCESS_KEY_ID = "django_user"
AWS_SECRET_ACCESS_KEY = "Gandu302@djangominio"
AWS_S3_ADDRESSING_STYLE = "path"
AWS_DEFAULT_ACL = None
# Static Files Bucket (Public Read)
AWS_STATIC_BUCKET_NAME = "arpansahu-static"
AWS_S3_CUSTOM_DOMAIN = f"{AWS_S3_ENDPOINT_URL.replace('https://', '')}/{AWS_STATIC_BUCKET_NAME}"
# Media Files Bucket (Private)
AWS_MEDIA_BUCKET_NAME = "arpansahu-media"
# Custom Storage Classes
from storages.backends.s3boto3 import S3Boto3Storage
class StaticStorage(S3Boto3Storage):
bucket_name = AWS_STATIC_BUCKET_NAME
default_acl = 'public-read' # Static files are publicly accessible
querystring_auth = False # No signed URLs needed
class MediaStorage(S3Boto3Storage):
bucket_name = AWS_MEDIA_BUCKET_NAME
default_acl = 'private' # Media files require authentication
file_overwrite = False # Don't overwrite files with same name
querystring_auth = True # Use presigned URLs for temporary access
querystring_expire = 3600 # URLs expire in 1 hour
# Storage Backends
STORAGES = {
"default": {
"BACKEND": "path.to.MediaStorage", # User uploads
},
"staticfiles": {
"BACKEND": "path.to.StaticStorage", # CSS, JS, images
},
}
Bucket Policies for Option 2:
-
arpansahu-static
: Set to
Download
(public read-only)
-
arpansahu-media
: Set to
Private
(Django controls access)
Option 3: Single Bucket with Path-Based Access (Recommended for Simplicity)
# settings.py
# MinIO/S3 Configuration
AWS_S3_ENDPOINT_URL = "https://minioapi.arpansahu.space"
AWS_S3_VERIFY = True
AWS_ACCESS_KEY_ID = "django_user"
AWS_SECRET_ACCESS_KEY = "Gandu302@djangominio"
AWS_STORAGE_BUCKET_NAME = "arpansahu-one-bucket"
AWS_S3_ADDRESSING_STYLE = "path"
AWS_DEFAULT_ACL = None
# Custom Storage Classes for Different Paths
from storages.backends.s3boto3 import S3Boto3Storage
class StaticStorage(S3Boto3Storage):
location = 'static' # Files stored in /static/ prefix
default_acl = 'public-read'
querystring_auth = False # No signed URLs (public access via bucket policy)
class MediaStorage(S3Boto3Storage):
location = 'media' # Files stored in /media/ prefix
default_acl = 'private'
file_overwrite = False
querystring_auth = True # Presigned URLs for authenticated users
querystring_expire = 3600 # 1 hour
class ProtectedStorage(S3Boto3Storage):
location = 'protected' # Files stored in /protected/ prefix
default_acl = 'private'
file_overwrite = False
querystring_auth = True
querystring_expire = 300 # 5 minutes (shorter for security)
# Storage Backends
STORAGES = {
"default": {
"BACKEND": "path.to.MediaStorage",
},
"staticfiles": {
"BACKEND": "path.to.StaticStorage",
},
}
Bucket Policy for Option 3:
Set custom policy (see step 3 above) to make
static/*
public, rest private.
Django Model Example with Protected Storage:
class Invoice(models.Model):
user = models.ForeignKey(User, on_delete=models.CASCADE)
pdf = models.FileField(
upload_to='invoices/',
storage=lambda: storages['protected'] # Protected path
)
def download_invoice(request, invoice_id):
invoice = Invoice.objects.get(id=invoice_id)
if invoice.user != request.user:
return HttpResponseForbidden()
# Generate presigned URL only for owner
storage = ProtectedStorage()
url = storage.url(invoice.pdf.name)
return redirect(url)
Environment Variables (.env)
# Single Bucket Setup
AWS_S3_ENDPOINT_URL="https://minioapi.arpansahu.space"
AWS_S3_VERIFY=True
AWS_ACCESS_KEY_ID="django_user"
AWS_SECRET_ACCESS_KEY="Gandu302@djangominio"
AWS_STORAGE_BUCKET_NAME="arpansahu-one-bucket"
AWS_S3_ADDRESSING_STYLE="path"
# Multiple Buckets Setup (add these)
AWS_STATIC_BUCKET_NAME="arpansahu-static"
AWS_MEDIA_BUCKET_NAME="arpansahu-media"
Collect Static Files
python manage.py collectstatic --noinput
Usage in Models
from django.db import models
class Document(models.Model):
title = models.CharField(max_length=200)
# Uploads to media bucket (private)
file = models.FileField(upload_to='documents/')
created_at = models.DateTimeField(auto_now_add=True)
class UserProfile(models.Model):
user = models.OneToOneField(User, on_delete=models.CASCADE)
# Uploads to media bucket with presigned URL access
avatar = models.ImageField(upload_to='avatars/')
Accessing Private Files (Presigned URLs)
from django.core.files.storage import default_storage
# Generate temporary URL for private file
file_url = default_storage.url('documents/private_file.pdf')
# URL is valid for 1 hour (querystring_expire setting)
🐍 Python boto3 Examples
Basic Operations
import boto3
from botocore.client import Config
# Initialize S3 client
s3 = boto3.client(
's3',
endpoint_url='https://minioapi.arpansahu.space',
aws_access_key_id='django_user',
aws_secret_access_key='Gandu302@djangominio',
config=Config(signature_version='s3v4'),
verify=True
)
# Upload file
s3.upload_file('local-file.txt', 'arpansahu-one-bucket', 'remote-file.txt')
# Upload with metadata
s3.upload_file(
'image.jpg',
'arpansahu-one-bucket',
'images/profile.jpg',
ExtraArgs={'ContentType': 'image/jpeg', 'ACL': 'public-read'}
)
# Download file
s3.download_file('arpansahu-one-bucket', 'remote-file.txt', 'downloaded.txt')
# List objects
response = s3.list_objects_v2(Bucket='arpansahu-one-bucket', Prefix='documents/')
for obj in response.get('Contents', []):
print(f"{obj['Key']} - {obj['Size']} bytes")
# Delete object
s3.delete_object(Bucket='arpansahu-one-bucket', Key='remote-file.txt')
# Generate presigned URL (temporary access)
url = s3.generate_presigned_url(
'get_object',
Params={'Bucket': 'arpansahu-one-bucket', 'Key': 'private-file.pdf'},
ExpiresIn=3600 # 1 hour
)
print(f"Temporary URL: {url}")
Upload Directory
import os
def upload_directory(local_dir, bucket, s3_prefix=''):
for root, dirs, files in os.walk(local_dir):
for file in files:
local_path = os.path.join(root, file)
relative_path = os.path.relpath(local_path, local_dir)
s3_path = os.path.join(s3_prefix, relative_path).replace('\\', '/')
print(f"Uploading {local_path} to {s3_path}")
s3.upload_file(local_path, bucket, s3_path)
# Usage
upload_directory('/path/to/local/folder', 'arpansahu-one-bucket', 'backups/')
🛠️ MinIO Client (mc)
MinIO Client provides a modern alternative to UNIX commands like ls, cat, cp, mirror, diff.
Installation
# Linux/Mac
wget https://dl.min.io/client/mc/release/linux-amd64/mc
chmod +x mc
sudo mv mc /usr/local/bin/
# Mac (Homebrew)
brew install minio/stable/mc
Configuration
# Add MinIO server as alias
mc alias set myminio https://minioapi.arpansahu.space django_user Gandu302@djangominio
# Test connection
mc admin info myminio
Common Commands
# List buckets
mc ls myminio
# List objects in bucket
mc ls myminio/arpansahu-one-bucket
# Copy file to bucket
mc cp local-file.txt myminio/arpansahu-one-bucket/
# Copy entire directory
mc cp --recursive local-folder/ myminio/arpansahu-one-bucket/folder/
# Mirror directory (sync)
mc mirror local-folder/ myminio/arpansahu-one-bucket/folder/
# Download file
mc cp myminio/arpansahu-one-bucket/file.txt ./downloaded.txt
# Remove file
mc rm myminio/arpansahu-one-bucket/file.txt
# Remove directory recursively
mc rm --recursive --force myminio/arpansahu-one-bucket/folder/
# Get file stats
mc stat myminio/arpansahu-one-bucket/file.txt
# Watch for events
mc watch myminio/arpansahu-one-bucket
Bucket Management
# Create bucket
mc mb myminio/new-bucket
# Remove bucket
mc rb myminio/old-bucket
# Set bucket policy (public read)
mc anonymous set public myminio/arpansahu-one-bucket
# Set bucket policy (download only)
mc anonymous set download myminio/arpansahu-one-bucket
# Get bucket policy
mc anonymous get myminio/arpansahu-one-bucket
🔧 Management & Maintenance
Docker Commands
# View logs
docker logs -f minio
# Restart container
docker restart minio
# Stop container
docker stop minio
# Start container
docker start minio
# Remove container
docker rm -f minio
Update MinIO
# Pull latest image
docker pull quay.io/minio/minio:latest
# Stop and remove old container
docker stop minio && docker rm minio
# Reinstall
cd "AWS Deployment/Minio"
./install.sh
Backup Data
# Backup all data
tar -czf minio-backup-$(date +%Y%m%d).tar.gz ~/minio/data
# Backup specific bucket (using mc)
mc mirror myminio/arpansahu-one-bucket ~/backups/bucket-backup/
# Restore from backup
mc mirror ~/backups/bucket-backup/ myminio/arpansahu-one-bucket/
Check Disk Usage
# Server disk space
df -h ~/minio/data
# Bucket sizes (via mc)
mc du myminio/arpansahu-one-bucket
🐛 Troubleshooting
WebSocket Connection Errors
Symptoms: Console shows repeated errors:
WebSocket connection to 'wss://minio.arpansahu.space/ws/objectManager' failed
Cause: Missing WebSocket upgrade headers in nginx configuration.
Fix:
cd "AWS Deployment/Minio"
sudo ./fix-websocket.sh
This script adds required headers:
-
proxy_http_version 1.1
-
proxy_set_header Upgrade $http_upgrade
-
proxy_set_header Connection "upgrade"
After running, hard refresh browser (Ctrl+Shift+R or Cmd+Shift+R).
Manual Verification:
grep -A 5 "server_name minio.arpansahu.space" /etc/nginx/sites-enabled/services | grep Upgrade
Should show:
proxy_set_header Upgrade $http_upgrade;
Can't Access Console
# Check if container is running
docker ps | grep minio
# Check logs
docker logs minio
# Restart container
docker restart minio
# Test nginx configuration
sudo nginx -t
# Reload nginx
sudo systemctl reload nginx
# Check DNS resolution
nslookup minio.arpansahu.space
Upload Fails / File Too Large
# Check nginx client_max_body_size
sudo grep -r "client_max_body_size" /etc/nginx/
# Should be 500M in MinIO configs
# If not, update and reload:
sudo vi /etc/nginx/sites-enabled/minio-console
sudo vi /etc/nginx/sites-enabled/minio-api
sudo systemctl reload nginx
# Check disk space
df -h ~/minio/data
Connection Refused / Can't Connect to API
# Verify ports are listening
sudo ss -lntp | grep -E '9000|9002'
# Test local access
curl http://localhost:9002 # Console
curl http://localhost:9000/minio/health/live # API health
# Check firewall
sudo ufw status
# Test from Mac/external
curl -I https://minio.arpansahu.space
curl -I https://minioapi.arpansahu.space
SSL/Certificate Issues
# Verify certificates exist
ls -la /etc/letsencrypt/live/arpansahu.space/
# Test SSL
openssl s_client -connect minio.arpansahu.space:443 -servername minio.arpansahu.space
# Check nginx SSL configuration
sudo nginx -T | grep -A 10 "minio.arpansahu.space"
Django Integration Issues
# Test boto3 connection
import boto3
s3 = boto3.client(
's3',
endpoint_url='https://minioapi.arpansahu.space',
aws_access_key_id='django_user',
aws_secret_access_key='Gandu302@djangominio'
)
print(s3.list_buckets())
Access Denied Errors
- Verify access keys are correct in Django settings
- Check bucket policy in MinIO Console → Buckets → [bucket name] → Access Policy
- Verify access key permissions in MinIO Console → Access Keys → [key] → Policy
-
Ensure bucket exists:
mc ls myminio
📚 Additional Resources
- MinIO Documentation: https://min.io/docs/minio/linux/index.html
- Django Storages: https://django-storages.readthedocs.io/en/latest/backends/amazon-S3.html
- boto3 Documentation: https://boto3.amazonaws.com/v1/documentation/api/latest/index.html
- MinIO Client Guide: https://min.io/docs/minio/linux/reference/minio-mc.html
🔒 Security Best Practices
Bucket Policy Guidelines
✅ DO:
- Use
Private
policy for user uploads, sensitive data, backups
- Use
Download
(public read) policy ONLY for static assets (CSS, JS, images)
- Create separate buckets for different access levels
- Use presigned URLs for temporary access to private files
- Enable bucket versioning for important data
❌ DON'T:
- Never use
Public
(full read/write) policy - major security risk
- Don't store sensitive data in public buckets
- Don't share root credentials with applications
- Don't set static and media files in same bucket with public policy
Bucket Policy by Use Case
| Content Type | Bucket Policy | Why |
|---|---|---|
| Static Files (CSS, JS, fonts, images) | Download (public read) | Need to be loaded by browsers without authentication |
| Media Uploads (user avatars, documents) | Private | Access controlled by Django, use presigned URLs |
| Database Backups | Private | Sensitive data, admin-only access |
| Public Assets (blog images, public downloads) | Download (public read) | Intentionally public content |
| Form Uploads (before processing) | Private | Temporary storage, should be access-controlled |
Access Key Permissions
Create access keys with minimal required permissions:
For Django Application:
{
"Version": "2012-10-17",
"Statement": [
{
"Effect": "Allow",
"Action": [
"s3:GetObject",
"s3:PutObject",
"s3:DeleteObject",
"s3:ListBucket"
],
"Resource": [
"arn:aws:s3:::arpansahu-media/*",
"arn:aws:s3:::arpansahu-static/*",
"arn:aws:s3:::arpansahu-media",
"arn:aws:s3:::arpansahu-static"
]
}
]
}
For Read-Only Access:
{
"Version": "2012-10-17",
"Statement": [
{
"Effect": "Allow",
"Action": [
"s3:GetObject",
"s3:ListBucket"
],
"Resource": [
"arn:aws:s3:::arpansahu-media/*",
"arn:aws:s3:::arpansahu-media"
]
}
]
}
General Security
- Never expose MinIO ports (9000, 9002) directly - always use nginx reverse proxy
- Use separate access keys for each application - never share root credentials
- Enable bucket versioning for important data
- Set minimal required permissions on access keys
- Regularly rotate access keys
- Monitor access logs via MinIO Console
- Use HTTPS only - never HTTP for production
- Keep MinIO updated to latest stable version
- Review bucket policies regularly - ensure they match current requirements
- Use presigned URLs for private content - temporary access with expiration
🌐 Complete Django Integration with All Services
Full Production Configuration Example
This example shows a complete Django setup with MinIO + Redis (TLS) + PostgreSQL + Celery , all using domain names and secure SSL/TLS connections.
Environment Variables (.env)
# Django
DEBUG=False
SECRET_KEY="your-secret-key"
ALLOWED_HOSTS=django-starter.arpansahu.space
# PostgreSQL (TLS stream proxy on port 9552)
DATABASE_URL=postgresql://postgres:your_postgres_password@postgres.arpansahu.space:9552/your_database_name
# Redis (TLS stream proxy on port 9551)
REDIS_CLOUD_URL=rediss://:your_redis_password@redis.arpansahu.space:9551
# MinIO S3 (API endpoint with HTTPS)
AWS_S3_ENDPOINT_URL=https://minioapi.arpansahu.space
AWS_S3_VERIFY=True
AWS_ACCESS_KEY_ID=your_minio_access_key
AWS_SECRET_ACCESS_KEY=your_minio_secret_key
AWS_STORAGE_BUCKET_NAME=your-bucket-name
AWS_S3_ADDRESSING_STYLE=path
Django Settings (settings.py)
import os
import ssl
from pathlib import Path
# Load environment variables
DEBUG = os.getenv('DEBUG', 'False') == 'True'
SECRET_KEY = os.getenv('SECRET_KEY')
ALLOWED_HOSTS = os.getenv('ALLOWED_HOSTS', '').split(',')
# Database Configuration
import dj_database_url
DATABASES = {
'default': dj_database_url.config(
default=os.getenv('DATABASE_URL'),
conn_max_age=600,
conn_health_checks=True,
)
}
# Redis Configuration
REDIS_CLOUD_URL = os.getenv('REDIS_CLOUD_URL')
# Cache with Redis SSL
CACHES = {
'default': {
'BACKEND': 'django_redis.cache.RedisCache',
'LOCATION': REDIS_CLOUD_URL,
'OPTIONS': {
'CLIENT_CLASS': 'django_redis.client.DefaultClient',
'CONNECTION_POOL_KWARGS': {
'ssl_cert_reqs': ssl.CERT_REQUIRED # Verify Let's Encrypt cert
}
}
}
}
# Celery Configuration with Redis SSL
CELERY_BROKER_URL = REDIS_CLOUD_URL
CELERY_RESULT_BACKEND = REDIS_CLOUD_URL
CELERY_ACCEPT_CONTENT = ['json']
CELERY_TASK_SERIALIZER = 'json'
CELERY_RESULT_SERIALIZER = 'json'
CELERY_TIMEZONE = 'UTC'
# Celery SSL Configuration (Let's Encrypt certificates are trusted)
CELERY_REDIS_BACKEND_USE_SSL = {
'ssl_cert_reqs': ssl.CERT_REQUIRED
}
CELERY_BROKER_USE_SSL = {
'ssl_cert_reqs': ssl.CERT_REQUIRED
}
# MinIO/S3 Configuration for Multi-Project Setup
AWS_S3_ENDPOINT_URL = os.getenv('AWS_S3_ENDPOINT_URL')
AWS_S3_VERIFY = os.getenv('AWS_S3_VERIFY', 'True') == 'True'
AWS_ACCESS_KEY_ID = os.getenv('AWS_ACCESS_KEY_ID')
AWS_SECRET_ACCESS_KEY = os.getenv('AWS_SECRET_ACCESS_KEY')
AWS_STORAGE_BUCKET_NAME = os.getenv('AWS_STORAGE_BUCKET_NAME')
AWS_S3_ADDRESSING_STYLE = 'path'
AWS_DEFAULT_ACL = None
# Custom domain for static files (portfolio prefix for multi-project)
PROJECT_NAME = 'django_starter' # Change per project
AWS_LOCATION = f'portfolio/{PROJECT_NAME}' # Project-specific prefix
AWS_S3_CUSTOM_DOMAIN = f'{AWS_S3_ENDPOINT_URL.replace("https://", "")}/{AWS_STORAGE_BUCKET_NAME}'
# Static files configuration
STATIC_URL = f'https://{AWS_S3_CUSTOM_DOMAIN}/{AWS_LOCATION}/static/'
STATIC_ROOT = BASE_DIR / 'staticfiles'
# Storage backends (Django 4.2+)
STORAGES = {
"default": {
"BACKEND": "storages.backends.s3boto3.S3Boto3Storage",
},
"staticfiles": {
"BACKEND": "storages.backends.s3boto3.S3StaticStorage",
},
}
# Additional S3 settings
AWS_S3_OBJECT_PARAMETERS = {
'CacheControl': 'max-age=86400', # Cache for 1 day
}
AWS_QUERYSTRING_AUTH = False # No signed URLs for static files
Celery Configuration (celery.py)
import os
from celery import Celery
os.environ.setdefault('DJANGO_SETTINGS_MODULE', 'django_starter.settings')
app = Celery('django_starter')
app.config_from_object('django.conf:settings', namespace='CELERY')
app.autodiscover_tasks()
@app.task(bind=True)
def debug_task(self):
print(f'Request: {self.request!r}')
Requirements
Django>=4.2
psycopg2-binary
dj-database-url
django-redis
redis
celery
django-storages
boto3
Deployment Commands
# Collect static files to MinIO
python manage.py collectstatic --noinput
# Run migrations
python manage.py migrate
# Start Django (production)
gunicorn django_starter.wsgi:application --bind 0.0.0.0:8016
# Start Celery worker
celery -A django_starter worker --loglevel=info
# Start Celery beat (if needed)
celery -A django_starter beat --loglevel=info
Infrastructure Requirements
All these services must be configured on your server:
- PostgreSQL with nginx TLS stream proxy on port 9552
- Redis with nginx TLS stream proxy on port 9551
- MinIO API with nginx HTTPS proxy at minioapi.arpansahu.space
- Let's Encrypt SSL certificates (automatically trusted by Python)
See individual service documentation:
-
PostgreSQL Setup
-
Redis Setup
-
MinIO Setup
Verification
# Test Redis connection
redis-cli -h redis.arpansahu.space -p 9551 -a your_redis_password --tls ping
# Should return: PONG
# Test MinIO access
curl -I https://minioapi.arpansahu.space/your-bucket-name/portfolio/your_project/static/admin/css/base.css
# Should return: HTTP/2 200
# Test static file serving
curl https://django-starter.arpansahu.space
# CSS/JS should load from minioapi.arpansahu.space
Expected Celery Logs
[2026-02-03 14:42:59,941: INFO/MainProcess] Connected to rediss://:**@redis.arpansahu.space:9551//
[2026-02-03 14:42:59,953: INFO/MainProcess] celery@django_starter ready.
Common Issues
| Issue | Cause | Solution |
|---|---|---|
| 400 Bad Request from boto3 | Using Console URL instead of API |
Use
minioapi.arpansahu.space
, not
minio.arpansahu.space
|
| CSS not loading | Files not uploaded to MinIO |
Run
collectstatic
, check MinIO bucket
|
| Redis SSL connection failed | Certificate verification issue |
Use
ssl.CERT_REQUIRED
(Let's Encrypt is trusted)
|
| Celery can't connect to Redis | Wrong URL or missing TLS proxy |
Use
rediss://
scheme, ensure nginx stream proxy on 9551
|
| collectstatic slow/fails | Network issues or wrong credentials | Check AWS_ACCESS_KEY_ID and AWS_SECRET_ACCESS_KEY |
✅ Verification
After installation, verify everything works:
# 1. Check container status
docker ps | grep minio
# 2. Check local access
curl http://localhost:9002
curl http://localhost:9000/minio/health/live
# 3. Check HTTPS access
curl -I https://minio.arpansahu.space
curl -I https://minioapi.arpansahu.space
# 4. Login to console
# Visit: https://minio.arpansahu.space
# Login with: arpansahu / Gandu302@minio
# 5. Test with mc client
mc alias set test https://minioapi.arpansahu.space django_user Gandu302@djangominio
mc ls test
All checks should pass ✅
📁 Files Reference
All deployment files are in:
AWS Deployment/Minio/
| File | Purpose |
|---|---|
.env.example
|
Template for environment variables |
.env
|
Actual credentials (not in git) |
install.sh
|
Main installation script |
add-nginx-config.sh
|
Adds nginx reverse proxy config |
fix-websocket.sh
|
Fixes WebSocket connection issues |
nginx-console.conf
|
Standalone Console nginx config |
nginx-api.conf
|
Standalone API nginx config |
apply_minio_policy.sh
|
Automated bucket policy application script |
apply_policy.py
|
Python script for bucket policy management |
minio_bucket_policy.json.example
|
Template for bucket policy |
minio_bucket_policy.json
|
Actual bucket policy (not in git) |
README.md
|
This documentation |
On Server:
- Data:
~/minio/data/
- Nginx config:
/etc/nginx/sites-available/services
(merged config)
- Logs:
docker logs minio
[README of Elasticsearch Setup]
[README of Apache Kafka Setup]
[README of RabbitMQ Setup]
Jenkins (CI/CD Automation Server)
Jenkins is an open-source automation server that enables developers to build, test, and deploy applications through continuous integration and continuous delivery (CI/CD). This guide provides a complete, production-ready setup with Java 21, Jenkins LTS, Nginx reverse proxy, and comprehensive credential management.
Prerequisites
Before installing Jenkins, ensure you have:
- Ubuntu Server 22.04 LTS
- Nginx with SSL certificates configured
- Domain name (example: jenkins.arpansahu.space)
- Wildcard SSL certificate already issued (via acme.sh)
- Minimum 2GB RAM, 20GB disk space
- Root or sudo access
- Docker installed (for containerized builds)
Architecture Overview
Internet (HTTPS)
│
└─ Nginx (Port 443) - TLS Termination
│
└─ jenkins.arpansahu.space
│
└─ Jenkins (localhost:8080)
│
├─ Jenkins Controller (Web UI + API)
├─ Build Agents (local/remote)
├─ Workspace (/var/lib/jenkins)
└─ Credentials Store
Key Principles:
- Jenkins runs on localhost only (port 8080)
- Nginx handles all TLS termination
- Credentials stored in Jenkins encrypted store
- Pipelines defined as code (Jenkinsfile)
- Docker-based builds for isolation
Why Jenkins
Advantages:
- Open-source and free
- Extensive plugin ecosystem (1800+)
- Pipeline as Code (Jenkinsfile)
- Distributed builds
- Docker integration
- GitHub/GitLab integration
- Email notifications
- Role-based access control
Use Cases:
- Automated builds on commit
- Automated testing
- Docker image building
- Deployment automation
- Scheduled jobs
- Integration with Harbor registry
- Multi-branch pipelines
Part 1: Install Java 21
Jenkins requires Java to run. We'll install OpenJDK 21 (latest LTS).
⚠️ Important: Java 17 support ends March 31, 2026. Use Java 21 for continued support.
Check Current Java Version
java -version
If you see Java 17 or older, follow the upgrade steps below.
Upgrade from Java 17 to Java 21 (If Needed)
If Jenkins is already installed on Java 17:
- Install Java 21
sudo apt update
sudo apt install -y openjdk-21-jdk
- Check Jenkins service status
sudo systemctl status jenkins
- Update Jenkins to use Java 21
sudo systemctl stop jenkins
sudo update-alternatives --config java
Select Java 21 from the list (e.g., `/usr/lib/jvm/java-21-openjdk-amd64/bin/java`)
- Verify Java version
java -version
Should show: `openjdk version "21.0.x"`
- Update JAVA_HOME for Jenkins
sudo nano /etc/default/jenkins
Add or update:
JAVA_HOME="/usr/lib/jvm/java-21-openjdk-amd64"
JENKINS_JAVA_CMD="$JAVA_HOME/bin/java"
- Restart Jenkins
sudo systemctl start jenkins
sudo systemctl status jenkins
-
Verify in Jenkins UI
Dashboard → Manage Jenkins → System Information → Look for
java.version(should be 21.x)
Fresh Installation of Java 21
For new installations:
- Update system packages
sudo apt update
- Install OpenJDK 21
sudo apt install -y openjdk-21-jdk
- Verify Java installation
java -version
Expected output:
openjdk version "21.0.x" 2024-xx-xx
OpenJDK Runtime Environment (build 21.0.x+x)
OpenJDK 64-Bit Server VM (build 21.0.x+x, mixed mode, sharing)
- Set JAVA_HOME (optional but recommended)
sudo nano /etc/environment
Add:
JAVA_HOME="/usr/lib/jvm/java-21-openjdk-amd64"
Apply changes:
source /etc/environment
echo $JAVA_HOME
Part 2: Install Jenkins LTS
Jenkins Long-Term Support (LTS) releases are recommended for production environments. Current LTS: 2.528.3
- Add Jenkins repository key (both legacy and modern format for compatibility)
# Modern keyring format (recommended)
curl -fsSL https://pkg.jenkins.io/debian-stable/jenkins.io-2023.key | sudo gpg --dearmor -o /usr/share/keyrings/jenkins-archive-keyring.gpg
# Also add legacy key for repository compatibility
gpg --keyserver keyserver.ubuntu.com --recv-keys 7198F4B714ABFC68
gpg --export 7198F4B714ABFC68 > /tmp/jenkins-key.gpg
sudo gpg --dearmor < /tmp/jenkins-key.gpg > /usr/share/keyrings/jenkins-old-keyring.gpg
- Add Jenkins repository
echo "deb [signed-by=/usr/share/keyrings/jenkins-old-keyring.gpg] https://pkg.jenkins.io/debian-stable binary/" | sudo tee /etc/apt/sources.list.d/jenkins.list > /dev/null
- Update package list
sudo apt update
- Install Jenkins (latest LTS)
# Install latest LTS version
sudo apt install -y jenkins
# Or install specific LTS version
# sudo apt install -y jenkins=2.528.3
- Check installed version
jenkins --version
Expected: `2.528.3` or newer LTS
- Enable Jenkins service
sudo systemctl enable jenkins
- Start Jenkins service
sudo systemctl start jenkins
- Verify Jenkins is running
sudo systemctl status jenkins
Expected: Active (running)
- Check Jenkins is listening on port 8080
sudo ss -tulnp | grep 8080
Expected: Jenkins listening on 127.0.0.1:8080
Part 2.1: Upgrade Jenkins to Latest LTS
To upgrade an existing Jenkins installation:
- Check current version
jenkins --version
# Or via API:
curl -s -I https://jenkins.arpansahu.space/api/json | grep X-Jenkins
- Check available versions
apt-cache policy jenkins | head -30
Note: Look for versions 2.xxx.x (LTS releases), not 2.5xx+ (weekly releases)
- Backup Jenkins before upgrade
sudo tar -czf /tmp/jenkins-backup-$(date +%Y%m%d-%H%M%S).tar.gz /var/lib/jenkins/
- Stop Jenkins
sudo systemctl stop jenkins
- Upgrade to latest LTS
sudo apt update
sudo apt install --only-upgrade jenkins -y
# Or install specific LTS version:
# sudo apt install jenkins=2.528.3 -y
- Start Jenkins
sudo systemctl start jenkins
- Verify upgrade
jenkins --version
sudo systemctl status jenkins
-
Check Jenkins UI
https://jenkins.arpansahu.space → Manage Jenkins → About Jenkins
Part 3: Configure Nginx Reverse Proxy
- Edit Nginx configuration
sudo nano /etc/nginx/sites-available/services
- Add Jenkins server block
# Jenkins CI/CD - HTTP → HTTPS
server {
listen 80;
listen [::]:80;
server_name jenkins.arpansahu.space;
return 301 https://$host$request_uri;
}
# Jenkins CI/CD - HTTPS
server {
listen 443 ssl http2;
listen [::]:443 ssl http2;
server_name jenkins.arpansahu.space;
ssl_certificate /etc/nginx/ssl/arpansahu.space/fullchain.pem;
ssl_certificate_key /etc/nginx/ssl/arpansahu.space/privkey.pem;
ssl_protocols TLSv1.2 TLSv1.3;
# Jenkins-specific timeouts
proxy_read_timeout 300;
proxy_connect_timeout 300;
proxy_send_timeout 300;
location / {
proxy_pass http://127.0.0.1:8080;
proxy_set_header Host $host;
proxy_set_header X-Real-IP $remote_addr;
proxy_set_header X-Forwarded-For $proxy_add_x_forwarded_for;
proxy_set_header X-Forwarded-Proto https;
# Required for Jenkins CLI and agent connections
proxy_http_version 1.1;
proxy_request_buffering off;
}
}
- Test Nginx configuration
sudo nginx -t
- Reload Nginx
sudo systemctl reload nginx
Part 4: Initial Jenkins Setup
- Get initial admin password
sudo cat /var/lib/jenkins/secrets/initialAdminPassword
Copy this password (example: a1b2c3d4e5f6...)
-
Access Jenkins Web UI
Go to: https://jenkins.arpansahu.space
-
Enter initial admin password
Paste the password from step 1.
-
Install suggested plugins
- Click: Install suggested plugins
- Wait for plugin installation (5-10 minutes)
-
Create admin user
Configure:
- Username:admin
- Password: (your strong password)
- Full name:Admin User
- Email: your-email@example.comClick: Save and Continue
-
Configure Jenkins URL
Jenkins URL:
https://jenkins.arpansahu.spaceClick: Save and Finish
-
Start using Jenkins
Click: Start using Jenkins
Part 5: Configure Jenkins Credentials
Jenkins stores credentials securely for use in pipelines. We'll configure 4 essential credentials.
5.1: GitHub Authentication Credentials
-
Navigate to credentials
Dashboard → Manage Jenkins → Credentials → System → Global credentials → Add Credentials
-
Configure GitHub credentials
- Kind : Username with password
- Scope : Global
-
Username
:
arpansahu(your GitHub username) -
Password
:
ghp_xxxxxxxxxxxx(GitHub Personal Access Token) -
ID
:
github-auth -
Description
:
Github Auth
Click: Create
Note: Generate GitHub PAT at https://github.com/settings/tokens with scopes: repo, admin:repo_hook
5.2: Harbor Registry Credentials
-
Add Harbor credentials
Dashboard → Manage Jenkins → Credentials → System → Global credentials → Add Credentials
-
Configure Harbor credentials
- Kind : Username with password
- Scope : Global
-
Username
:
admin(or robot account:robot$ci-bot) - Password : (Harbor password or robot token)
-
ID
:
harbor-credentials -
Description
:
harbor-credentials
Click: Create
5.3: Jenkins Admin API Credentials
-
Add Jenkins admin credentials
Dashboard → Manage Jenkins → Credentials → System → Global credentials → Add Credentials
-
Configure Jenkins API credentials
- Kind : Username with password
- Scope : Global
-
Username
:
admin(Jenkins admin username) - Password : (Jenkins admin password)
-
ID
:
jenkins-admin-credentials -
Description
:
Jenkins admin credentials for API authentication and pipeline usage
Click: Create
Use case: Pipeline triggers, REST API calls, remote job execution
5.4: Sentry Authentication Token
-
Add Sentry CLI token
Dashboard → Manage Jenkins → Credentials → System → Global credentials → Add Credentials
-
Configure Sentry credentials
- Kind : Secret text
- Scope : Global
- Secret : (Sentry auth token from https://sentry.io/settings/account/api/auth-tokens/)
-
ID
:
sentry-auth-token -
Description
:
Sentry CLI Authentication Token
Click: Create
Use case: Sentry release tracking, source map uploads, error monitoring integration
5.5: GitHub Authentication Credentials
-
Add GitHub credentials
Dashboard → Manage Jenkins → Credentials → System → Global credentials → Add Credentials
-
Configure GitHub credentials
- Kind : Username with password
- Scope : Global
- Username : (GitHub username)
- Password : (GitHub Personal Access Token with repo permissions)
-
ID
:
github_auth -
Description
:
GitHub authentication for branch merging and repository operations
Click: Create
How to generate GitHub PAT:
1. Go to GitHub → Settings → Developer settings → Personal access tokens → Tokens (classic)
2. Generate new token with permissions:repo(Full control of private repositories)
3. Copy token immediately (shown only once)Use case: Automated branch merging, repository operations, deployment workflows
Part 6: Configure Global Jenkins Variables
Global variables are available to all Jenkins pipelines.
-
Navigate to system configuration
Dashboard → Manage Jenkins → System
-
Scroll to Global properties
Check: Environment variables
-
Add global variables
Click: Add (for each variable)
Name Value Description MAIL_JET_API_KEY (your Mailjet API key) Email notification service MAIL_JET_API_SECRET (your Mailjet secret) Email notification service MAIL_JET_EMAIL_ADDRESS noreply@arpansahu.space Sender email address MY_EMAIL_ADDRESS your-email@example.com Notification recipient -
Save configuration
Scroll down and click: Save
Part 7: Configure Jenkins for Docker Builds
Jenkins needs Docker access to build containerized applications.
- Add Jenkins user to Docker group
sudo usermod -aG docker jenkins
- Restart Jenkins to apply group changes
sudo systemctl restart jenkins
- Verify Jenkins can access Docker
sudo -u jenkins docker ps
Expected: Docker container list (even if empty)
Part 8: Configure Jenkins Sudo Access (Optional)
Required if pipelines need to copy files from protected directories.
- Edit sudoers file
sudo visudo
-
Add Jenkins sudo permissions
Add at end of file:
# Allow Jenkins to run specific commands without password
jenkins ALL=(ALL) NOPASSWD: /bin/cp, /bin/mkdir, /bin/chown
Or for full sudo access (less secure):
jenkins ALL=(ALL) NOPASSWD: ALL
-
Save and exit
In nano:
Ctrl + O,Enter,Ctrl + X
In vi:Esc,:wq,Enter -
Verify sudo access
sudo -u jenkins sudo -l
Part 9: Create Project Nginx Configuration
Each project needs its own Nginx configuration for deployment.
- Create project Nginx configuration
sudo nano /etc/nginx/sites-available/my-django-app
- Add project server block (Docker deployment)
# Django App - HTTP → HTTPS
server {
listen 80;
listen [::]:80;
server_name myapp.arpansahu.space;
return 301 https://$host$request_uri;
}
# Django App - HTTPS
server {
listen 443 ssl http2;
listen [::]:443 ssl http2;
server_name myapp.arpansahu.space;
ssl_certificate /etc/nginx/ssl/arpansahu.space/fullchain.pem;
ssl_certificate_key /etc/nginx/ssl/arpansahu.space/privkey.pem;
ssl_protocols TLSv1.2 TLSv1.3;
location / {
proxy_pass http://127.0.0.1:8000;
proxy_set_header Host $host;
proxy_set_header X-Real-IP $remote_addr;
proxy_set_header X-Forwarded-For $proxy_add_x_forwarded_for;
proxy_set_header X-Forwarded-Proto https;
# WebSocket support
proxy_http_version 1.1;
proxy_set_header Upgrade $http_upgrade;
proxy_set_header Connection "upgrade";
}
}
-
For Kubernetes deployment (alternative)
Replace
proxy_passline:
proxy_pass http://<CLUSTER_IP>:30080;
- Enable site configuration
sudo ln -s /etc/nginx/sites-available/my-django-app /etc/nginx/sites-enabled/
- Test Nginx configuration
sudo nginx -t
- Reload Nginx
sudo systemctl reload nginx
Part 10: Create Jenkinsfile for Build Pipeline
Create
Jenkinsfile-build
in your project repository root.
Example Jenkinsfile-build:
pipeline {
agent { label 'local' }
environment {
HARBOR_URL = 'harbor.arpansahu.space'
HARBOR_PROJECT = 'library'
IMAGE_NAME = 'my-django-app'
IMAGE_TAG = "${env.BUILD_NUMBER}"
}
stages {
stage('Checkout') {
steps {
checkout scm
}
}
stage('Build Docker Image') {
steps {
script {
docker.build("${HARBOR_URL}/${HARBOR_PROJECT}/${IMAGE_NAME}:${IMAGE_TAG}")
}
}
}
stage('Push to Harbor') {
steps {
script {
docker.withRegistry("https://${HARBOR_URL}", 'harbor-credentials') {
docker.image("${HARBOR_URL}/${HARBOR_PROJECT}/${IMAGE_NAME}:${IMAGE_TAG}").push()
docker.image("${HARBOR_URL}/${HARBOR_PROJECT}/${IMAGE_NAME}:${IMAGE_TAG}").push('latest')
}
}
}
}
stage('Trigger Deploy') {
steps {
build job: 'my-django-app-deploy', wait: false
}
}
}
post {
success {
emailext(
subject: "Build Success: ${env.JOB_NAME} #${env.BUILD_NUMBER}",
body: "Build completed successfully.",
to: "${env.MY_EMAIL_ADDRESS}"
)
}
failure {
emailext(
subject: "Build Failed: ${env.JOB_NAME} #${env.BUILD_NUMBER}",
body: "Build failed. Check Jenkins console output.",
to: "${env.MY_EMAIL_ADDRESS}"
)
}
}
}
Part 11: Create Jenkinsfile for Deploy Pipeline
Create
Jenkinsfile-deploy
in your project repository root.
Example Jenkinsfile-deploy:
pipeline {
agent { label 'local' }
environment {
HARBOR_URL = 'harbor.arpansahu.space'
HARBOR_PROJECT = 'library'
IMAGE_NAME = 'my-django-app'
CONTAINER_NAME = 'my-django-app'
CONTAINER_PORT = '8000'
}
stages {
stage('Stop Old Container') {
steps {
script {
sh """
docker stop ${CONTAINER_NAME} || true
docker rm ${CONTAINER_NAME} || true
"""
}
}
}
stage('Pull Latest Image') {
steps {
script {
docker.withRegistry("https://${HARBOR_URL}", 'harbor-credentials') {
docker.image("${HARBOR_URL}/${HARBOR_PROJECT}/${IMAGE_NAME}:latest").pull()
}
}
}
}
stage('Deploy Container') {
steps {
script {
sh """
docker run -d \
--name ${CONTAINER_NAME} \
--restart unless-stopped \
-p ${CONTAINER_PORT}:8000 \
--env-file /var/lib/jenkins/.env/${IMAGE_NAME} \
${HARBOR_URL}/${HARBOR_PROJECT}/${IMAGE_NAME}:latest
"""
}
}
}
stage('Health Check') {
steps {
script {
sleep(time: 10, unit: 'SECONDS')
sh "curl -f http://localhost:${CONTAINER_PORT}/health || exit 1"
}
}
}
}
post {
success {
emailext(
subject: "Deploy Success: ${env.JOB_NAME}",
body: "Deployment completed successfully.",
to: "${env.MY_EMAIL_ADDRESS}"
)
}
failure {
emailext(
subject: "Deploy Failed: ${env.JOB_NAME}",
body: "Deployment failed. Check Jenkins console output.",
to: "${env.MY_EMAIL_ADDRESS}"
)
}
}
}
Part 12: Create Jenkins Pipeline Projects
12.1: Create Build Pipeline
-
Create new pipeline
Dashboard → New Item
-
Configure pipeline
-
Name
:
my-django-app-build - Type : Pipeline
- Click: OK
-
Name
:
-
Configure pipeline settings
- Description : Build and push Docker image to Harbor
- GitHub project : (check and add your repo URL)
- Build Triggers : GitHub hook trigger for GITScm polling
-
Configure Pipeline definition
- Definition : Pipeline script from SCM
- SCM : Git
-
Repository URL
:
https://github.com/arpansahu/my-django-app.git -
Credentials
:
github-auth -
Branch
:
*/build -
Script Path
:
Jenkinsfile-build
-
Save pipeline
Click: Save
12.2: Create Deploy Pipeline
-
Create new pipeline
Dashboard → New Item
-
Configure pipeline
-
Name
:
my-django-app-deploy - Type : Pipeline
- Click: OK
-
Name
:
-
Configure pipeline settings
- Description : Deploy Docker container from Harbor
- Build Triggers : None (triggered by build pipeline)
-
Configure Pipeline definition
- Definition : Pipeline script from SCM
- SCM : Git
-
Repository URL
:
https://github.com/arpansahu/my-django-app.git -
Credentials
:
github-auth -
Branch
:
*/main -
Script Path
:
Jenkinsfile-deploy
-
Save pipeline
Click: Save
Part 13: Configure Environment Files
Store sensitive environment variables outside the repository.
- Create environment file directory
sudo mkdir -p /var/lib/jenkins/.env
sudo chown jenkins:jenkins /var/lib/jenkins/.env
- Create project environment file
sudo nano /var/lib/jenkins/.env/my-django-app
- Add environment variables
# Django settings
SECRET_KEY=your-secret-key-here
DEBUG=False
ALLOWED_HOSTS=myapp.arpansahu.space
# Database
DATABASE_URL=postgresql://user:pass@db:5432/myapp
# Redis
REDIS_URL=redis://redis:6379/0
# Email
EMAIL_BACKEND=django.core.mail.backends.smtp.EmailBackend
EMAIL_HOST=smtp.mailjet.com
EMAIL_PORT=587
EMAIL_USE_TLS=True
EMAIL_HOST_USER=your-mailjet-api-key
EMAIL_HOST_PASSWORD=your-mailjet-secret
# Sentry
SENTRY_DSN=https://xxx@sentry.io/xxx
- Set proper permissions
sudo chown jenkins:jenkins /var/lib/jenkins/.env/my-django-app
sudo chmod 600 /var/lib/jenkins/.env/my-django-app
Part 14: Configure Email Notifications
-
Install Email Extension Plugin
Dashboard → Manage Jenkins → Plugins → Available plugins
Search:
Email Extension PluginClick: Install
-
Configure SMTP settings
Dashboard → Manage Jenkins → System → Extended E-mail Notification
Configure:
- SMTP server :in-v3.mailjet.com
- SMTP port :587
- Use SMTP Authentication : ✓ Checked
- User Name :${MAIL_JET_API_KEY}
- Password :${MAIL_JET_API_SECRET}
- Use TLS : ✓ Checked
- Default user e-mail suffix :@arpansahu.space -
Test email configuration
Click: Test configuration by sending test e-mail
Enter:
${MY_EMAIL_ADDRESS}Expected: Email received
-
Save configuration
Click: Save
Managing Jenkins Service
- Check Jenkins status
sudo systemctl status jenkins
- Stop Jenkins
sudo systemctl stop jenkins
- Start Jenkins
sudo systemctl start jenkins
- Restart Jenkins
sudo systemctl restart jenkins
- View Jenkins logs
sudo journalctl -u jenkins -f
- View Jenkins application logs
sudo tail -f /var/log/jenkins/jenkins.log
Backup and Restore
- Backup Jenkins home directory
# Stop Jenkins
sudo systemctl stop jenkins
# Backup Jenkins home
sudo tar -czf jenkins-backup-$(date +%Y%m%d).tar.gz /var/lib/jenkins
# Start Jenkins
sudo systemctl start jenkins
- Backup only critical data
sudo tar -czf jenkins-config-backup-$(date +%Y%m%d).tar.gz \
/var/lib/jenkins/config.xml \
/var/lib/jenkins/jobs/ \
/var/lib/jenkins/users/ \
/var/lib/jenkins/credentials.xml \
/var/lib/jenkins/secrets/
- Restore Jenkins backup
# Stop Jenkins
sudo systemctl stop jenkins
# Restore backup
sudo tar -xzf jenkins-backup-YYYYMMDD.tar.gz -C /
# Set ownership
sudo chown -R jenkins:jenkins /var/lib/jenkins
# Start Jenkins
sudo systemctl start jenkins
Common Issues and Fixes
-
Jenkins not starting
Cause: Java not found or port conflict
Fix:
# Check Java installation
java -version
# Check if port 8080 is in use
sudo ss -tulnp | grep 8080
# Check Jenkins logs
sudo journalctl -u jenkins -n 50
-
Cannot push to Harbor from Jenkins
Cause: Docker credentials or network issue
Fix:
# Test Docker login as Jenkins user
sudo -u jenkins docker login harbor.arpansahu.space
# Check Jenkins can reach Harbor
sudo -u jenkins curl -I https://harbor.arpansahu.space
-
Pipeline fails with permission denied
Cause: Jenkins doesn't have Docker access
Fix:
# Add Jenkins to Docker group
sudo usermod -aG docker jenkins
# Restart Jenkins
sudo systemctl restart jenkins
# Verify
sudo -u jenkins docker ps
-
Email notifications not working
Cause: SMTP configuration incorrect
Fix:
- Verify Mailjet API credentials in global variables
- Check SMTP settings in Email Extension configuration
- Send test email from Jenkins
- Check Mailjet dashboard for send logs
-
GitHub webhook not triggering builds
Cause: Webhook not configured or firewall blocking
Fix:
# Verify Jenkins is accessible from internet
curl -I https://jenkins.arpansahu.space
# Configure GitHub webhook
# Repository → Settings → Webhooks → Add webhook
# Payload URL: https://jenkins.arpansahu.space/github-webhook/
# Content type: application/json
# Events: Just the push event
Security Best Practices
-
Use HTTPS only
- Never access Jenkins over HTTP
- Always use Nginx reverse proxy with TLS
-
Strong authentication
# Enable security realm
Dashboard → Manage Jenkins → Security → Security Realm
Select: Jenkins' own user database
-
Enable CSRF protection
Dashboard → Manage Jenkins → Security → CSRF Protection
Check: Enable CSRF Protection -
Limit build agent connections
Dashboard → Manage Jenkins → Security → Agents
Set: Fixed port (50000) or disable -
Use credentials store
- Never hardcode credentials in Jenkinsfile
- Always use Jenkins credentials store
- Rotate credentials regularly
-
Regular updates
# Check for Jenkins updates
Dashboard → Manage Jenkins → System Information
# Update Jenkins
sudo apt update
sudo apt upgrade jenkins
- Backup regularly
# Automate with cron
sudo crontab -e
Add:
0 2 * * * /usr/local/bin/backup-jenkins.sh
Performance Optimization
- Increase Java heap size
sudo nano /etc/default/jenkins
Add/modify:
JAVA_ARGS="-Xmx2048m -Xms1024m"
Restart Jenkins:
sudo systemctl restart jenkins
-
Clean old builds
Configure in project:
- Discard old builds
- Keep max 10 builds
- Keep builds for 7 days -
Use build agents
Distribute builds across multiple machines instead of building everything on controller.
Monitoring Jenkins
-
Check Jenkins system info
Dashboard → Manage Jenkins → System Information
-
Monitor disk usage
du -sh /var/lib/jenkins/*
-
Monitor build queue
Dashboard → Build Queue (left sidebar)
-
View build history
Dashboard → Build History (left sidebar)
Final Verification Checklist
Run these commands to verify Jenkins is working:
# Check Jenkins service
sudo systemctl status jenkins
# Check Java version
java -version
# Check port binding
sudo ss -tulnp | grep 8080
# Check Nginx config
sudo nginx -t
# Test HTTPS access
curl -I https://jenkins.arpansahu.space
# Verify Docker access
sudo -u jenkins docker ps
Then test in browser:
- Access: https://jenkins.arpansahu.space
- Login with admin credentials
- Verify all 4 credentials exist
- Create test pipeline
- Run manual build
- Check email notification received
What This Setup Provides
After following this guide, you will have:
- Jenkins LTS with Java 21
- HTTPS access via Nginx reverse proxy
- 4 configured credentials (GitHub, Harbor, Jenkins API, Sentry)
- Global environment variables for emails
- Docker integration for builds
- Email notifications via Mailjet
- Build and deploy pipeline examples
- Production-ready configuration
- Automatic startup with systemd
- Comprehensive monitoring and logging
Example Configuration Summary
| Component | Value |
|---|---|
| Jenkins URL | https://jenkins.arpansahu.space |
| Jenkins Port | 8080 (localhost only) |
| Jenkins Home | /var/lib/jenkins |
| Java Version | OpenJDK 21 |
| Admin User | admin |
| Nginx Config | /etc/nginx/sites-available/services |
Architecture Summary
Internet (HTTPS)
│
└─ Nginx (TLS Termination)
│ [Wildcard Certificate: *.arpansahu.space]
│
└─ jenkins.arpansahu.space (Port 443 → 8080)
│
└─ Jenkins Controller
│
├─ Credentials Store
│ ├─ github-auth
│ ├─ harbor-credentials
│ ├─ jenkins-admin-credentials
│ └─ sentry-auth-token
│
├─ Build Pipelines
│ ├─ Jenkinsfile-build (Docker build + push)
│ └─ Jenkinsfile-deploy (Docker deploy)
│
└─ Integration
├─ GitHub (webhooks)
├─ Harbor (registry)
├─ Docker (builds)
├─ Mailjet (notifications)
└─ Sentry (error tracking)
Key Rules to Remember
- Jenkins port 8080 never exposed externally
- Always use credentials store, never hardcode
- Use Jenkinsfile for pipeline as code
- Separate build and deploy pipelines
- Store .env files outside repository
- Enable email notifications for failures
- Regular backups of /var/lib/jenkins
- Keep Jenkins and plugins updated
- Use Harbor for private registry
- Monitor build queue and disk usage
Next Steps
After setting up Jenkins:
- Configure GitHub webhooks for automatic builds
- Create pipelines for each project
- Set up build agents for distributed builds
- Configure Slack/Teams notifications
- Implement automated testing in pipelines
- Set up deployment approvals
- Configure Jenkins metrics monitoring
My Jenkins instance: https://jenkins.arpansahu.space
For Harbor integration, see harbor.md documentation.
Harbor (Self-Hosted Private Docker Registry)
Harbor is an open-source container image registry that secures images with role-based access control, scans images for vulnerabilities, and signs images as trusted. It extends Docker Distribution by adding enterprise features like security, identity management, and image replication. This guide provides a complete, production-ready setup with Nginx reverse proxy.
Prerequisites
Before installing Harbor, ensure you have:
- Ubuntu Server 22.04 LTS
- Docker Engine installed (see docker_installation.md)
- Nginx with SSL certificates configured
- Domain name (example: harbor.arpansahu.space)
- Wildcard SSL certificate already issued (via acme.sh)
- Minimum 4GB RAM, 40GB disk space
- Root or sudo access
Architecture Overview
Internet (HTTPS)
│
└─ Nginx (Port 443) - TLS Termination
│
└─ harbor.arpansahu.space
│
└─ Harbor Internal Nginx (localhost:8080)
│
├─ Harbor Core
├─ Harbor Registry
├─ Harbor Portal (Web UI)
├─ Trivy (Vulnerability Scanner)
├─ Notary (Image Signing)
└─ ChartMuseum (Helm Charts)
Key Principles:
- Harbor runs on localhost only
- System Nginx handles all external TLS
- Harbor has its own internal Nginx
- All data persisted in Docker volumes
- Automatic restart via systemd
Why Harbor
Advantages:
- Role-based access control (RBAC)
- Vulnerability scanning with Trivy
- Image signing and trust (Notary)
- Helm chart repository
- Image replication
- Garbage collection
- Web UI for management
- Docker Hub proxy cache
Use Cases:
- Private Docker registry for organization
- Secure image storage
- Vulnerability assessment
- Compliance and auditing
- Multi-project isolation
- Image lifecycle management
Part 1: Download and Extract Harbor
- Download latest Harbor release
cd /opt
sudo wget https://github.com/goharbor/harbor/releases/download/v2.11.0/harbor-offline-installer-v2.11.0.tgz
Check for latest version at: https://github.com/goharbor/harbor/releases
- Extract Harbor installer
sudo tar -xzvf harbor-offline-installer-v2.11.0.tgz
cd harbor
- Verify extracted files
ls -la
Expected files:
- harbor.yml.tmpl
- install.sh
- prepare
- common.sh
- harbor.*.tar.gz (images)
Part 2: Configure Harbor
- Copy template configuration
sudo cp harbor.yml.tmpl harbor.yml
- Edit Harbor configuration
sudo nano harbor.yml
-
Configure essential settings
Find and modify these lines:
# Hostname for Harbor
hostname: harbor.arpansahu.space
# HTTP settings (used for internal communication)
http:
port: 8080
# HTTPS settings (disabled - Nginx handles this)
# Comment out or remove the https section completely
# https:
# port: 443
# certificate: /path/to/cert
# private_key: /path/to/key
# Harbor admin password
harbor_admin_password: YourStrongPasswordHere
# Database settings (PostgreSQL)
database:
password: ChangeDatabasePassword
max_idle_conns: 100
max_open_conns: 900
# Data volume location
data_volume: /data
# Trivy (vulnerability scanner)
trivy:
ignore_unfixed: false
skip_update: false
offline_scan: false
insecure: false
# Job service
jobservice:
max_job_workers: 10
# Notification webhook job
notification:
webhook_job_max_retry: 3
# Log settings
log:
level: info
local:
rotate_count: 50
rotate_size: 200M
location: /var/log/harbor
Important changes:
- Set `hostname` to your domain
- Set `http.port` to 8080 (internal)
- Comment out entire `https` section
- Change `harbor_admin_password`
- Change `database.password`
- Keep `data_volume: /data` for persistence
-
Save and exit
In nano:
Ctrl + O,Enter,Ctrl + X
Part 3: Install Harbor
- Run Harbor installer with all components
sudo ./install.sh --with-notary --with-trivy --with-chartmuseum
This will:
- Load Harbor Docker images
- Generate docker-compose.yml
- Create necessary directories
- Start all Harbor services
Installation takes 5-10 minutes depending on system.
- Verify installation
sudo docker compose ps
Expected services (all should be "Up"):
- harbor-core
- harbor-db (PostgreSQL)
- harbor-jobservice
- harbor-log
- harbor-portal (Web UI)
- nginx (Harbor's internal)
- redis
- registry
- registryctl
- trivy-adapter
- notary-server
- notary-signer
- chartmuseum
- Check Harbor logs
sudo docker compose logs -f
Press `Ctrl + C` to exit logs.
Part 4: Configure System Nginx
- Edit Nginx configuration
sudo nano /etc/nginx/sites-available/services
- Add Harbor server block
# Harbor Registry - HTTP → HTTPS
server {
listen 80;
listen [::]:80;
server_name harbor.arpansahu.space;
return 301 https://$host$request_uri;
}
# Harbor Registry - HTTPS
server {
listen 443 ssl http2;
listen [::]:443 ssl http2;
server_name harbor.arpansahu.space;
ssl_certificate /etc/nginx/ssl/arpansahu.space/fullchain.pem;
ssl_certificate_key /etc/nginx/ssl/arpansahu.space/privkey.pem;
ssl_protocols TLSv1.2 TLSv1.3;
location / {
# Allow large image uploads (2GB recommended, 0 for unlimited)
# Note: Set to at least 2G for typical Docker images
client_max_body_size 2G;
proxy_pass http://127.0.0.1:8080;
proxy_set_header Host $host;
proxy_set_header X-Real-IP $remote_addr;
proxy_set_header X-Forwarded-For $proxy_add_x_forwarded_for;
proxy_set_header X-Forwarded-Proto https;
# WebSocket support
proxy_http_version 1.1;
proxy_set_header Upgrade $http_upgrade;
proxy_set_header Connection "upgrade";
# Timeouts for large image pushes
proxy_connect_timeout 300;
proxy_send_timeout 300;
proxy_read_timeout 300;
}
}
- Test Nginx configuration
sudo nginx -t
- Reload Nginx
sudo systemctl reload nginx
Part 5: Configure Auto-Start with Systemd
Harbor needs to start automatically after reboot. Docker Compose alone doesn't provide this.
- Create systemd service file
sudo nano /etc/systemd/system/harbor.service
- Add service configuration
[Unit]
Description=Harbor Container Registry
After=docker.service
Requires=docker.service
[Service]
Type=oneshot
RemainAfterExit=yes
WorkingDirectory=/opt/harbor
ExecStart=/usr/bin/docker compose up -d
ExecStop=/usr/bin/docker compose down
Restart=on-failure
RestartSec=10
[Install]
WantedBy=multi-user.target
- Reload systemd daemon
sudo systemctl daemon-reload
- Enable Harbor service
sudo systemctl enable harbor
- Verify service status
sudo systemctl status harbor
Expected: Loaded and active
Part 6: Configure Firewall and Port Forwarding
- Configure UFW firewall
# Allow HTTP/HTTPS (if not already allowed)
sudo ufw allow 80/tcp
sudo ufw allow 443/tcp
# Block direct access to Harbor port
sudo ufw deny 8080/tcp
# Reload firewall
sudo ufw reload
-
Configure router port forwarding
Access router admin: https://airtel.arpansahu.space (or http://192.168.1.1:81)
Add port forwarding rules:
Service External Port Internal IP Internal Port Protocol Harbor HTTP 80 192.168.1.200 80 TCP Harbor HTTPS 443 192.168.1.200 443 TCP Note: Do NOT forward port 8080 (Harbor internal port).
Part 7: Test Harbor Installation
- Check all containers are running
sudo docker compose ps
All should show "Up" status.
- Test local access
curl -I http://127.0.0.1:8080
Expected: HTTP 200 or 301
- Test external HTTPS access
curl -I https://harbor.arpansahu.space
Expected: HTTP 200
-
Access Harbor Web UI
Go to: https://harbor.arpansahu.space
-
Login with admin credentials
-
Username:
admin - Password: (from harbor.yml harbor_admin_password)
-
Username:
Part 8: Initial Harbor Configuration
-
Change admin password
- Click admin (top right) → Change Password
- Set strong password
- Save
-
Create project
- Go to: Projects → New Project
-
Project Name:
library(default) or custom name - Access Level: Private (recommended)
- Click: OK
-
Create robot account for CI/CD
- Go to: Projects → library → Robot Accounts
- Click: New Robot Account
-
Name:
ci-bot - Expiration: Never (or set expiry)
- Permissions: Push Artifact, Pull Artifact
- Click: Add
- Save token securely (shown only once)
Part 9: Using Harbor as Docker Registry
Login to Harbor
- Login from Docker client
docker login harbor.arpansahu.space
Enter:
- Username: `admin` (or your username)
- Password: (your Harbor password)
Expected: Login Succeeded
- Login with robot account (for CI/CD)
docker login harbor.arpansahu.space -u robot$ci-bot -p YOUR_ROBOT_TOKEN
Push Images to Harbor
- Tag existing image
docker tag nginx:latest harbor.arpansahu.space/library/nginx:latest
Format: `harbor.domain.com/project/image:tag`
- Push image to Harbor
docker push harbor.arpansahu.space/library/nginx:latest
-
Verify in Harbor UI
- Go to: Projects → library → Repositories
- You should see: nginx repository
Pull Images from Harbor
- Pull image from Harbor
docker pull harbor.arpansahu.space/library/nginx:latest
- Use in docker-compose.yml
services:
web:
image: harbor.arpansahu.space/library/nginx:latest
Part 10: Configure Image Retention Policy
Retention policies automatically delete old images to save space.
-
Navigate to project
- Projects → library → Policy
-
Add retention rule
Click: Add Rule
Configure:
- Repositories : matching**(all repositories)
- By artifact count : Retain the most recently pulled3artifacts
- Tags : matching**(all tags)
- Untagged artifacts : ✓ Checked (delete untagged)This keeps last 3 pulled images and deletes others.
-
Schedule retention policy
Click: Add Retention Rule → Schedule
Configure schedule:
- Type : Daily / Weekly / Monthly
- Time : 02:00 AM (off-peak)
- Cron :0 2 * * *(2 AM daily)Click: Save
-
Test retention policy
Click: Dry Run
This shows what would be deleted without actually deleting.
Part 11: Enable Vulnerability Scanning
Harbor uses Trivy to scan images for vulnerabilities.
-
Configure automatic scanning
- Go to: Projects → library → Configuration
- Enable: Automatically scan images on push
- Click: Save
-
Manual scan existing image
- Go to: Projects → library → Repositories → nginx
- Select tag: latest
- Click: Scan
-
View scan results
- Click on tag
- View: Vulnerabilities tab
- See: Critical, High, Medium, Low vulnerabilities
-
Set CVE allowlist (optional)
- Go to: Projects → library → Configuration
- Add CVE IDs to allow despite vulnerabilities
- Use for false positives or accepted risks
Managing Harbor Service
- Check Harbor status
sudo systemctl status harbor
- Stop Harbor
sudo systemctl stop harbor
or
cd /opt/harbor
sudo docker compose down
- Start Harbor
sudo systemctl start harbor
or
cd /opt/harbor
sudo docker compose up -d
- Restart Harbor
sudo systemctl restart harbor
- View Harbor logs
cd /opt/harbor
sudo docker compose logs -f
- View specific service logs
sudo docker compose logs -f harbor-core
Backup and Restore
- Backup Harbor data
# Stop Harbor
sudo systemctl stop harbor
# Backup data directory
sudo tar -czf harbor-data-backup-$(date +%Y%m%d).tar.gz /data
# Backup configuration
sudo cp /opt/harbor/harbor.yml /backup/harbor-config-$(date +%Y%m%d).yml
# Backup database
sudo docker exec harbor-db pg_dumpall -U postgres > harbor-db-backup-$(date +%Y%m%d).sql
# Start Harbor
sudo systemctl start harbor
- Restore Harbor data
# Stop Harbor
sudo systemctl stop harbor
# Restore data directory
sudo tar -xzf harbor-data-backup-YYYYMMDD.tar.gz -C /
# Restore configuration
sudo cp /backup/harbor-config-YYYYMMDD.yml /opt/harbor/harbor.yml
# Restore database
sudo docker exec -i harbor-db psql -U postgres < harbor-db-backup-YYYYMMDD.sql
# Start Harbor
sudo systemctl start harbor
Common Issues and Fixes
-
Harbor containers not starting
Cause: Port conflict or insufficient resources
Fix:
# Check if port 8080 is in use
sudo ss -tulnp | grep 8080
# Check Docker logs
cd /opt/harbor
sudo docker compose logs
# Check system resources
free -h
df -h
-
Cannot login to Harbor
Cause: Wrong credentials or database issue
Fix:
- Verify admin password in harbor.yml
- Reset admin password:
cd /opt/harbor
sudo docker compose exec harbor-core harbor-core password-reset
-
Image push fails
Cause: Storage full or permission issues
Fix:
# Check disk space
df -h /data
# Check Harbor logs
sudo docker compose logs -f registry
# Check data directory permissions
sudo ls -la /data
-
SSL certificate errors
Cause: Nginx certificate misconfigured
Fix:
# Verify certificate
openssl x509 -in /etc/nginx/ssl/arpansahu.space/fullchain.pem -noout -dates
# Check Nginx configuration
sudo nginx -t
# Reload Nginx
sudo systemctl reload nginx
-
Vulnerability scanning not working
Cause: Trivy adapter not running or internet connectivity
Fix:
# Check Trivy adapter
sudo docker compose ps trivy-adapter
# Check Trivy logs
sudo docker compose logs trivy-adapter
# Update Trivy database manually
sudo docker compose exec trivy-adapter /home/scanner/trivy --download-db-only
Security Best Practices
-
Use strong passwords
- Admin password: minimum 16 characters
- Database password: minimum 16 characters
- Robot account tokens: treat as secrets
-
Enable HTTPS only
- Never use HTTP for Harbor
- Always proxy through Nginx with TLS
-
Implement RBAC
- Create projects with limited access
- Use robot accounts for automation
- Assign minimal required permissions
-
Enable vulnerability scanning
- Automatically scan on push
- Set CVE severity thresholds
- Block deployment of vulnerable images
-
Configure image retention
- Automatically delete old images
- Keep only necessary image versions
- Schedule during off-peak hours
-
Regular backups
# Automate with cron
sudo crontab -e
Add:
0 2 * * * /usr/local/bin/backup-harbor.sh
- Monitor logs
# Regular log review
sudo docker compose logs --since 24h | grep ERROR
Performance Optimization
-
Configure garbage collection
- Go to: Administration → Garbage Collection
- Schedule: Weekly at 2 AM
- This removes unreferenced image layers
-
Optimize database
# Run vacuum on PostgreSQL
sudo docker compose exec harbor-db vacuumdb -U postgres -d registry
-
Configure resource limits
Edit docker-compose.yml (auto-generated):
services:
registry:
deploy:
resources:
limits:
memory: 2G
reservations:
memory: 512M
-
Enable Redis cache
Harbor uses Redis by default for caching.
Increase Redis memory if needed.
Monitoring Harbor
- Check Harbor health
curl -k https://harbor.arpansahu.space/api/v2.0/health
- Monitor Docker resources
sudo docker stats
- Check disk usage
du -sh /data/*
- View system logs
sudo journalctl -u harbor -f
Updating Harbor
-
Backup current installation
Follow backup procedure above.
-
Download new Harbor version
cd /opt
sudo wget https://github.com/goharbor/harbor/releases/download/vX.Y.Z/harbor-offline-installer-vX.Y.Z.tgz
- Stop current Harbor
sudo systemctl stop harbor
- Extract new version
sudo tar -xzvf harbor-offline-installer-vX.Y.Z.tgz
sudo mv harbor harbor-old
sudo mv harbor-new harbor
- Copy configuration
sudo cp harbor-old/harbor.yml harbor/harbor.yml
- Run migration
cd /opt/harbor
sudo ./install.sh --with-notary --with-trivy --with-chartmuseum
- Start Harbor
sudo systemctl start harbor
Final Verification Checklist
Run these commands to verify Harbor is working:
# Check all containers
sudo docker compose ps
# Check systemd service
sudo systemctl status harbor
# Check local access
curl -I http://127.0.0.1:8080
# Check HTTPS access
curl -I https://harbor.arpansahu.space
# Check Nginx config
sudo nginx -t
# Check firewall
sudo ufw status | grep -E '(80|443)'
# Test Docker login
docker login harbor.arpansahu.space
Then test in browser:
- Access: https://harbor.arpansahu.space
- Login with admin credentials
- Create test project
- Push test image
- Scan image for vulnerabilities
- Verify retention policy configured
What This Setup Provides
After following this guide, you will have:
- Self-hosted private Docker registry
- HTTPS access via Nginx reverse proxy
- Automatic startup with systemd
- Vulnerability scanning with Trivy
- Image signing with Notary
- Helm chart repository
- Automatic image retention
- Web UI for management
- Robot accounts for CI/CD
- Production-ready configuration
Example Configuration Summary
| Component | Value |
|---|---|
| Harbor URL | https://harbor.arpansahu.space |
| Internal Port | 8080 (localhost only) |
| Admin User | admin |
| Default Project | library |
| Data Directory | /data |
| Config File | /opt/harbor/harbor.yml |
| Service File | /etc/systemd/system/harbor.service |
Architecture Summary
Internet (HTTPS)
│
└─ Nginx (TLS Termination)
│ [Wildcard Certificate: *.arpansahu.space]
│
└─ harbor.arpansahu.space (Port 443 → 8080)
│
└─ Harbor Stack (Docker Compose)
├─ Harbor Core (API + Logic)
├─ Harbor Portal (Web UI)
├─ Registry (Image Storage)
├─ PostgreSQL (Metadata)
├─ Redis (Cache)
├─ Trivy (Vulnerability Scanner)
├─ Notary (Image Signing)
└─ ChartMuseum (Helm Charts)
Key Rules to Remember
- Harbor internal port (8080) never exposed externally
- System Nginx handles all TLS termination
- Use systemd for automatic startup
- Robot accounts for CI/CD pipelines
- Configure retention to manage storage
- Enable vulnerability scanning on push
- Regular backups of /data directory
- Monitor disk usage in /data
- Use RBAC for multi-tenant access
- Keep Harbor updated
Troubleshooting
1. 413 Request Entity Too Large Error
Symptom:
Docker push fails with
413 Request Entity Too Large
when pushing large images.
Cause:
Nginx
client_max_body_size
limit is too small (default is 1MB).
Solution:
- Edit system nginx configuration:
sudo nano /etc/nginx/sites-available/services
- Find the Harbor location block and add/update:
location / {
client_max_body_size 2G; # Adjust as needed
proxy_pass http://127.0.0.1:8080;
# ... rest of config
}
- Test and reload nginx:
sudo nginx -t
sudo systemctl reload nginx
Note:
Harbor's internal nginx is already set to
client_max_body_size 0;
(unlimited) in its
/etc/nginx/nginx.conf
, so you only need to fix the external/system nginx configuration at
/etc/nginx/sites-available/services
.
Verify Harbor's internal nginx (optional):
docker exec nginx cat /etc/nginx/nginx.conf | grep client_max_body_size
# Should show: client_max_body_size 0;
2. Cannot Connect to Harbor
Check these:
# 1. Is Harbor running?
sudo systemctl status harbor
docker ps | grep harbor
# 2. Is nginx running?
sudo systemctl status nginx
# 3. Check logs
sudo journalctl -u harbor -n 50
docker logs nginx
3. Login Issues
# Reset admin password
cd /opt/harbor
sudo docker-compose stop
sudo ./prepare
sudo docker-compose up -d
4. Disk Space Full
# Check disk usage
df -h /data
# Run garbage collection
docker exec harbor-core harbor-gc
# Or via UI: Administration → Garbage Collection → Run Now
5. Slow Image Pushes
Check nginx configuration for these settings:
proxy_buffering off;
proxy_request_buffering off;
proxy_connect_timeout 300;
proxy_send_timeout 300;
proxy_read_timeout 300;
Next Steps
After setting up Harbor:
- Create projects for different teams
- Configure robot accounts for CI/CD
- Set up vulnerability scan policies
- Configure image retention rules
- Enable garbage collection
- Set up replication (if multi-site)
- Integrate with CI/CD pipelines
My Harbor instance: https://harbor.arpansahu.space
For CI/CD integration, see Jenkins documentation.
Third-Party Services
| Service | Purpose | Configuration |
|---|---|---|
| Mailjet | Transactional email delivery (activation, welcome, password reset, social connected) |
MAIL_JET_API_KEY
,
MAIL_JET_API_SECRET
|
| Sentry | Error tracking and performance monitoring |
SENTRY_DSH_URL
,
SENTRY_ENVIRONMENT
|
| Google OAuth | Social authentication |
GOOGLE_CLIENT_ID
,
GOOGLE_CLIENT_SECRET
|
| GitHub OAuth | Social authentication |
GITHUB_CLIENT_ID
,
GITHUB_CLIENT_SECRET
|
| Facebook OAuth | Social authentication |
FACEBOOK_APP_ID
,
FACEBOOK_APP_SECRET
|
| Twitter/X OAuth 2.0 | Social authentication |
TWITTER_API_KEY
,
TWITTER_API_SECRET
|
| LinkedIn OpenID Connect | Social authentication |
LINKEDIN_CLIENT_ID
,
LINKEDIN_CLIENT_SECRET
|
Website Uptime Monitor
This project monitors the uptime of specified websites and sends an email alert if any website is down or returns a non-2xx status code. The project uses a shell script to set up a virtual environment, install dependencies, run the monitoring script, and then clean up the virtual environment.
Prerequisites
- Python 3
- Pip (Python package installer)
- Mailjet account for email alerts
- Cron for scheduling the script
Setup
1. Clone the Repository
git clone https://github.com/yourusername/website-uptime-monitor.git
cd website-uptime-monitor
2. Create a
.env
File
Create a
.env
file in the root directory and add the following content:
MAILJET_API_KEY=your_mailjet_api_key
MAILJET_SECRET_KEY=your_mailjet_secret_key
SENDER_EMAIL=your_sender_email@example.com
RECEIVER_EMAIL=your_receiver_email@example.com
Running the Script
To run the script manually, give permissions and execute:
chmod +x ./setup_and_run.sh
./setup_and_run.sh
chmod +x ./docker_cleanup_mail.sh
./docker_cleanup_mail.sh
Setting Up a Cron Job
To run the script automatically at regular intervals, set up a cron job:
- Edit the crontab:
crontab -e
- Add the following line to run the script every 5 hours:
0 */5 * * * /bin/bash /root/arpansahu-one-scripts/setup_and_run.sh >> /root/logs/website_up_time.log 2>&1
0 0 * * * export MAILJET_API_KEY="MAILJET_API_KEY" && export MAILJET_SECRET_KEY="MAILJET_SECRET_KEY" && export SENDER_EMAIL="SENDER_EMAIL" && export RECEIVER_EMAIL="RECEIVER_EMAIL" && /usr/bin/docker system prune -af --volumes > /root/logs/docker_prune.log 2>&1 && /root/arpansahu-one-scripts/docker_cleanup_mail.sh
Integrating Jenkins
- Now Create a file named Jenkinsfile at the root of Git Repo and add following lines to file
pipeline {
agent { label 'local' }
environment {
ENV_PROJECT_NAME = "arpansahu_one_scripts"
}
stages {
stage('Initialize') {
steps {
script {
echo "Current workspace path is: ${env.WORKSPACE}"
}
}
}
stage('Checkout') {
steps {
checkout scm
}
}
}
post {
success {
script {
// Retrieve the latest commit message
def commitMessage = sh(script: "git log -1 --pretty=%B", returnStdout: true).trim()
if (currentBuild.description == 'DEPLOYMENT_EXECUTED') {
sh """curl -s \
-X POST \
--user $MAIL_JET_API_KEY:$MAIL_JET_API_SECRET \
https://api.mailjet.com/v3.1/send \
-H "Content-Type:application/json" \
-d '{
"Messages":[
{
"From": {
"Email": "$MAIL_JET_EMAIL_ADDRESS",
"Name": "ArpanSahuOne Jenkins Notification"
},
"To": [
{
"Email": "$MY_EMAIL_ADDRESS",
"Name": "Development Team"
}
],
"Subject": "Jenkins Build Pipeline your project ${currentBuild.fullDisplayName} Ran Successfully",
"TextPart": "Hola Development Team, your project ${currentBuild.fullDisplayName} is now deployed",
"HTMLPart": "<h3>Hola Development Team, your project ${currentBuild.fullDisplayName} is now deployed </h3> <br> <p> Build Url: ${env.BUILD_URL} </p>"
}
]
}'"""
}
// Trigger the common_readme job for all repositories"
build job: 'common_readme', parameters: [string(name: 'environment', value: 'prod')], wait: false
}
}
failure {
sh """curl -s \
-X POST \
--user $MAIL_JET_API_KEY:$MAIL_JET_API_SECRET \
https://api.mailjet.com/v3.1/send \
-H "Content-Type:application/json" \
-d '{
"Messages":[
{
"From": {
"Email": "$MAIL_JET_EMAIL_ADDRESS",
"Name": "ArpanSahuOne Jenkins Notification"
},
"To": [
{
"Email": "$MY_EMAIL_ADDRESS",
"Name": "Developer Team"
}
],
"Subject": "Jenkins Build Pipeline your project ${currentBuild.fullDisplayName} Ran Failed",
"TextPart": "Hola Development Team, your project ${currentBuild.fullDisplayName} deployment failed",
"HTMLPart": "<h3>Hola Development Team, your project ${currentBuild.fullDisplayName} is not deployed, Build Failed </h3> <br> <p> Build Url: ${env.BUILD_URL} </p>"
}
]
}'"""
}
}
}
Note: agent {label 'local'} is used to specify which node will execute the jenkins job deployment. So local linux server is labelled with 'local' are the project with this label will be executed in local machine node.
- Configure a Jenkins project from jenkins ui located at https://jenkins.arpansahu.me
Make sure to use Pipeline project and name it whatever you want I have named it as per great_chat

In this above picture you can see credentials right? you can add your github credentials and harbor credentials use harbor-credentials as id for harbor credentials.
from Manage Jenkins on home Page --> Manage Credentials
and add your GitHub credentials from there
- Add a .env file to you project using following command (This step is no more required stage('Dependencies'))
sudo vi /var/lib/jenkins/workspace/arpansahu_one_script/.env
Your workspace name may be different.
Add all the env variables as required and mentioned in the Readme File.
-
Add Global Jenkins Variables from Dashboard --> Manage --> Jenkins
Configure System -
MAIL_JET_API_KEY
- MAIL_JET_API_SECRET
- MAIL_JET_EMAIL_ADDRESS
- MY_EMAIL_ADDRESS
Now you are good to go.
License
This project is licensed under the MIT License. See the LICENSE file for details.
Documentation
![]()
![]()
![]()
![]()
![]()
Environment Variables
To run this project, you will need to add the following environment variables to your .env file
SECRET_KEY=
Set to False for production, True for local development
DEBUG=False
ALLOWED_HOSTS=
MAIL_JET_API_KEY=
MAIL_JET_API_SECRET=
AWS_ACCESS_KEY_ID=
AWS_SECRET_ACCESS_KEY=
AWS_STORAGE_BUCKET_NAME=
BUCKET_TYPE=
Set to True to use S3/MinIO for static/media files, False to use local filesystem
USE_S3=True
==================== Domain Configuration ====================
For LOCAL: DOMAIN=localhost:8016 and PROTOCOL=http
For PRODUCTION: DOMAIN=yourdomain.com and PROTOCOL=https://
DOMAIN=
PROTOCOL=
DATABASE_URL=
REDIS_CLOUD_URL=
SENTRY
SENTRY_ENVIRONMENT=
SENTRY_DSH_URL=
deploy_kube.sh requirements
HARBOR_USERNAME=
HARBOR_PASSWORD=
HARBOR_URL=https://harbor.example.com
MY_EMAIL_ADDRESS=
Flower Basic Auth
FLOWER_ADMIN_USERNAME=
FLOWER_ADMIN_PASS=
RabbitMQ Configuration
RABBITMQ_HOST=
RABBITMQ_PORT=5672
RABBITMQ_USER=
RABBITMQ_PASSWORD=
RABBITMQ_VHOST=/
RABBITMQ_MANAGEMENT_PORT=15672
Kafka Configuration
KAFKA_BOOTSTRAP_SERVERS=
KAFKA_SECURITY_PROTOCOL=SASL_SSL
KAFKA_SASL_MECHANISM=PLAIN
KAFKA_SASL_USERNAME=
KAFKA_SASL_PASSWORD=
KAFKA_SSL_TRUSTSTORE_PASSWORD=
KAFKA_SSL_KEYSTORE_PASSWORD=
Elasticsearch Configuration
ELASTICSEARCH_HOST=
ELASTICSEARCH_USER=
ELASTICSEARCH_PASSWORD=
ELASTICSEARCH_INDEX_PREFIX=django_starter
==================== Social Authentication (OAuth) ====================
IMPORTANT: Add these callback URLs to your OAuth provider console:
Local Dev: http://localhost:8016/accounts/
/login/callback/
Production: https://yourdomain.com/accounts/
/login/callback/
Replace
with: google, github, facebook, twitter, linkedin_oauth2
Google OAuth - https://console.developers.google.com/
GOOGLE_CLIENT_ID=
GOOGLE_CLIENT_SECRET=
GitHub OAuth - https://github.com/settings/developers
GITHUB_CLIENT_ID=
GITHUB_CLIENT_SECRET=
Facebook OAuth - https://developers.facebook.com/apps/
FACEBOOK_APP_ID=
FACEBOOK_APP_SECRET=
Twitter/X OAuth - https://developer.twitter.com/en/portal/dashboard
TWITTER_API_KEY=
TWITTER_API_SECRET=
LinkedIn OAuth - https://www.linkedin.com/developers/apps
LINKEDIN_CLIENT_ID=
LINKEDIN_CLIENT_SECRET=